Configuration
Configuring Default Currency
eQuate supports multiple currency symbols. If your desired currency symbol is not listed, there is an option to enter a custom currency symbol.
- Baht (THB) ฿
- Balboa (PAB) B/.
- Bolivares Fuertes (VEF) Bs
- Cordobas (NIO) C$
- Denars (MKD) ден
- Dinars (RSD) Дин.
- Dollars (GYD) $
- Dollars (HKD) $
- Dollars (JMD) J$
- Dollars (LRD) $
- Dollars (NAD) $
- Dollars (NZD) $
- Dollars (SBD) $
- Dollars (SGD) $
- Dollars (SRD) $
- Dollars (TTD) TT$
- Dollars (TVD) $
- Dong (VND) ₫
- Forint (HUF) Ft
- Guarani (PYG) Gs
- Guilders (ANG) ƒ
- Hryvnia (UAH) ₴
- Kips (LAK) ₭
- Krone (NOK) kr
- Kronor (SEK) kr
- Kronur (ISK) kr
- Lati (LVL) Ls
- Lempiras (HNL) L
- Lira (TRY) TL
- Liras (TRL) £
- Litai (LTL) Lt
- Meticais (MZN) MT
- Nairas (NGN) ₦
- New Dollars (TWD) NT$
- New Lei (RON) lei
- New Shekels (ILS) ₪
- Nuevos Soles (PEN) S/.
- Pesos (MXN) $
- Pesos (PHP) Php
- Pesos (UYU) $U
- Pounds (GGP) £
- Pounds (IMP) £
- Pounds (JEP) £
- Pounds (LBP) £
- Pounds (SHP) £
- Pounds (SYP) £
- Rand (ZAR) R
- Rials (IRR) ﷼
- Rials (OMR) ﷼
- Rials (QAR) ﷼
- Rials (YER) ﷼
- Ringgits (MYR) RM
- Riyals (SAR) ﷼
- Rubles (RUB) руб
- Rupees (INR) Rp
- Rupees (LKR) ₨
- Rupees (MUR) ₨
- Rupees (NPR) ₨
- Rupees (PKR) ₨
- Rupees (SCR) ₨
- Rupiahs (IDR) Rp
- Shillings (SOS) S
- Soms (KGS) лв
- Sums (UZS) лв
- Switzerland Francs (CHF) CHF
- Tenge (KZT) лв
- Tugriks (MNT) ₮
- Won (KPW) ₩
- Won (KRW) ₩
- Yen (JPY) ¥
- Zimbabwe Dollars (ZWD) Z$
- Zlotych (PLN) zł
- Login to eQuate Back Office
- On the left menu, select "Settings", under "System", click Settings.
- Select Locale (see Figure A)
- Find "System Currency" and change to your preferred currency.
- Press Save Changes to complete your change.
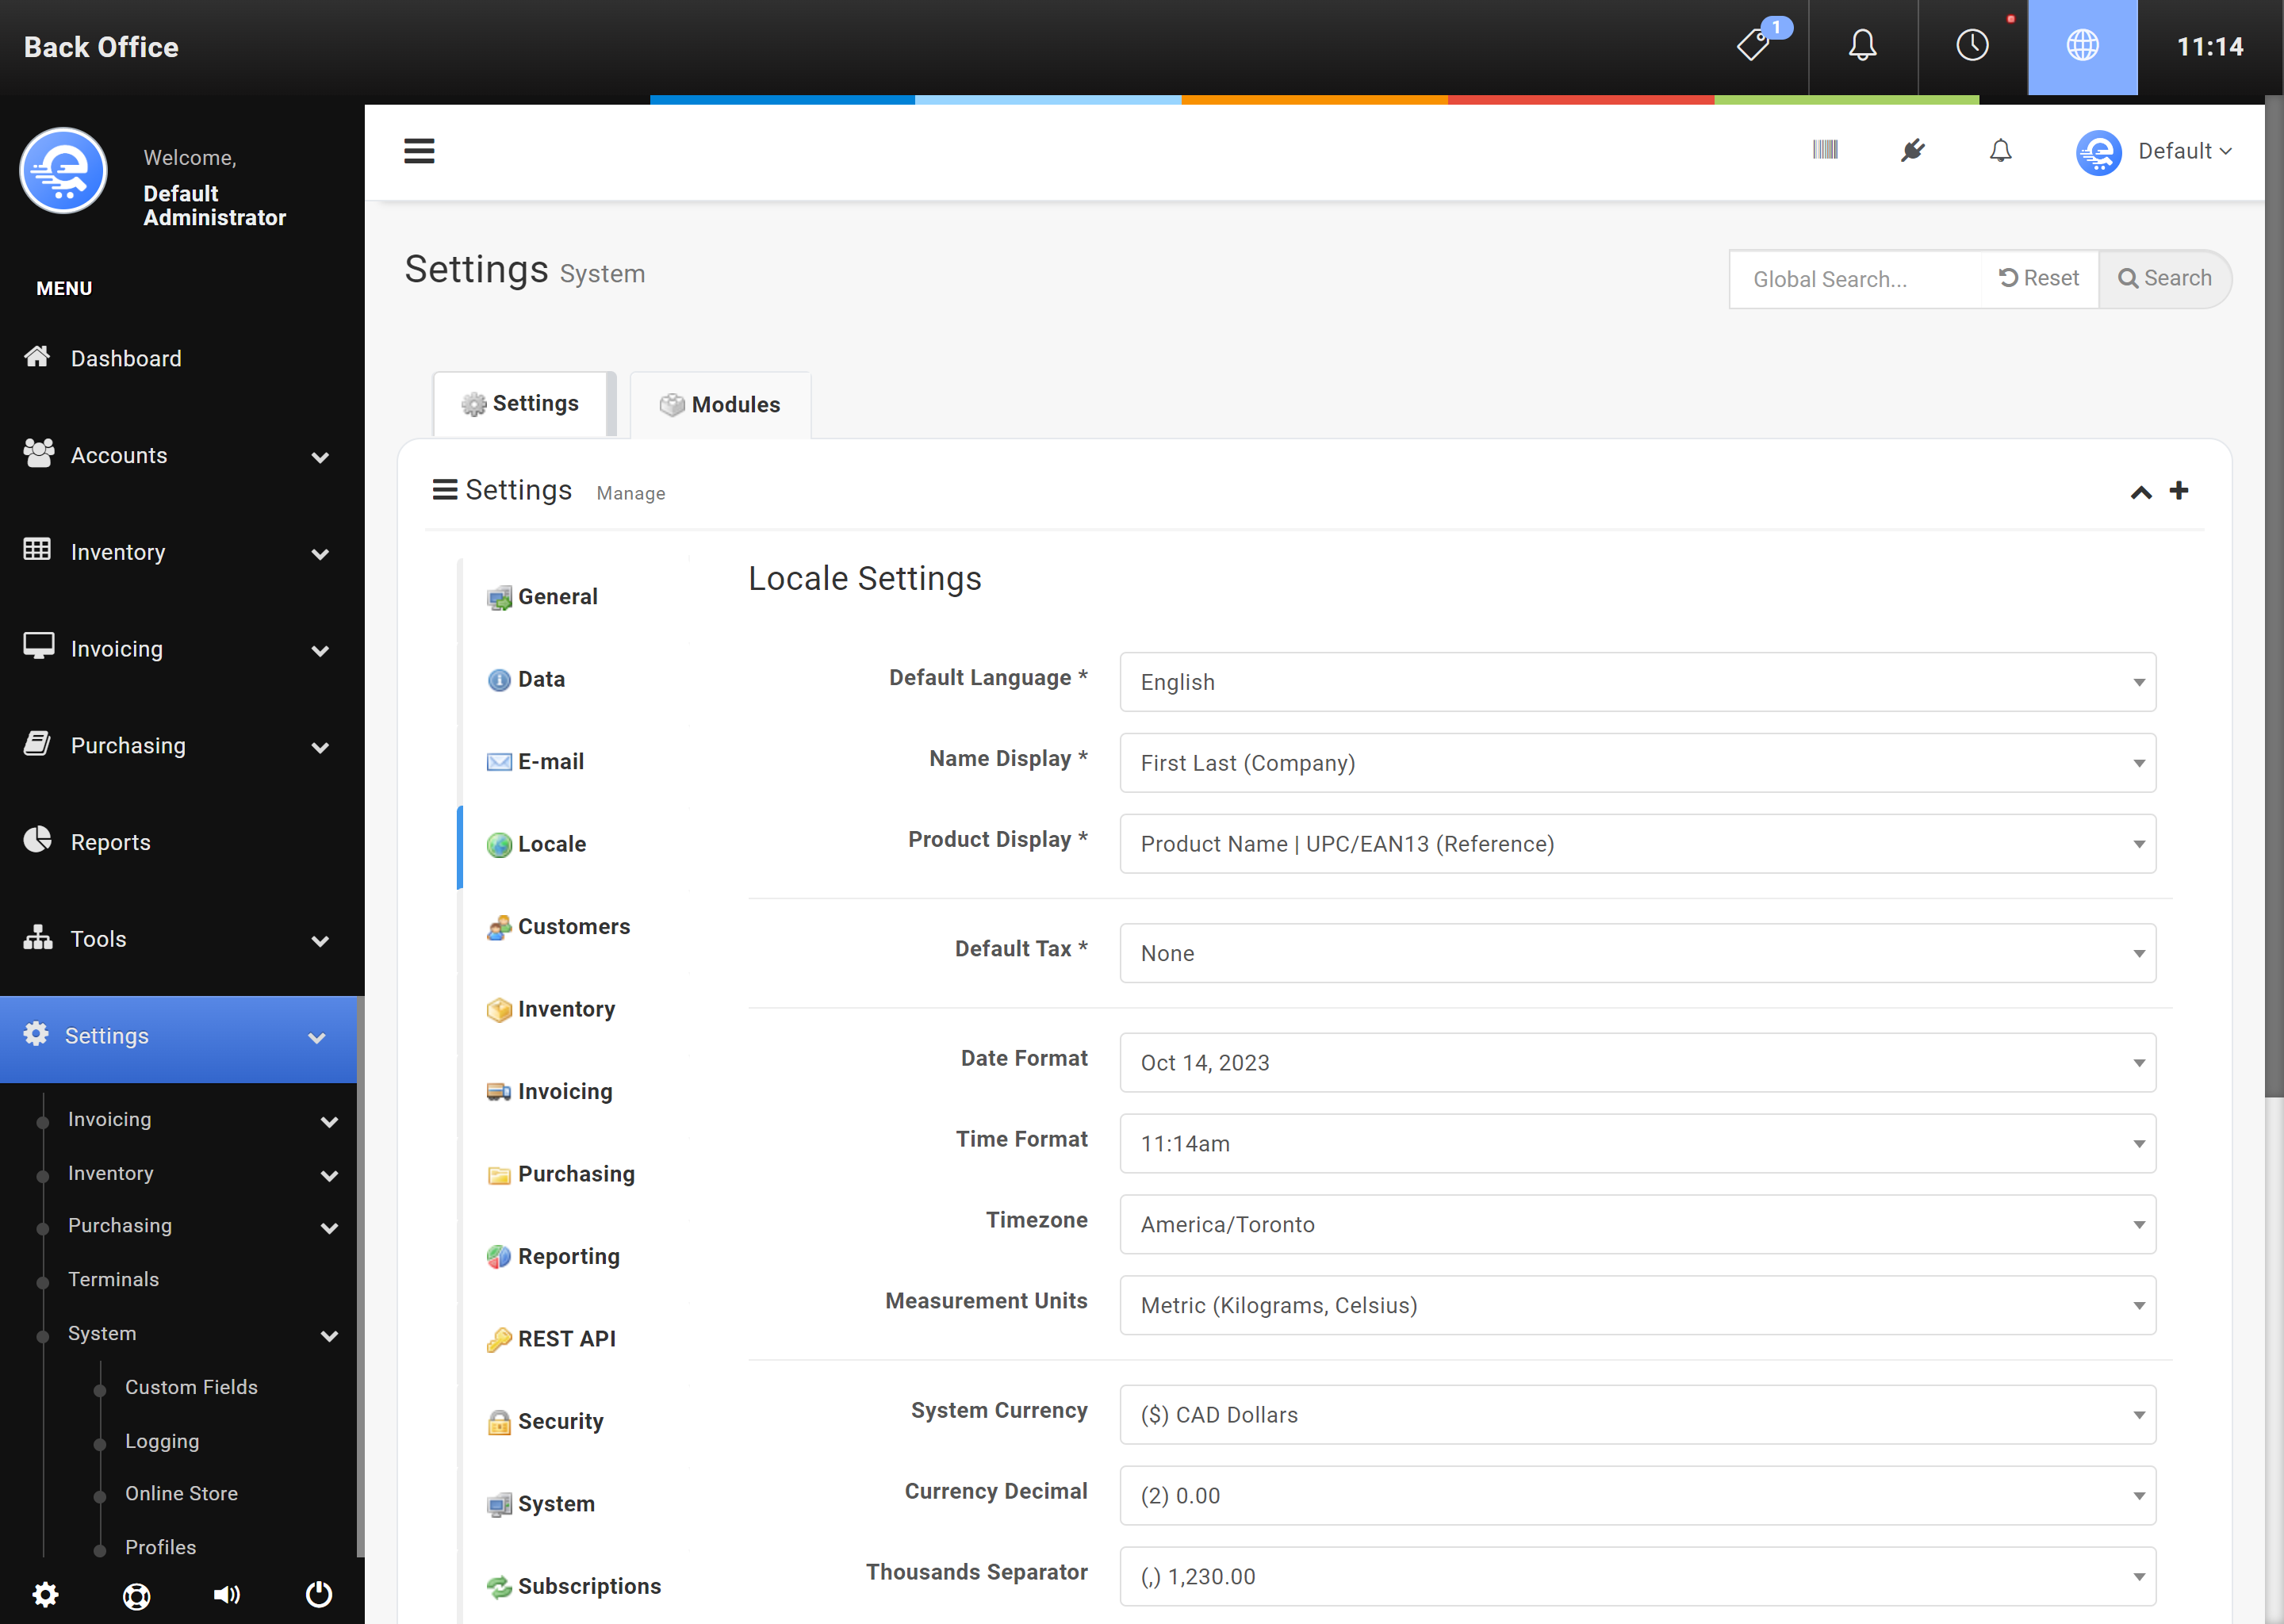
Figure A
Change the default currency by locating "System Currency" under "Locale" in Settings & Modules.
Configuring Monitor & Customer Display Screen
This guide assumes all of your hardware components have been installed and in working order. If you need assistance with setting up your device drivers, please contact your IT support person, or hardware manufacturer.
Monitor Setup
Touch Screen Monitors
- A minimum resolution of 1024 x 768 pixels is recommended.
- We recommend using mouse emulation and single click (no sound) mouse pointer options for the Touch Screen settings.
Regular Monitors
- Minimum resolution is 1024 x 768 pixels.
Customer Display Screen Setup
Currently not supported - to be supported in a future release.
- ELO - www.elotouch.com
Configuring Bar Code & Swipe Readers
This guide assumes all of your hardware components are installed and in working order. If you need assistance with setting up your device drivers, please contact your IT support person, or hardware manufacturer.
Bar Code Scanner Setup
- Barcode Readers should be setup by default.
Keyboard Emulation type devices are the only current supported devices. Generally, almost all USB hardware manufacturered after 2011 is keyboard emulated.
Card Reader Setup
- Card Readers should be setup by default.
Keyboard Emulation type devices are the only current supported devices. Generally, almost all USB hardware manufacturered after 2011 is keyboard emulated.
- Honeywell - www.honeywellaidc.com
- ID Tech - www.idtechproducts.com
Configuring Printer & Cash Drawer Settings
This guide assumes all of your hardware components are installed and in working order. If you need assistance with setting up your device drivers, please contact your IT support person, or hardware manufacturer.
Printer
- In the Client - Navigate to Options, and then click on Printer Settings. (see Figure G)
- Set your desired preferences on this page.
- When you print for the first time, you will need to set the margins correctly:
- Navigate to your POS through the web browser (for Windows, go to http://localhost:8888/.
- Attempt to print a receipt from the Point Of Sale, at this time, a window should open and allow you to configure the browsers settings (which also changes the Point Of Sale settings). When complete, complete a test print, and exit Google Chrome.
Cash Drawer
- The cash drawer should be configured through your Printer settings.
- In Windows, open up your Control Panel and find Printers.
- Right click on your Thermal printer, and go to Advanced Settings
- Look for "Open Cash Drawer Before Printing" and change to Enabled
- Click Apply
To use the Cash Drawer feature, you must have a supported Printer. The printer should support 5 pin (Printer to Cash Drawer) connection.
- Star Micronics - www.starmicronics.com
- Dymo - www.dymo.com
- EPSON - www.epson.com
Configuring Taxes
eQuate POS provides tax management in the Back Office. Tax groups hold mulitple tax rates. Tax rates can be applied to certain locations and hold various rates. For example, in Canada, some provinces require two different tax rates to be applied to items. An example of this would be GST (5%) and PST (7%) in Ontario, Canada. For this setup, one single Tax Group would be setup, and then two individual tax rates would be added and assigned to the tax group.
Adding A Tax Group
Tax groups hold various tax rates. Only one tax group can be used when applying tax to a product or item.
- Login to the Back Office.
- On the left menu, select "Settings" under Settings, then select "Invoicing", then "Taxes".
- Click "Add Tax Group" button (see Figure A below).
- Provide a name for the tax group and then click "Save Changes" (see Figure C).

Figure A
Add your online store in the Back Office area. Select "New Online Store".
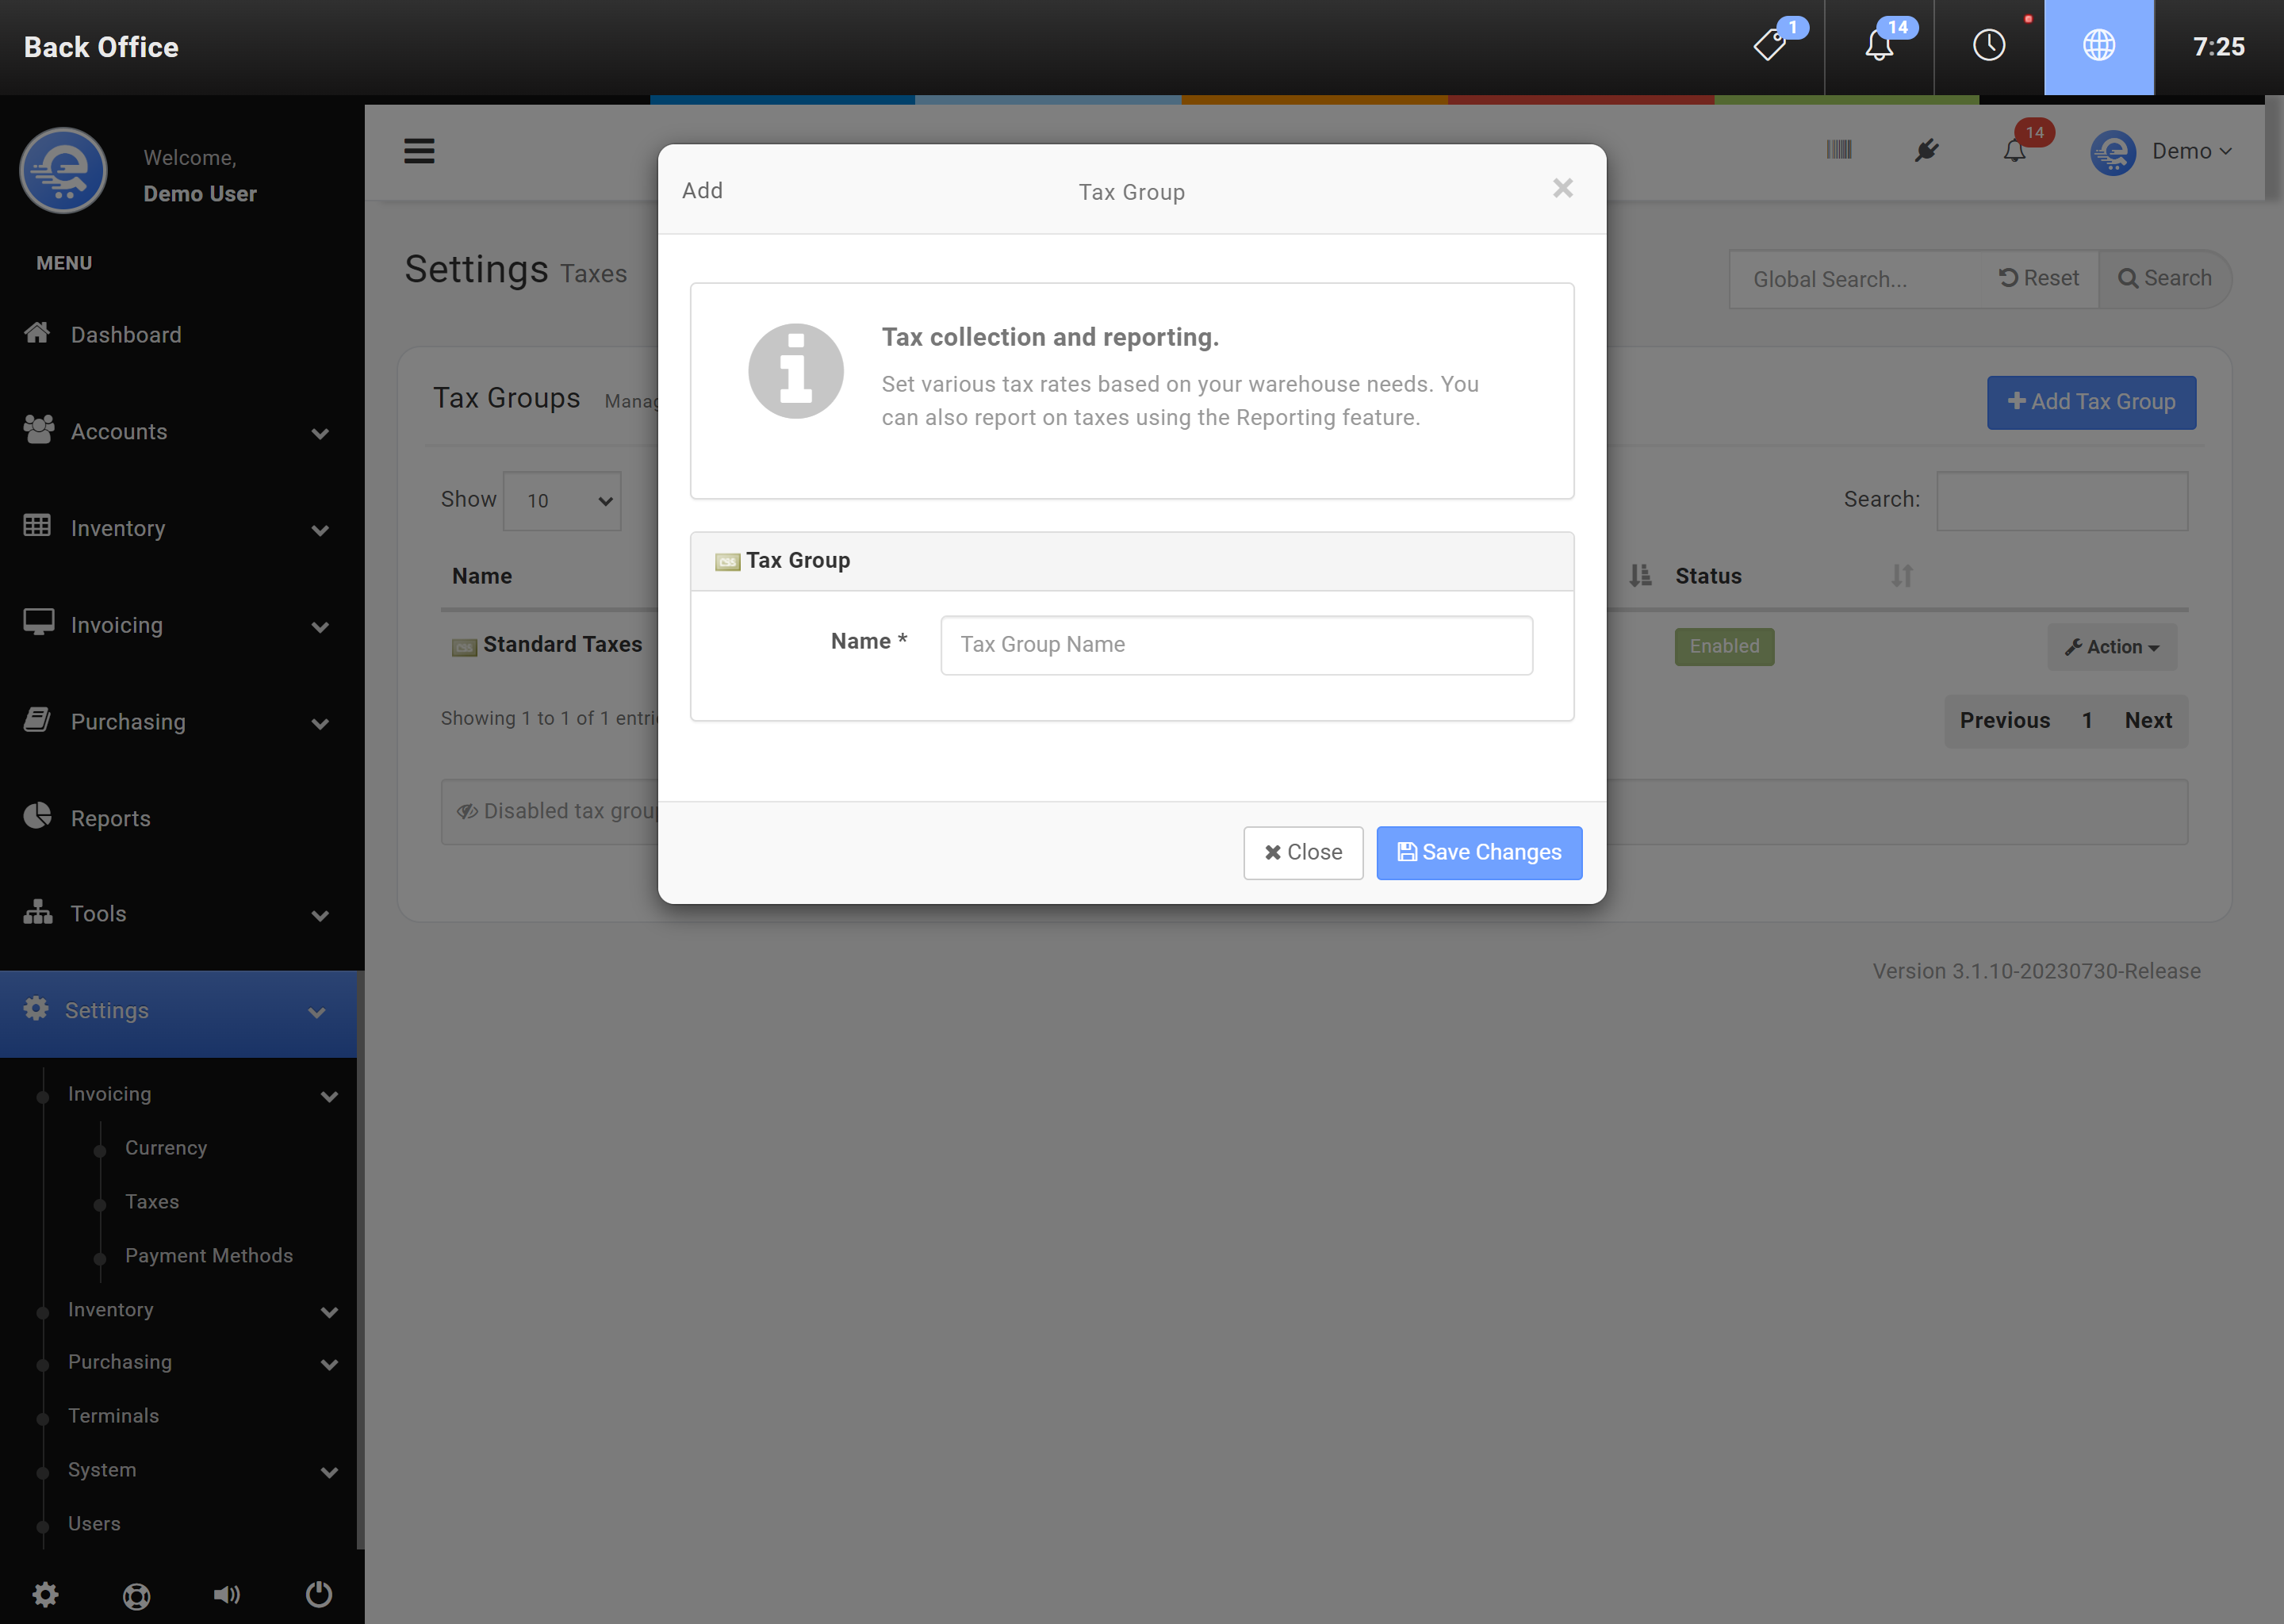
Figure B
Enter your VirtueMart SQL details and press "Save Changes".
Adding Tax Rates
Tax rates can be added within the Tax Group. You can add an unlimited amount of tax rates under tax groups.
- Login to the Back Office.
- On the left menu, select "Settings" under Settings, then select "Invoicing", then "Taxes".
- Find the Tax Group you would like to add or modify a Tax rate then select "Action", then "Edit" (see Figure D).
- Click "Add Tax" and then provide the tax rate details (see Figure E).
- Click "Save Changes" when complete.
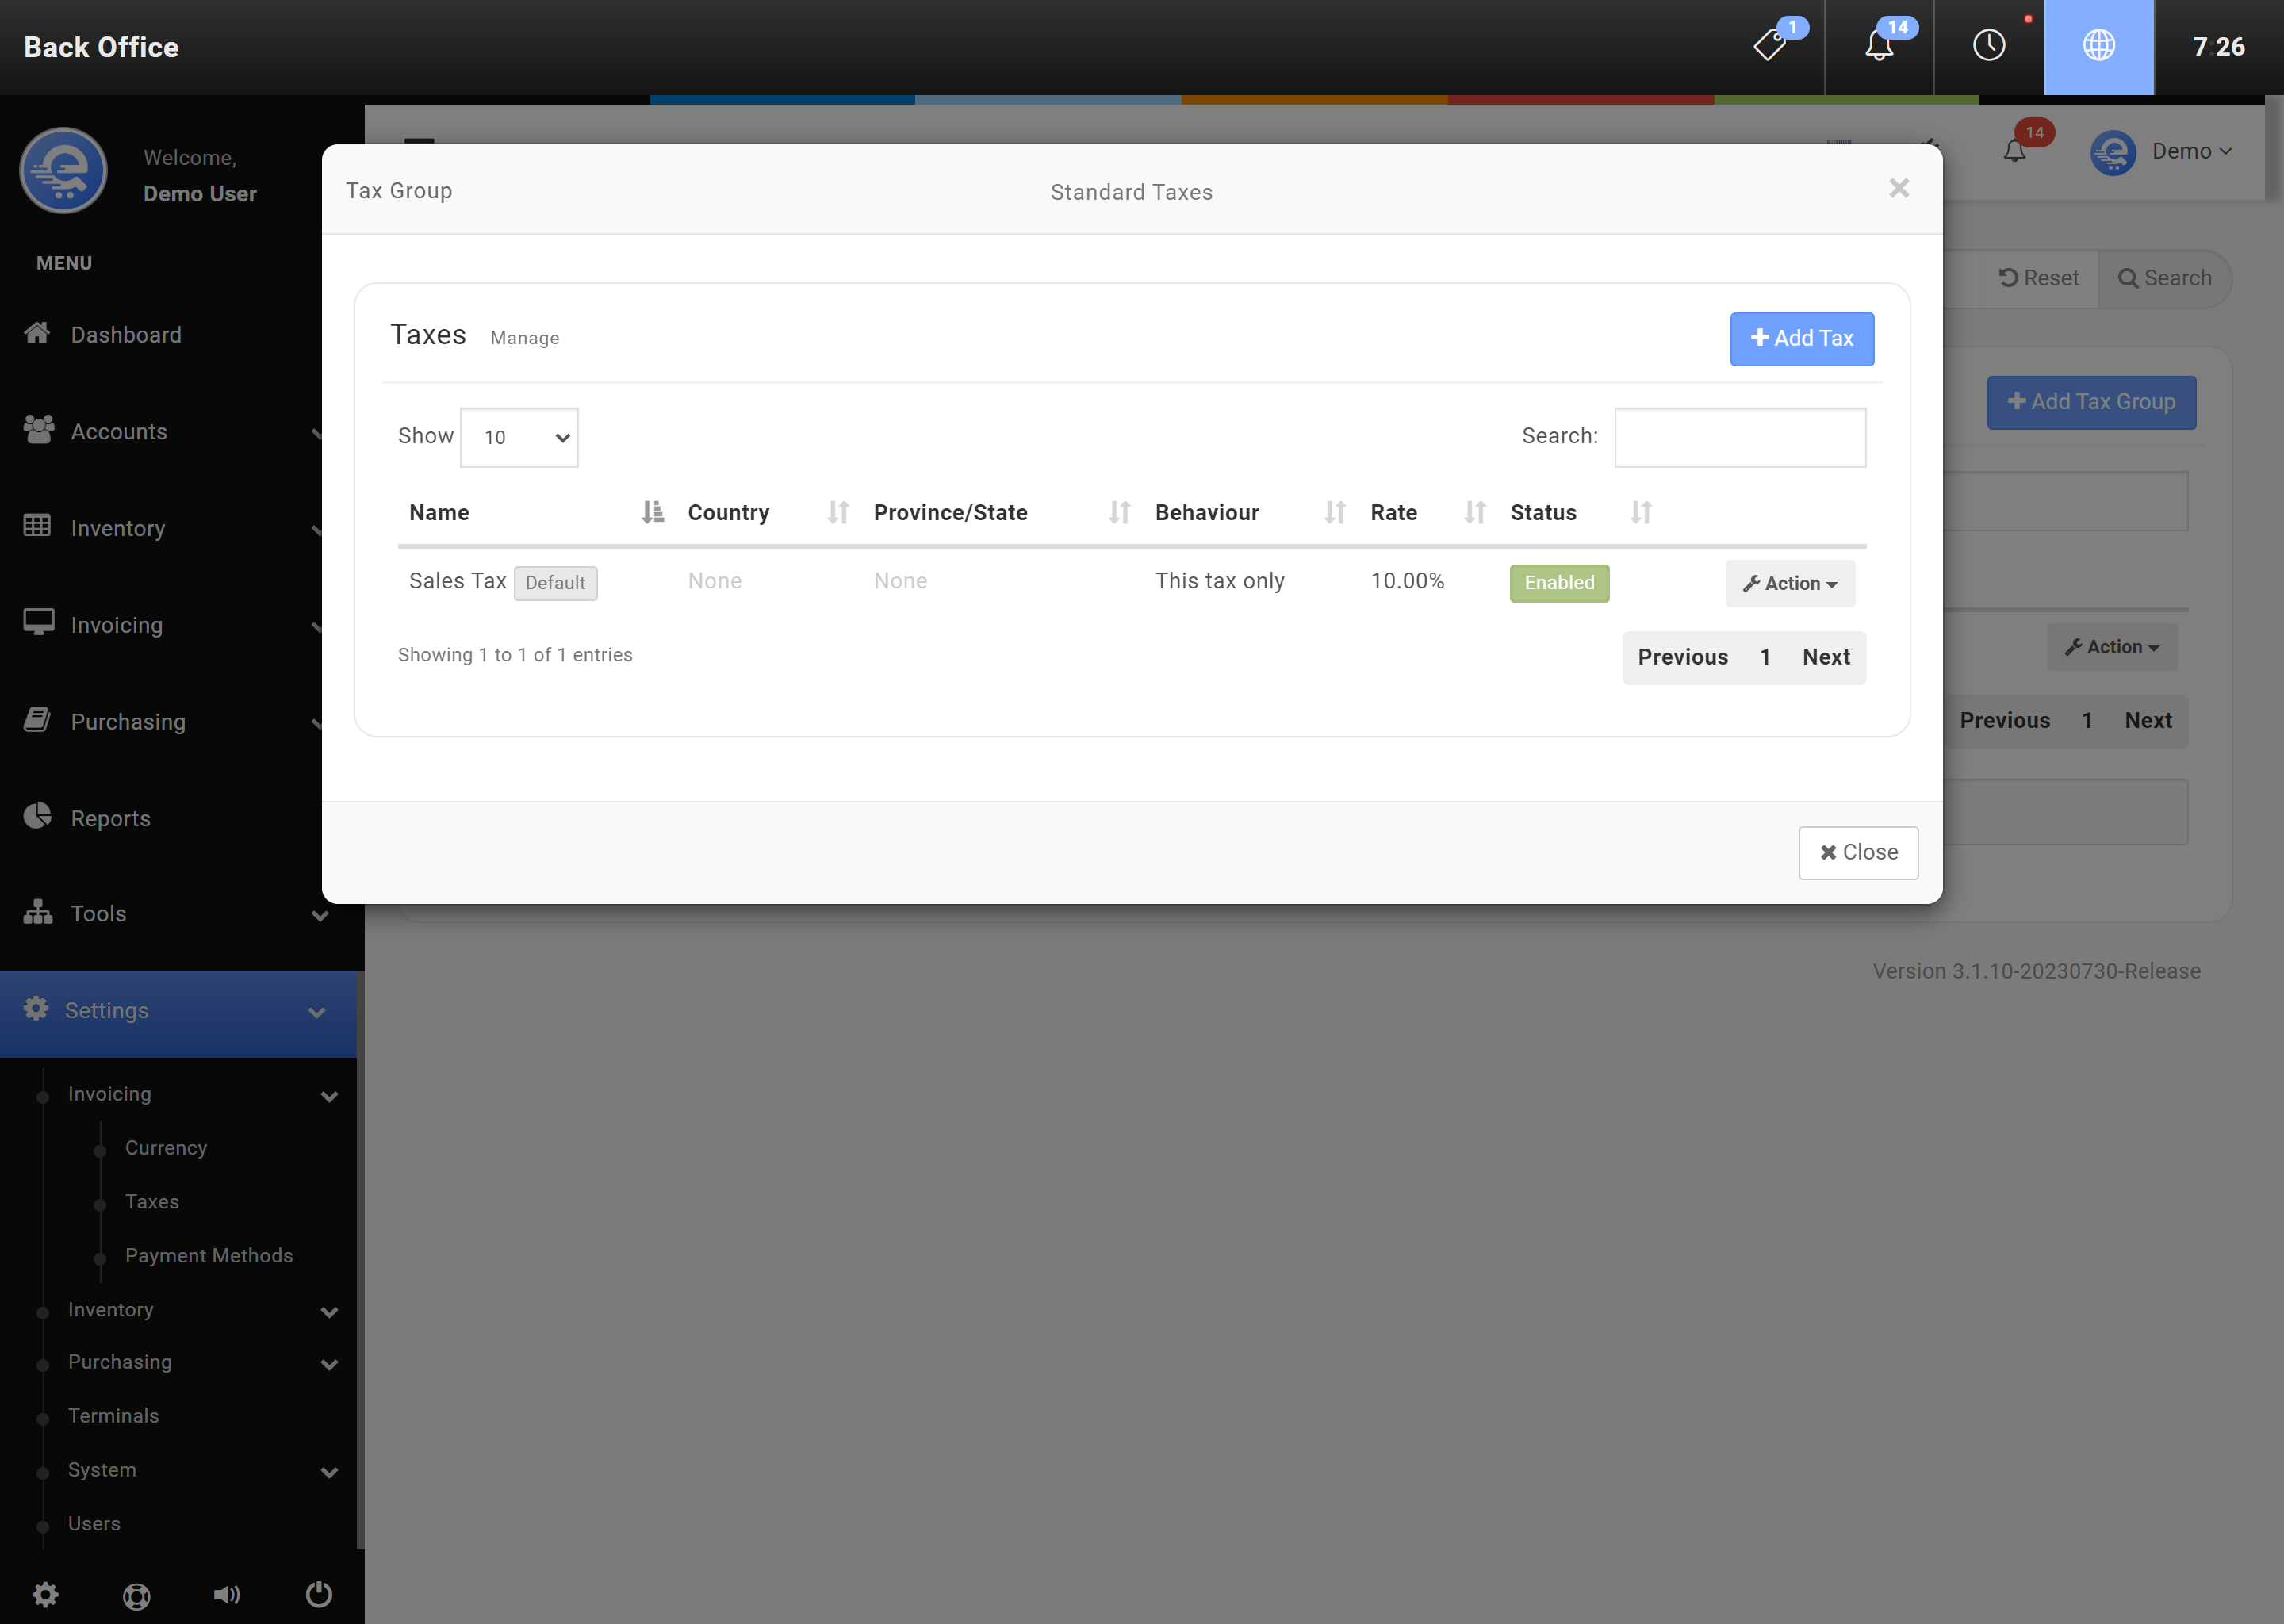
Figure C
After saving your online store to eQuate POS, you will see "Pending" until the system has synchronized.
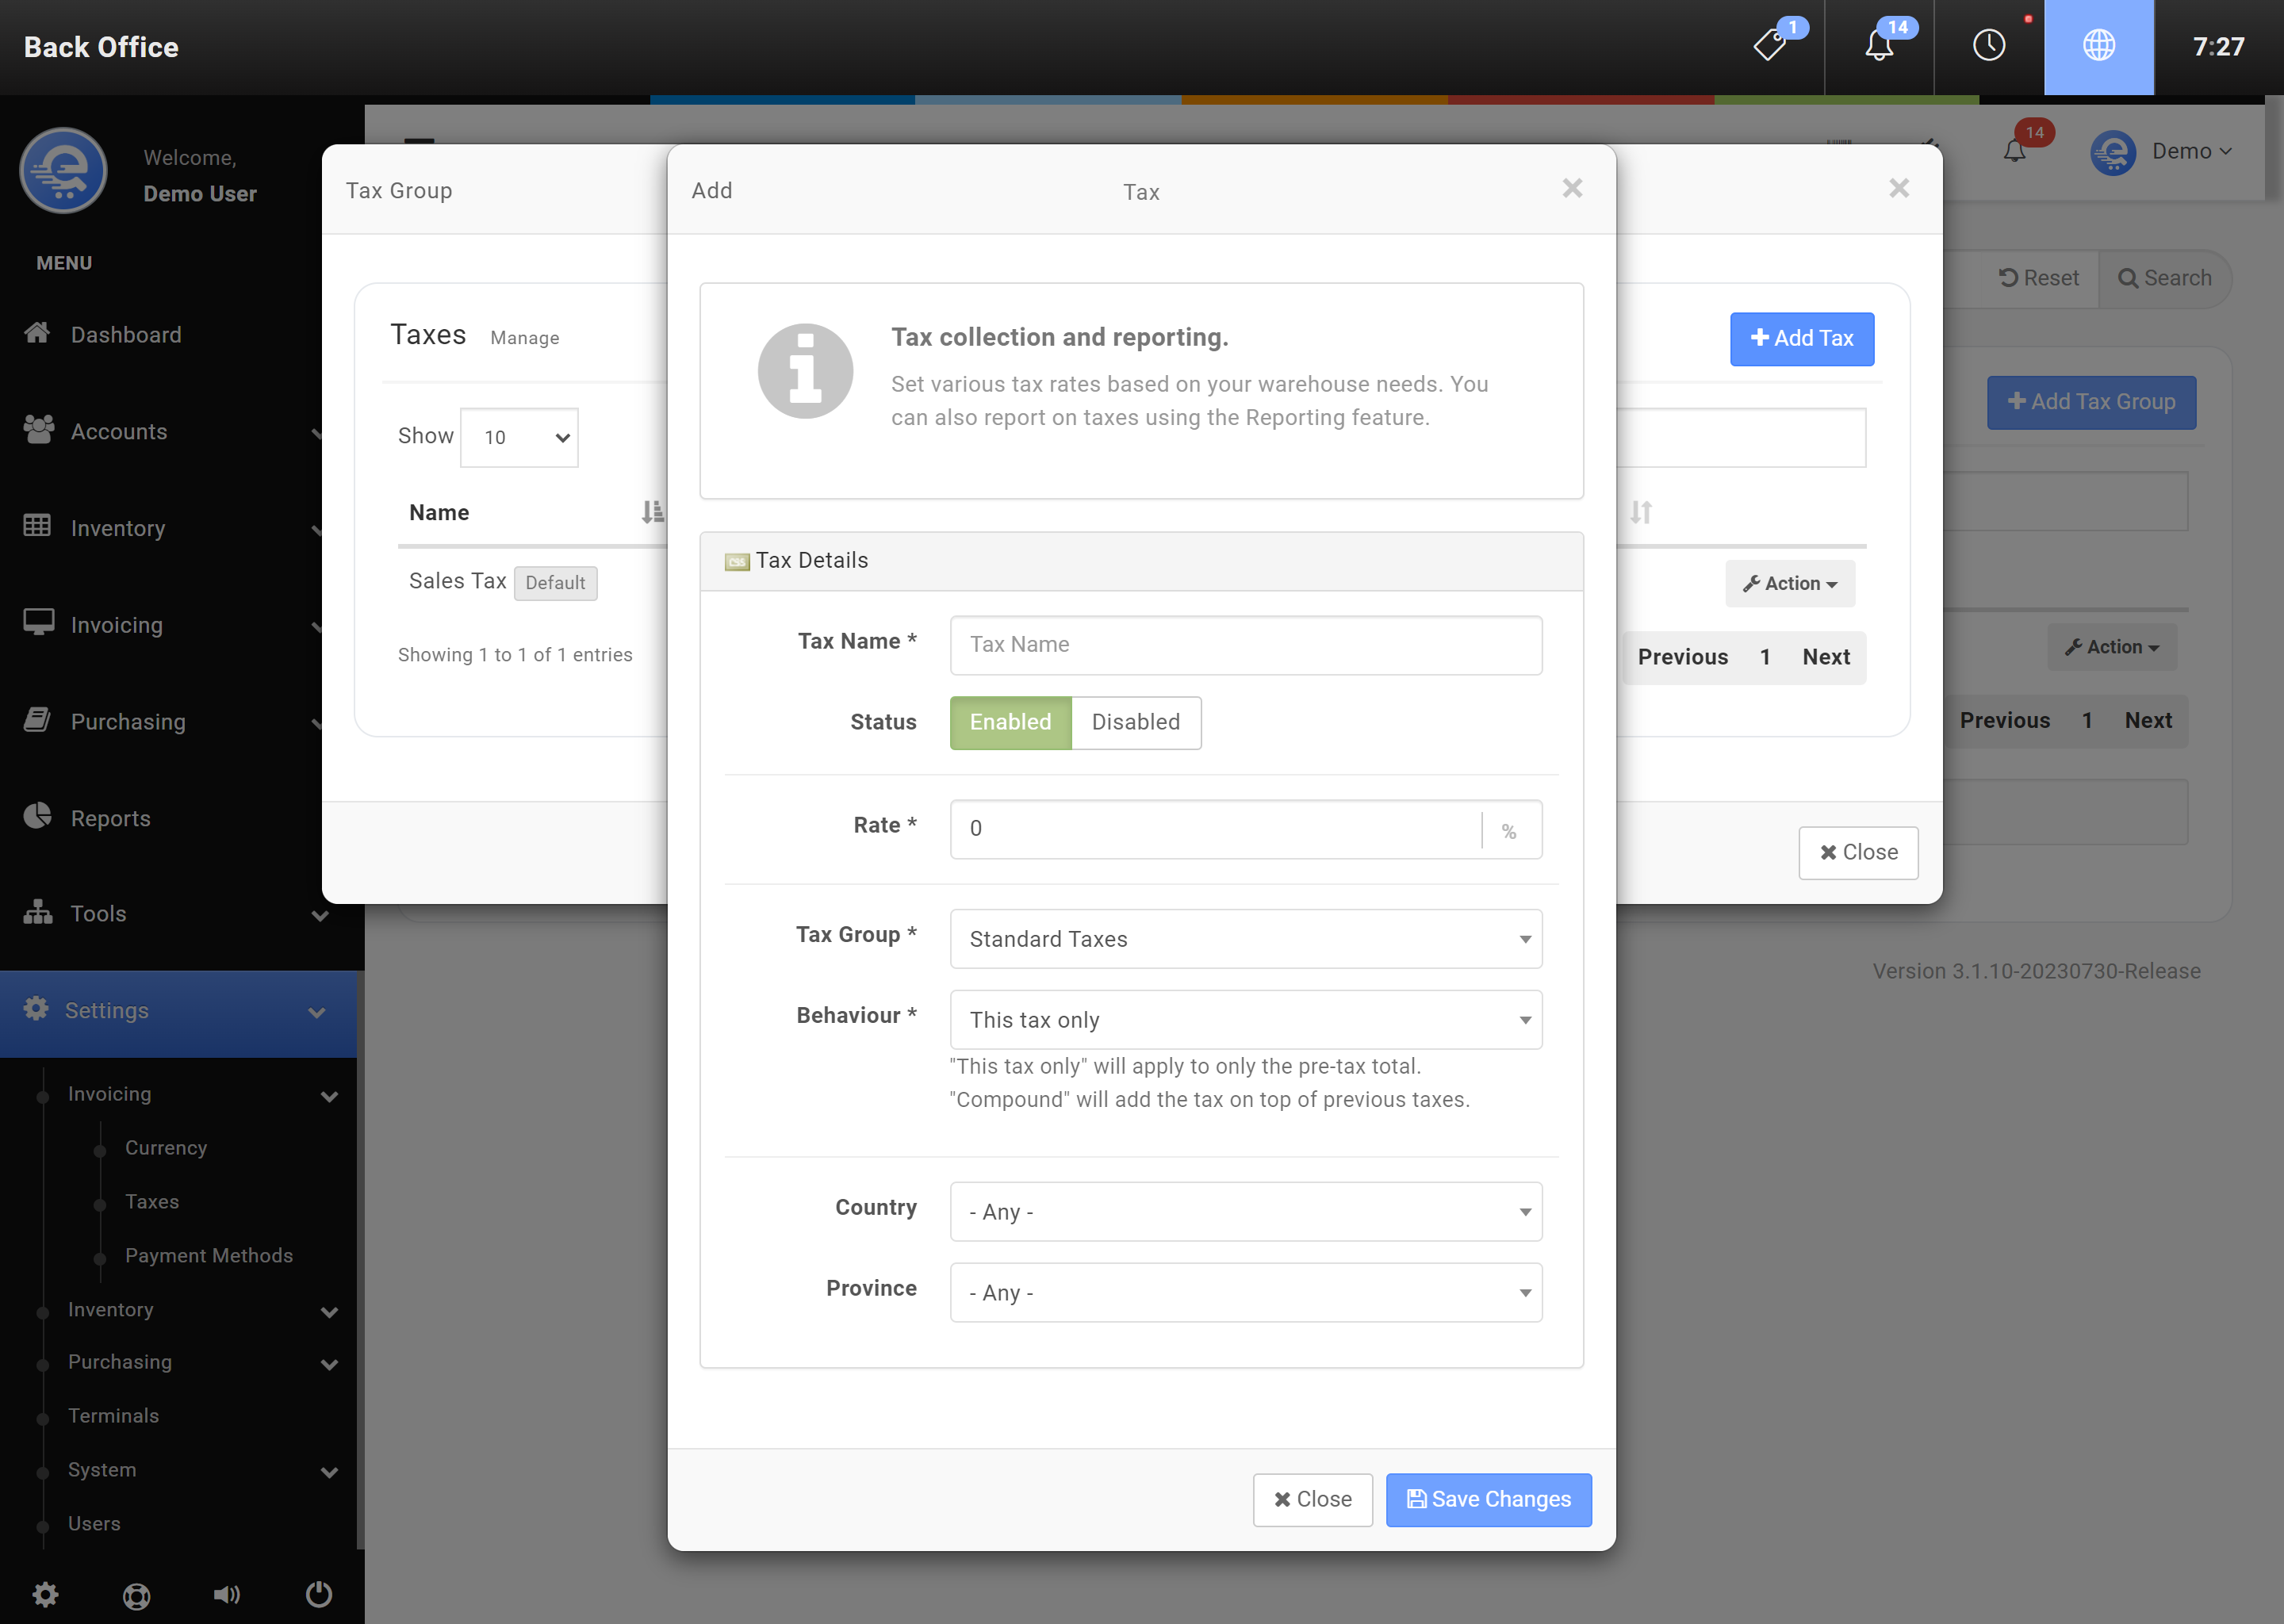
Figure D
To disable the synchronization, select "Edit" under Actions and set the status to Disabled and press "Save Changes".
Setting Default Tax Group
During the creation of each product, you can set the default tax group for that product. However, sometimes you may need to add custom items to an order. Setting the default tax group will ensure the proper tax group is applied to these custom items. Setting the default tax group also allows you to create products quicker by not having to select your preferred tax group everytime.
- Login to the Back Office.
- On the left menu, select "Settings" under Settings, then select "Invoicing", then "Taxes".
- Find the Tax Group you would like to add or modify a Tax rate then select "Action", then "Edit" (see Figure D).
- Click "Add Tax" and then provide the tax rate details (see Figure E).
- Click "Save Changes" when complete.

Figure E
After saving your online store to eQuate POS, you will see "Pending" until the system has synchronized.
Configuring Login Screen
Operators can login using an I.D. number, and a PIN (if applicable). Enabling this feature will allow you to use Payroll functions, Chat functions, and Sales Tracking.
- Login to the Back Office.
- On the left menu, click "Settings", under "System", click "Settings".
- Select "Terminals" in the left sub-menu.
- Find "Require Login" and change to either Enabled or Disabled (see Figure A below).
- Press "Save Changes" to finalize changes made.
- The terminal must synchronize before the changes are discovered (see Figure B below).
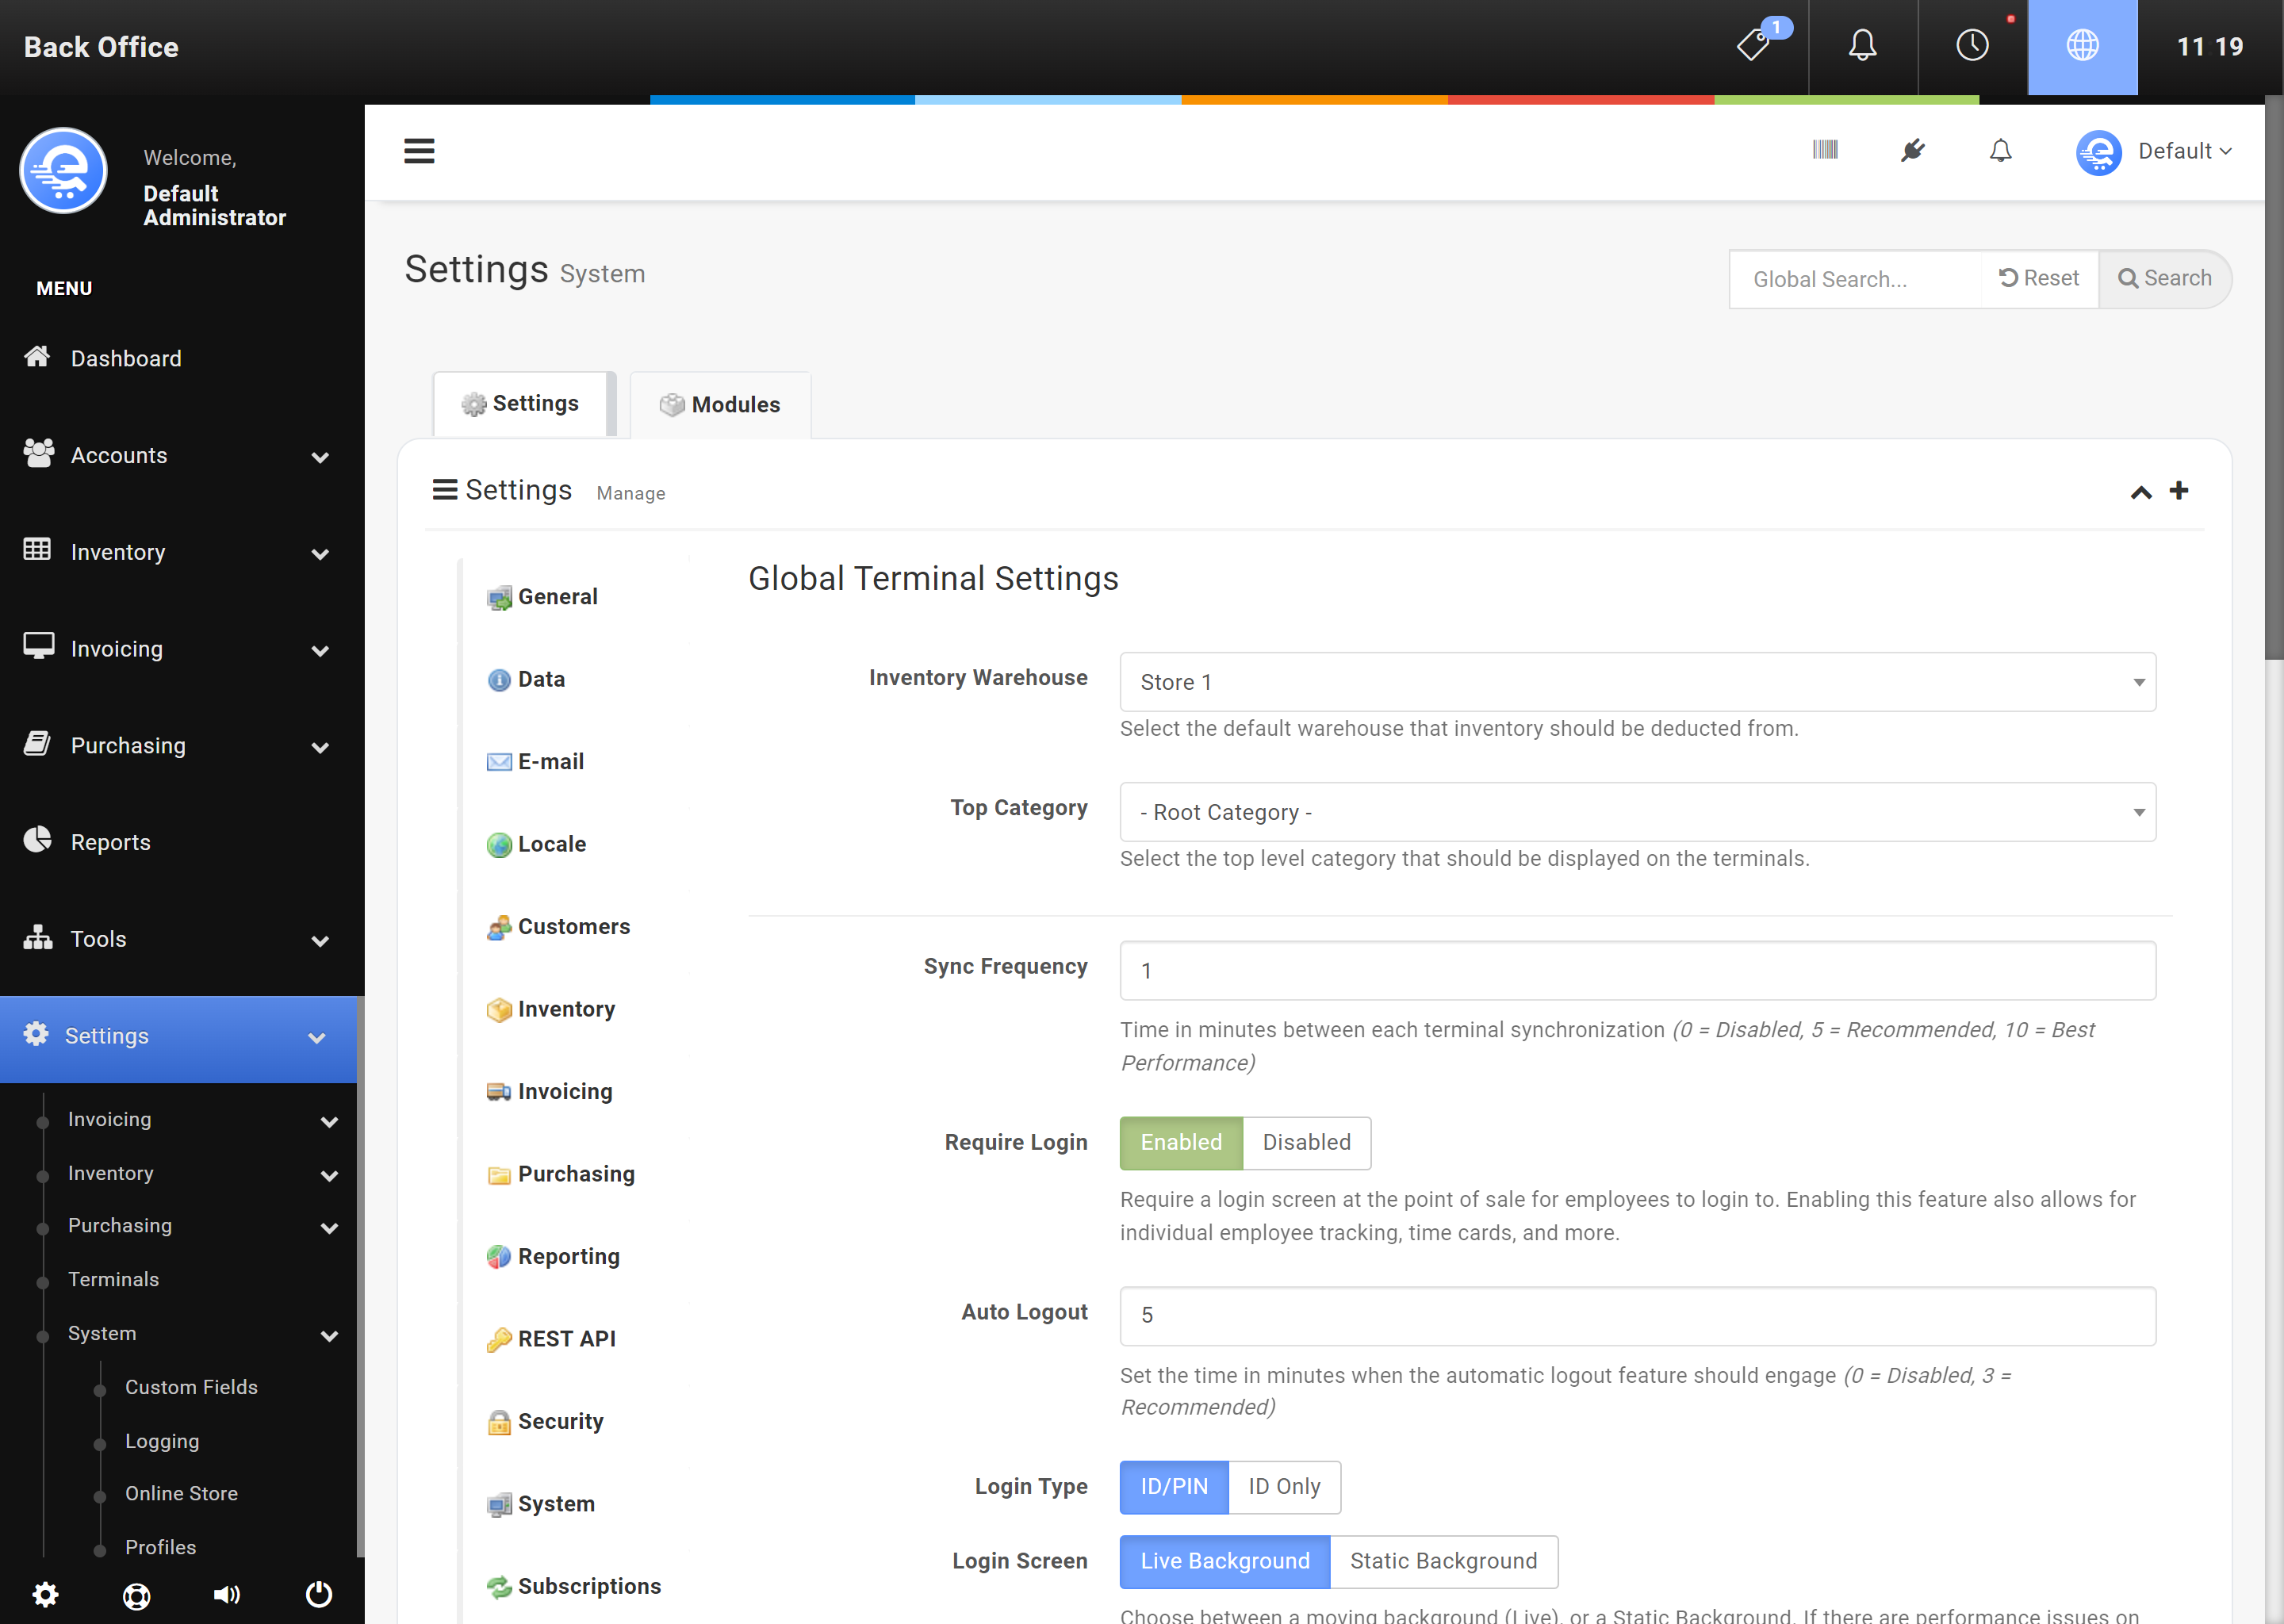
Figure A
Cash Out screen showing "Customer Entitlement" option which will display the customers total loyalty points.
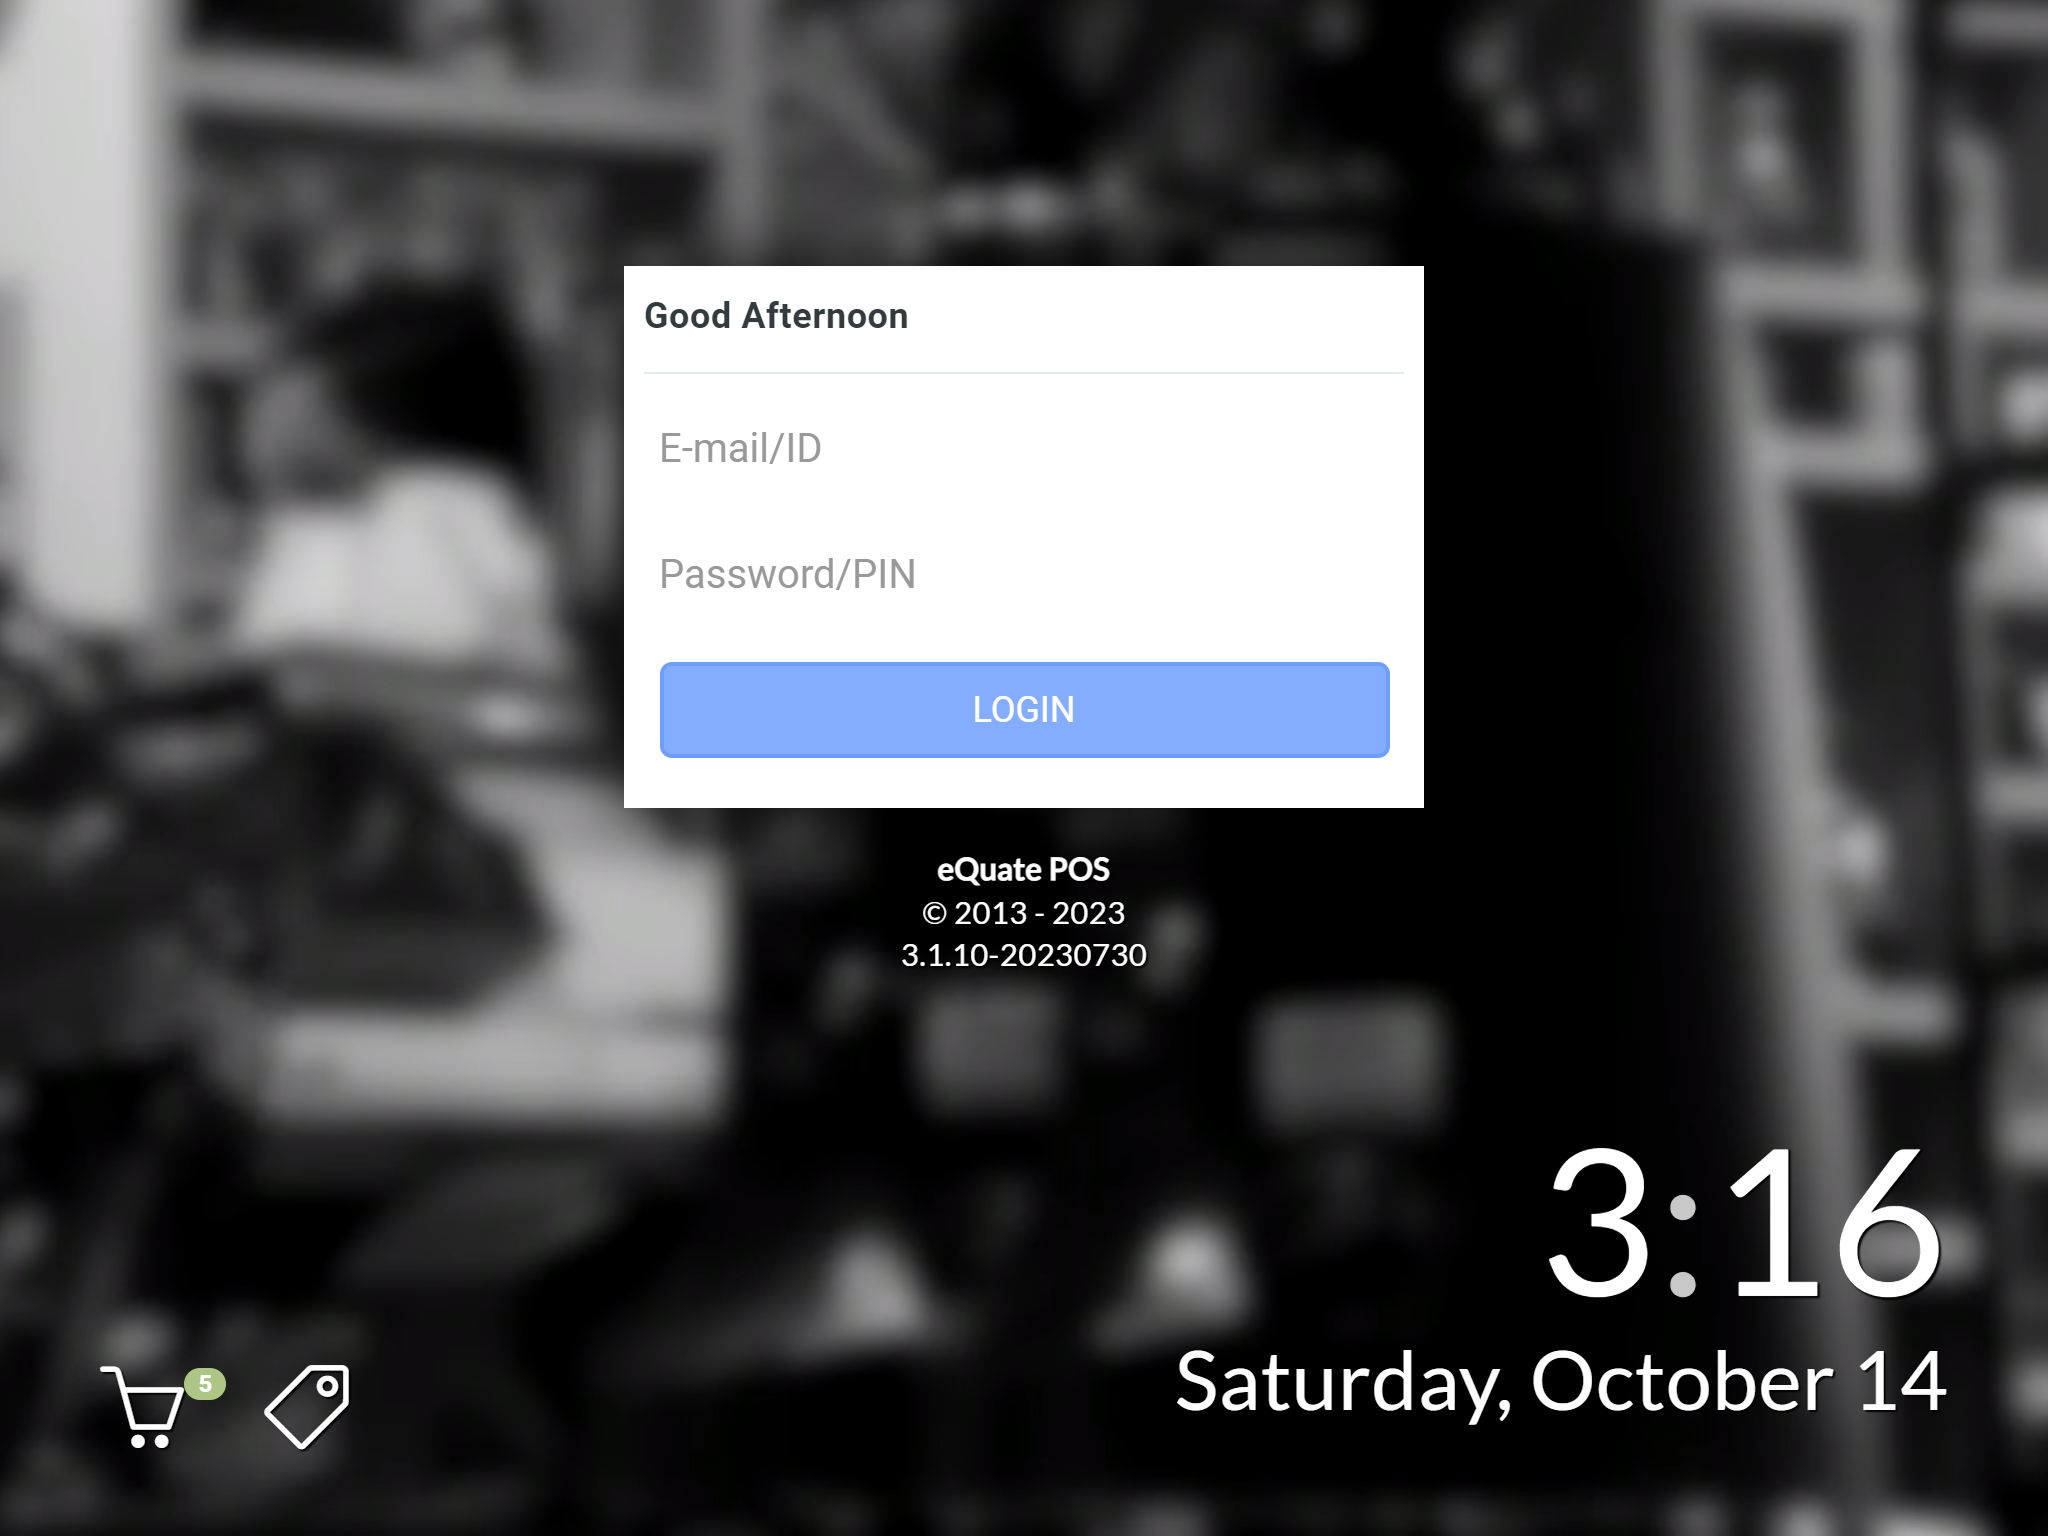
Figure B
Adjust Loyalty points on the Customer Profile screen by going to More > Loyalty.
- Login to the Back Office.
- On the left menu, click "Settings", then click "Terminals".
- On the "Action" drop-down menu, select "Edit" (see Figure C below).
- On the left sub-menu, click "Settings".
- Find "Require Login" and change to either Enabled or Disabled, or use Global Settings (default) (see Figure D below).
- Press "Save Changes" to finalize changes made.
- The terminal must synchronize before the changes are discovered (see Figure E below).

Figure C
Adjust Loyalty points on the Customer Profile screen by going to More > Loyalty.
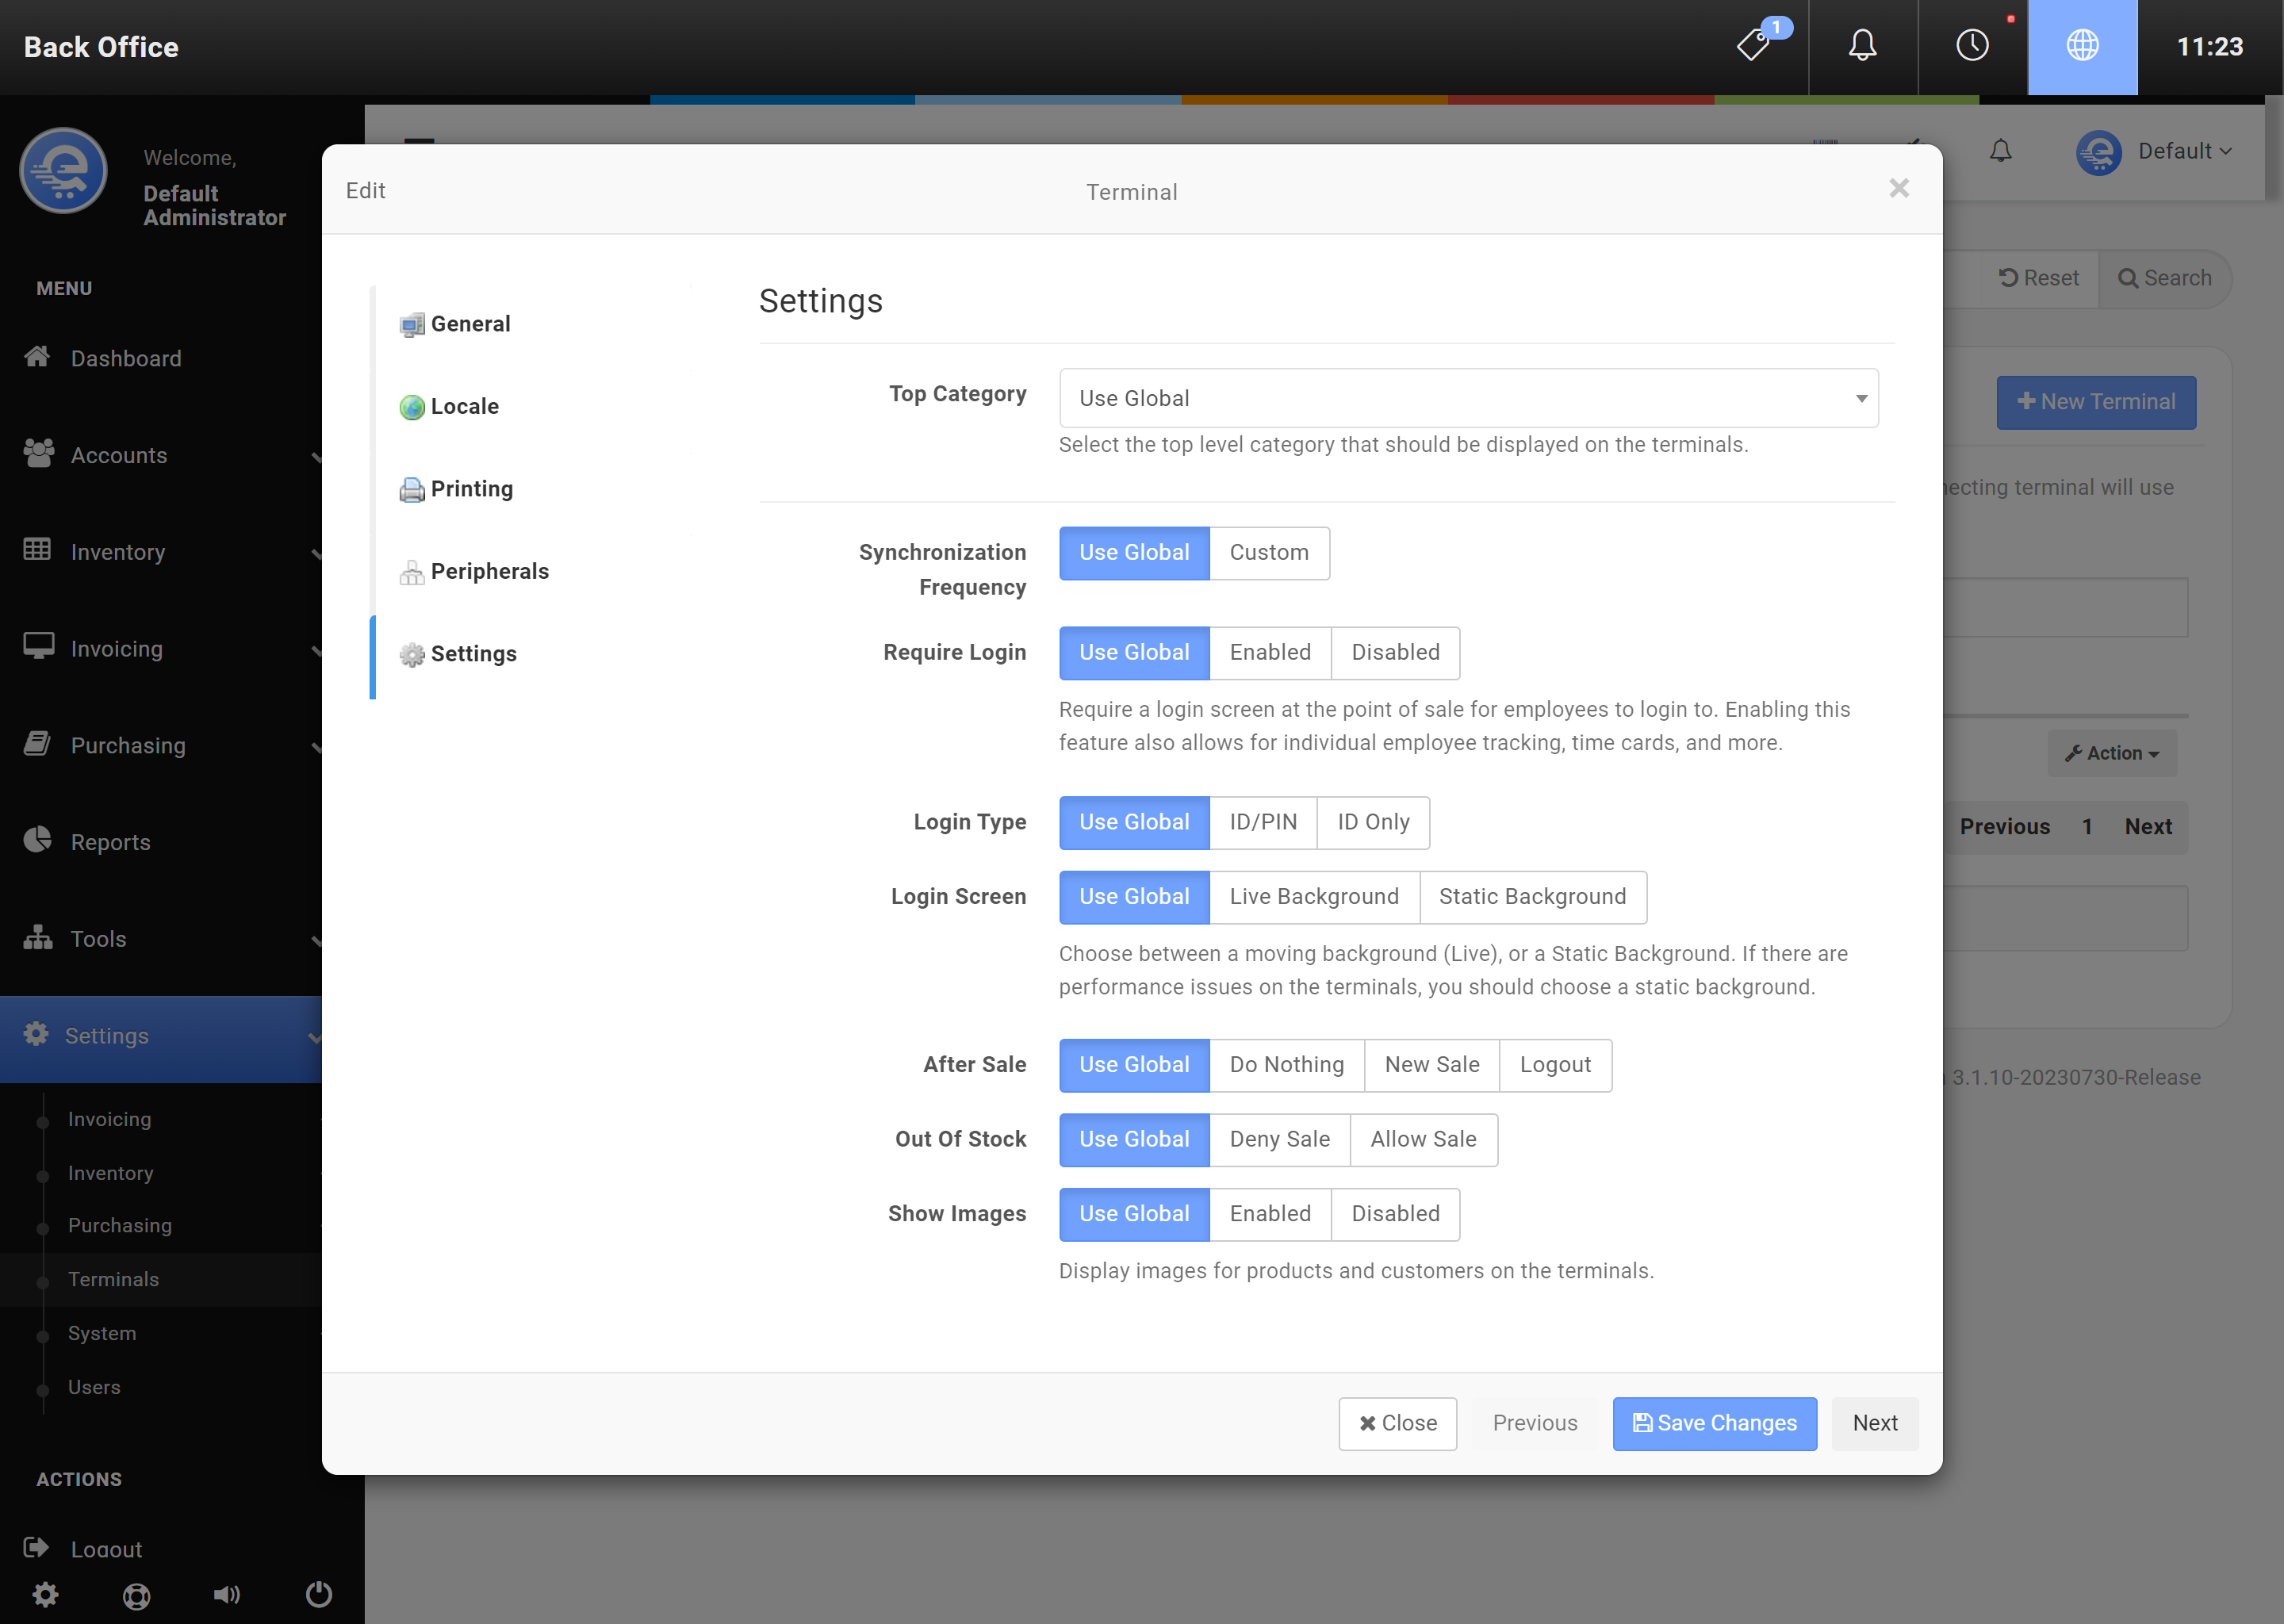
Figure D
Adjust Loyalty points on the Customer Profile screen by going to More > Loyalty.
Figure E
Login screen with system time and information buttons.
Configuring Payment Methods
eQuate POS allows you to add different types of payment methods (cash, debit, credit) so you can track the types of payments your customers make. By default, eQuate POS is already configured with popular payment methods like Cash, Debit, and Credt.
- Navigate to the Back Office area
- On the left menu, click on "Settings", then click "Invoicing", then "Payment Methods".
- Click on "Add Payment Method" (see Figure A).
- Press "Save Changes" to finalize changes made (see Figure B).
- The terminal must synchronize before the changes are discovered.
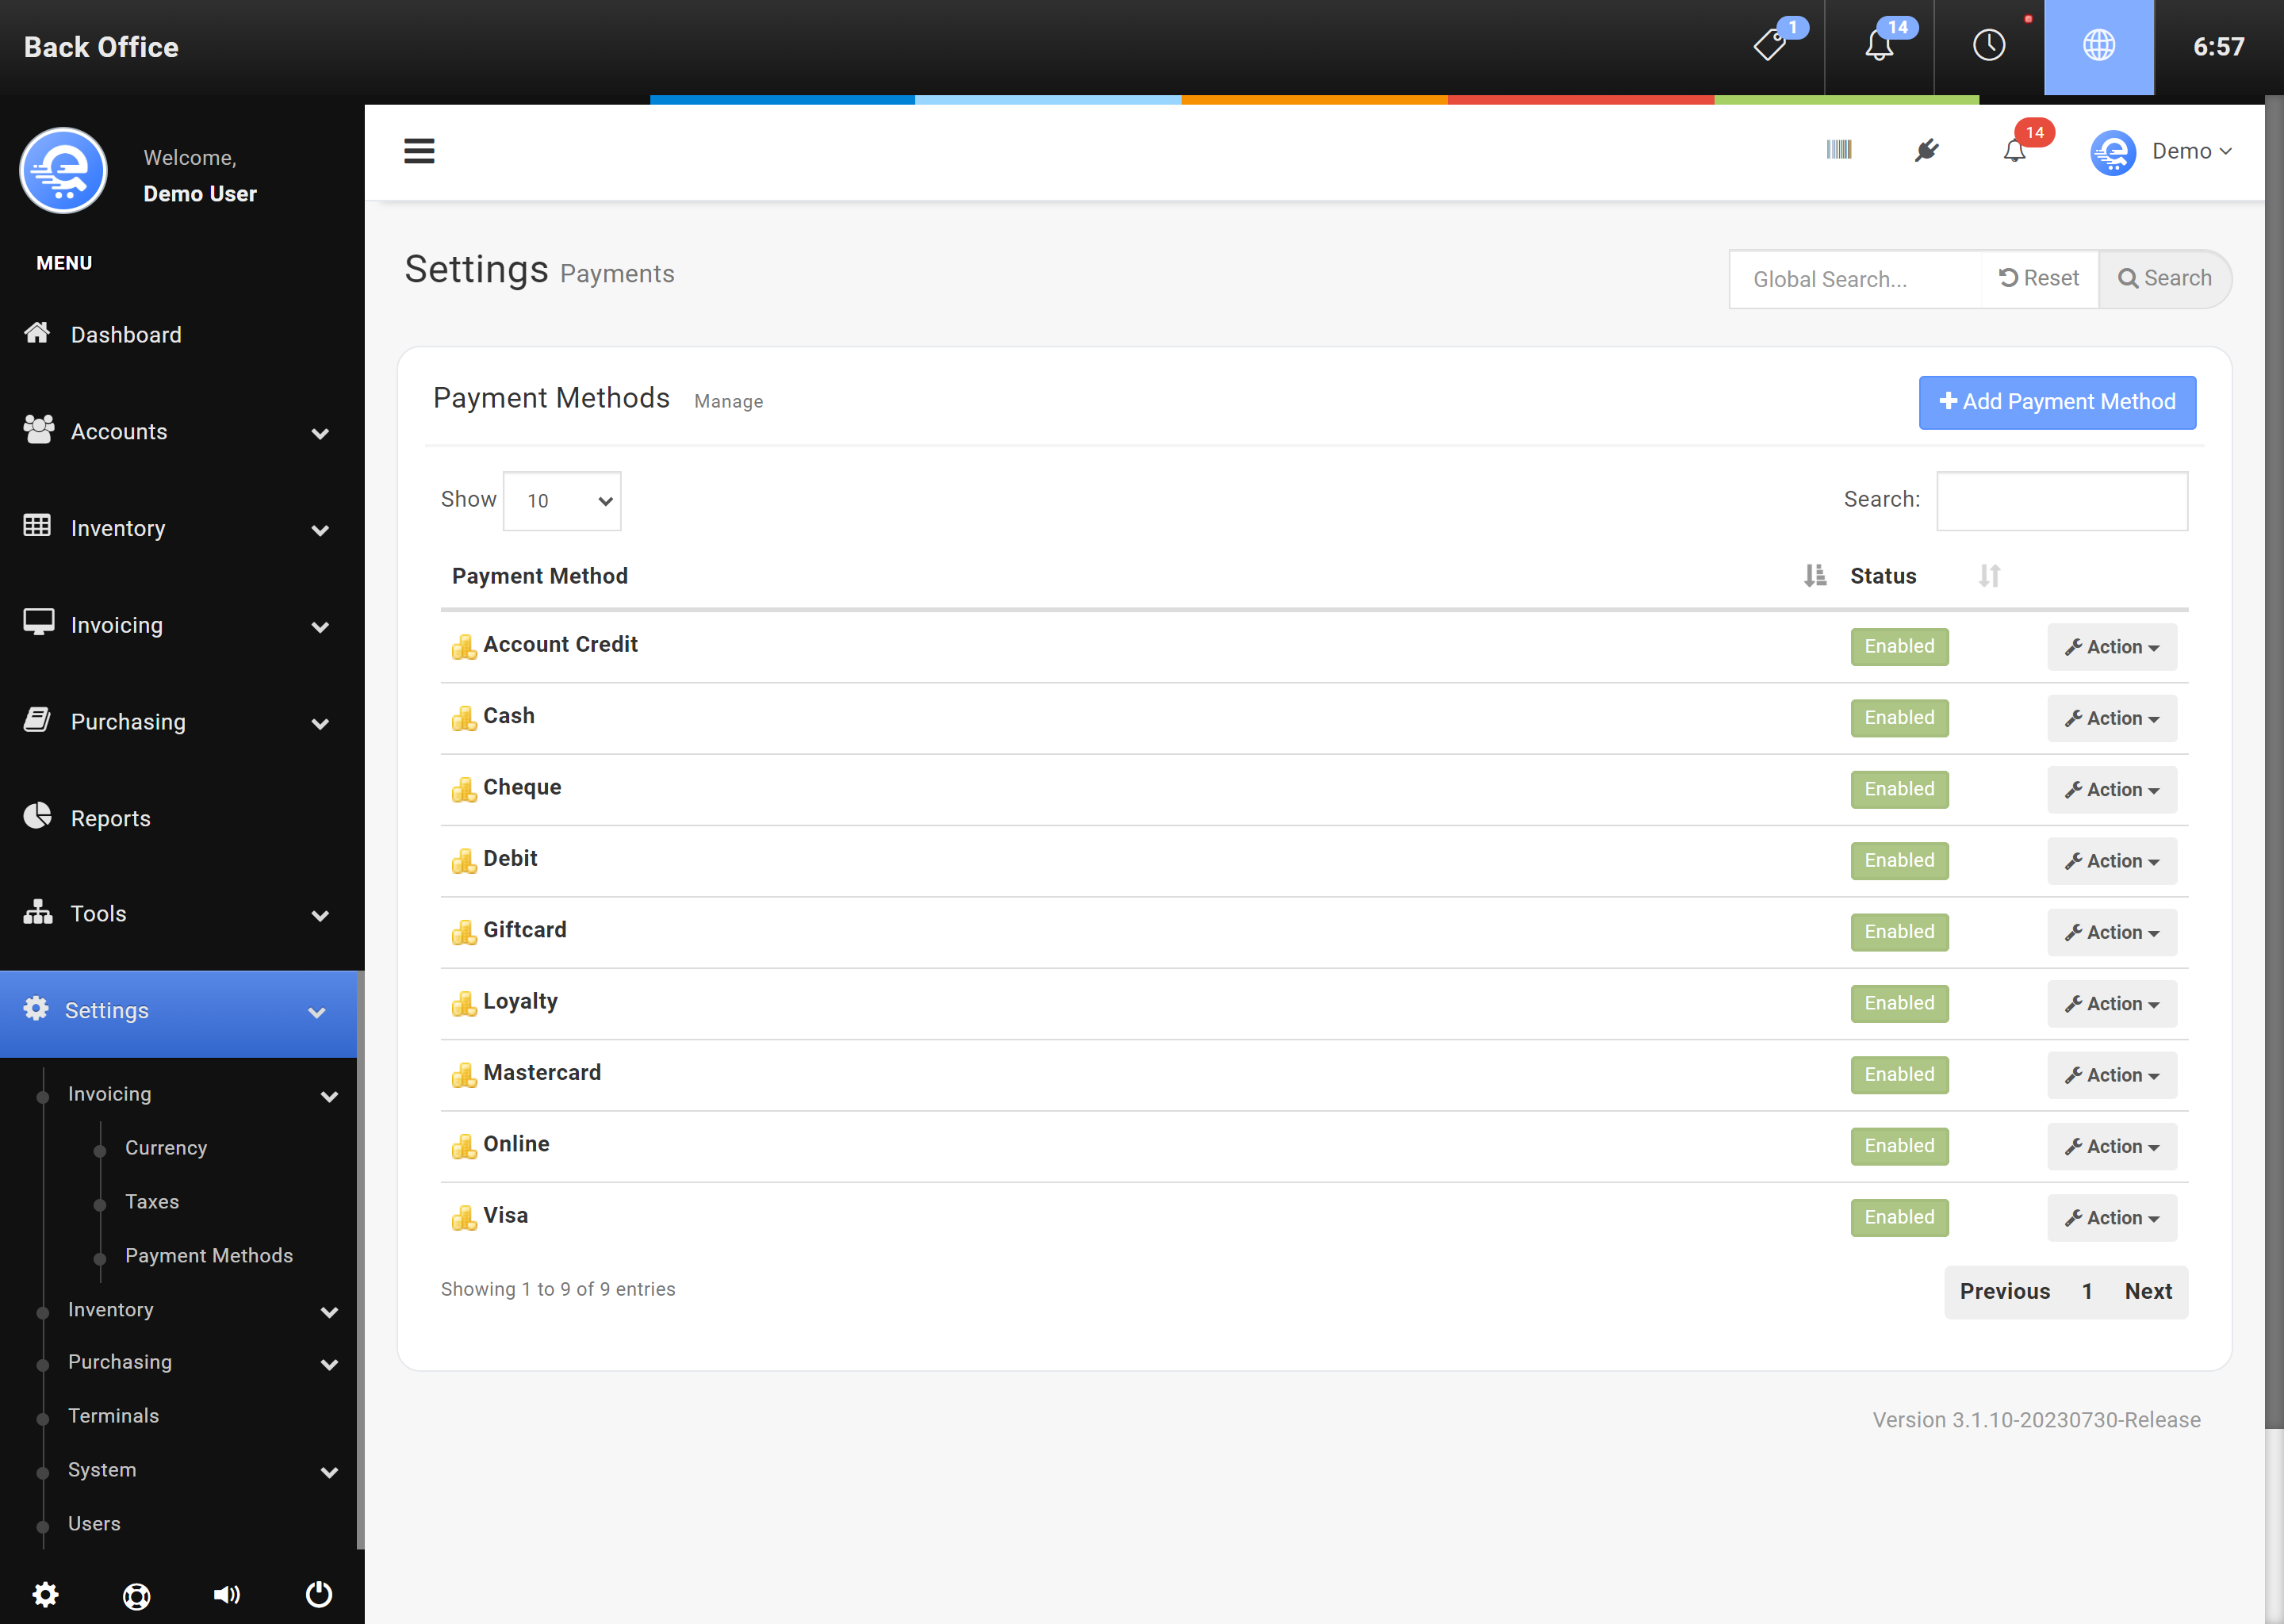
Figure A
From the Back Office, create a new Payment Method by clicking "Add Payment Method".
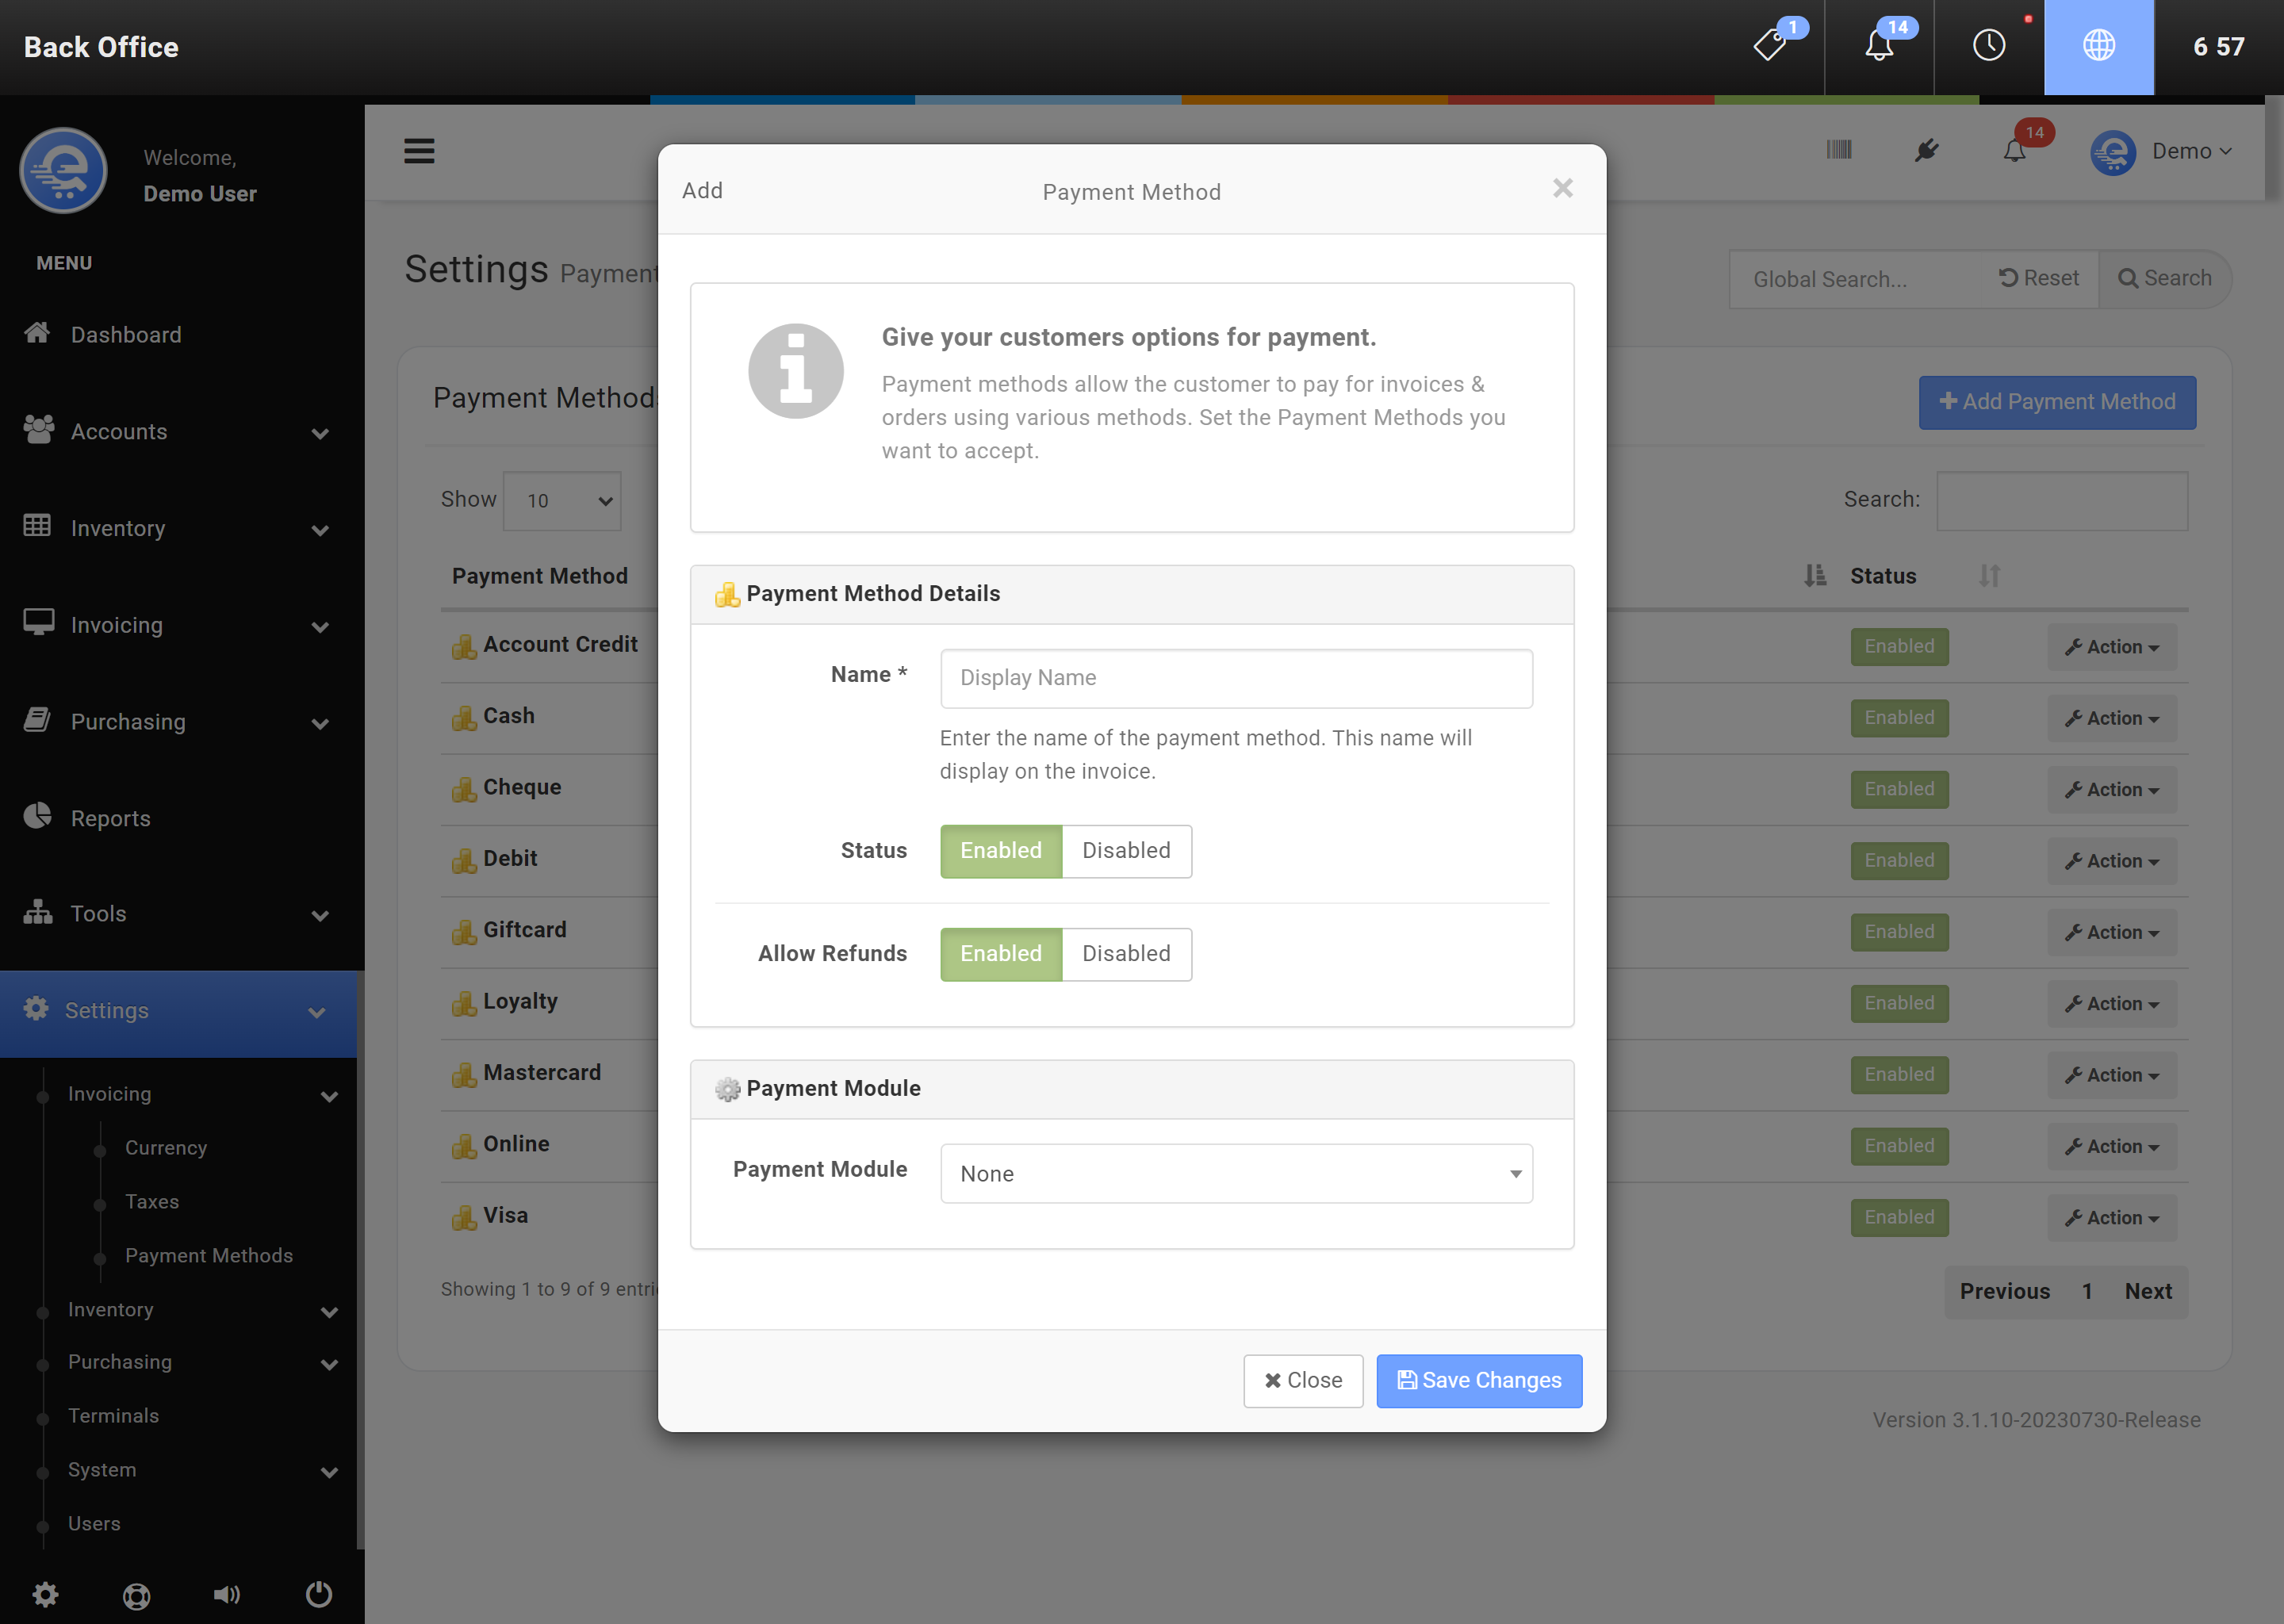
Figure B
Select the relavent areas you would like the users assigned in this group to access. Any areas that are not selected, the user will not have access to.
Configuring Ingenico Desk/Move 5000
eQuate POS can communicate to payment debit terminals like the Ingenico Desk 5000 or Ingenico Move 5000. This allows you to combine external hardware to have a integrated payment solution with your Point Of Sale. The Ingenico device you are adding to eQuate POS must be on the same local network as your eQuate POS terminal.
Supported devices:
| Manufacturer | Model | Support |
|---|---|---|
| Ingenico | Desk 5000 | Yes |
| Ingenico | Move 5000 | Yes |
Ingenico Devices:
- Ingenico devices must have semi-integrated mode enabled by the payment processor.
- Ingenico devices will only work on the same local network as your Point Of Sale terminal.
- You must configure a static IP on the Ingenico terminals, or setup a DCHP lease on your network router to ensure the peripheral's IP address does not change.
- The Move 5000 must not change to the GSM network; when this happens, the terminal will not communicate with eQuate POS. We recommend disabling this feature on the Move 5000.
- The Move 5000 will go into sleep mode when off the dock or unplugged. You should always leave the Move 5000 docked or plugged in when using it with eQuate POS.
Ingenico Desk/Move 5000 Configuration
You will need to configure your Ingenico Desk/Move 5000 before adding it to eQuate POS
You should;
- Perform any downloads on your Ingenico Desk/Move 5000 before following this guide. (Admin Menu > Maintenance > Download > Start Download)
- Ensure the Ingenico device is connected to your local network and configured with a static IP/DHCP lease. You may need assistance from your I.T. department for this.
- For the Ingenico Move 5000;
- Disable the Mobile Data option; go to the Setup Menu on the Ingenico device, select Communications, and Mobile Data, and toggle to "OFF".
- Keep the device on the dock or plugged in at all times. If the device goes to sleep, eQuate POS will not be able to communicate with the device.
If you have the Move 5000 model, you should increase the sleep timer. The Move 5000 must always be connected to a power source for integration to work.
- On the Ingenico device; select the bottom left Admin (gear icon).
- Select "3 - Setup Menu"
- Select "5 - Term Settings"
- Select "2 - Term HW"
- Select "2 - Sleep Timer"
- Enter the time in seconds. We recommend the maximum size, "9999" (166 minutes). Press Enter.
- Press the Red button 4 times to go back to the main screen.
- On the Ingenico device; select the bottom left Admin (gear icon).
- Select "8 - Misc. Options"
- Select "1 - Semi-Integrated"
- Toggle "Enable SemiInteg" mode to "ON" (If you do not see this option, your terminal must be configured by your provider to allow semi-integration).
- Select "2 - Communication Type"
- Select "3 - Ethernet" (for Move 5000, select "WiFi") press Enter.
- Enter the port, which will be "95" by default. We recommend leaving it on this port. Press Enter
- Select "Receipt Options", and set this to "ECR". Press Enter.
- Press the Red button 3 times to go back to the main screen.
- On the Ingenico device; select the bottom left Admin (gear icon).
- Select "3 - Setup Menu"
- Go to "2 - Communications"
- Click on Ethernet (Desk 5000) or WiFi Settings (Move 5000)
- Desk 5000:
- Select "Ethernet Setup"
- Select "Static IP" and press Enter.
- Input the TerminalIP (this is the static IP you will use for your terminal)
- Enter the appropriate GatewayIP, IPSubMask, and PriDNSIP/SecDNSIP (if applicable)
- Press the green save button.
- Move 5000:
- Select "Advanced Settings"
- Select "IP Settings"
- Select "Static IP" and press Enter.
- Input the TerminalIP (this is the static IP you will use for your terminal)
- Enter the appropriate GatewayIP, IPSubMask, and PriDNSIP/SecDNSIP (if applicable)
- Press the green save button.
- Desk 5000:
- Press the Red button 4 times to go back to the main screen.
- When you have enabled Semi-Integration mode and set the static IP, proceed to follow the instructions for Adding a Peripheral to eQuate POS
Adding a Peripheral to eQuate POS
Once you have backed up your Prestashop database, you can proceed to add the connection between Prestashop and eQuate POS from the Back Office.
- Login to the Back Office.
- On the left menu, select "Settings" then select "Terminals".
- On the terminal you want to configure the peripheral for, select "Actions" then "Edit".
- Click on the "Peripherals" tab
- Select the peripheral type Ingenico Desk/Move 5000:
- Enter the local static IP address of the debit terminal (peripheral).
- Enter the port selected during the activation of semi-integrated mode. By default, this is usually 95.
- Enter the payment methods you would like to associate with this peripheral (Debit, Credit, etc...)
- Once you are done entering the information, press "Save Changes".
- Synchronize your Front Office by pressing the Synchronize button.
- Test your peripheral.
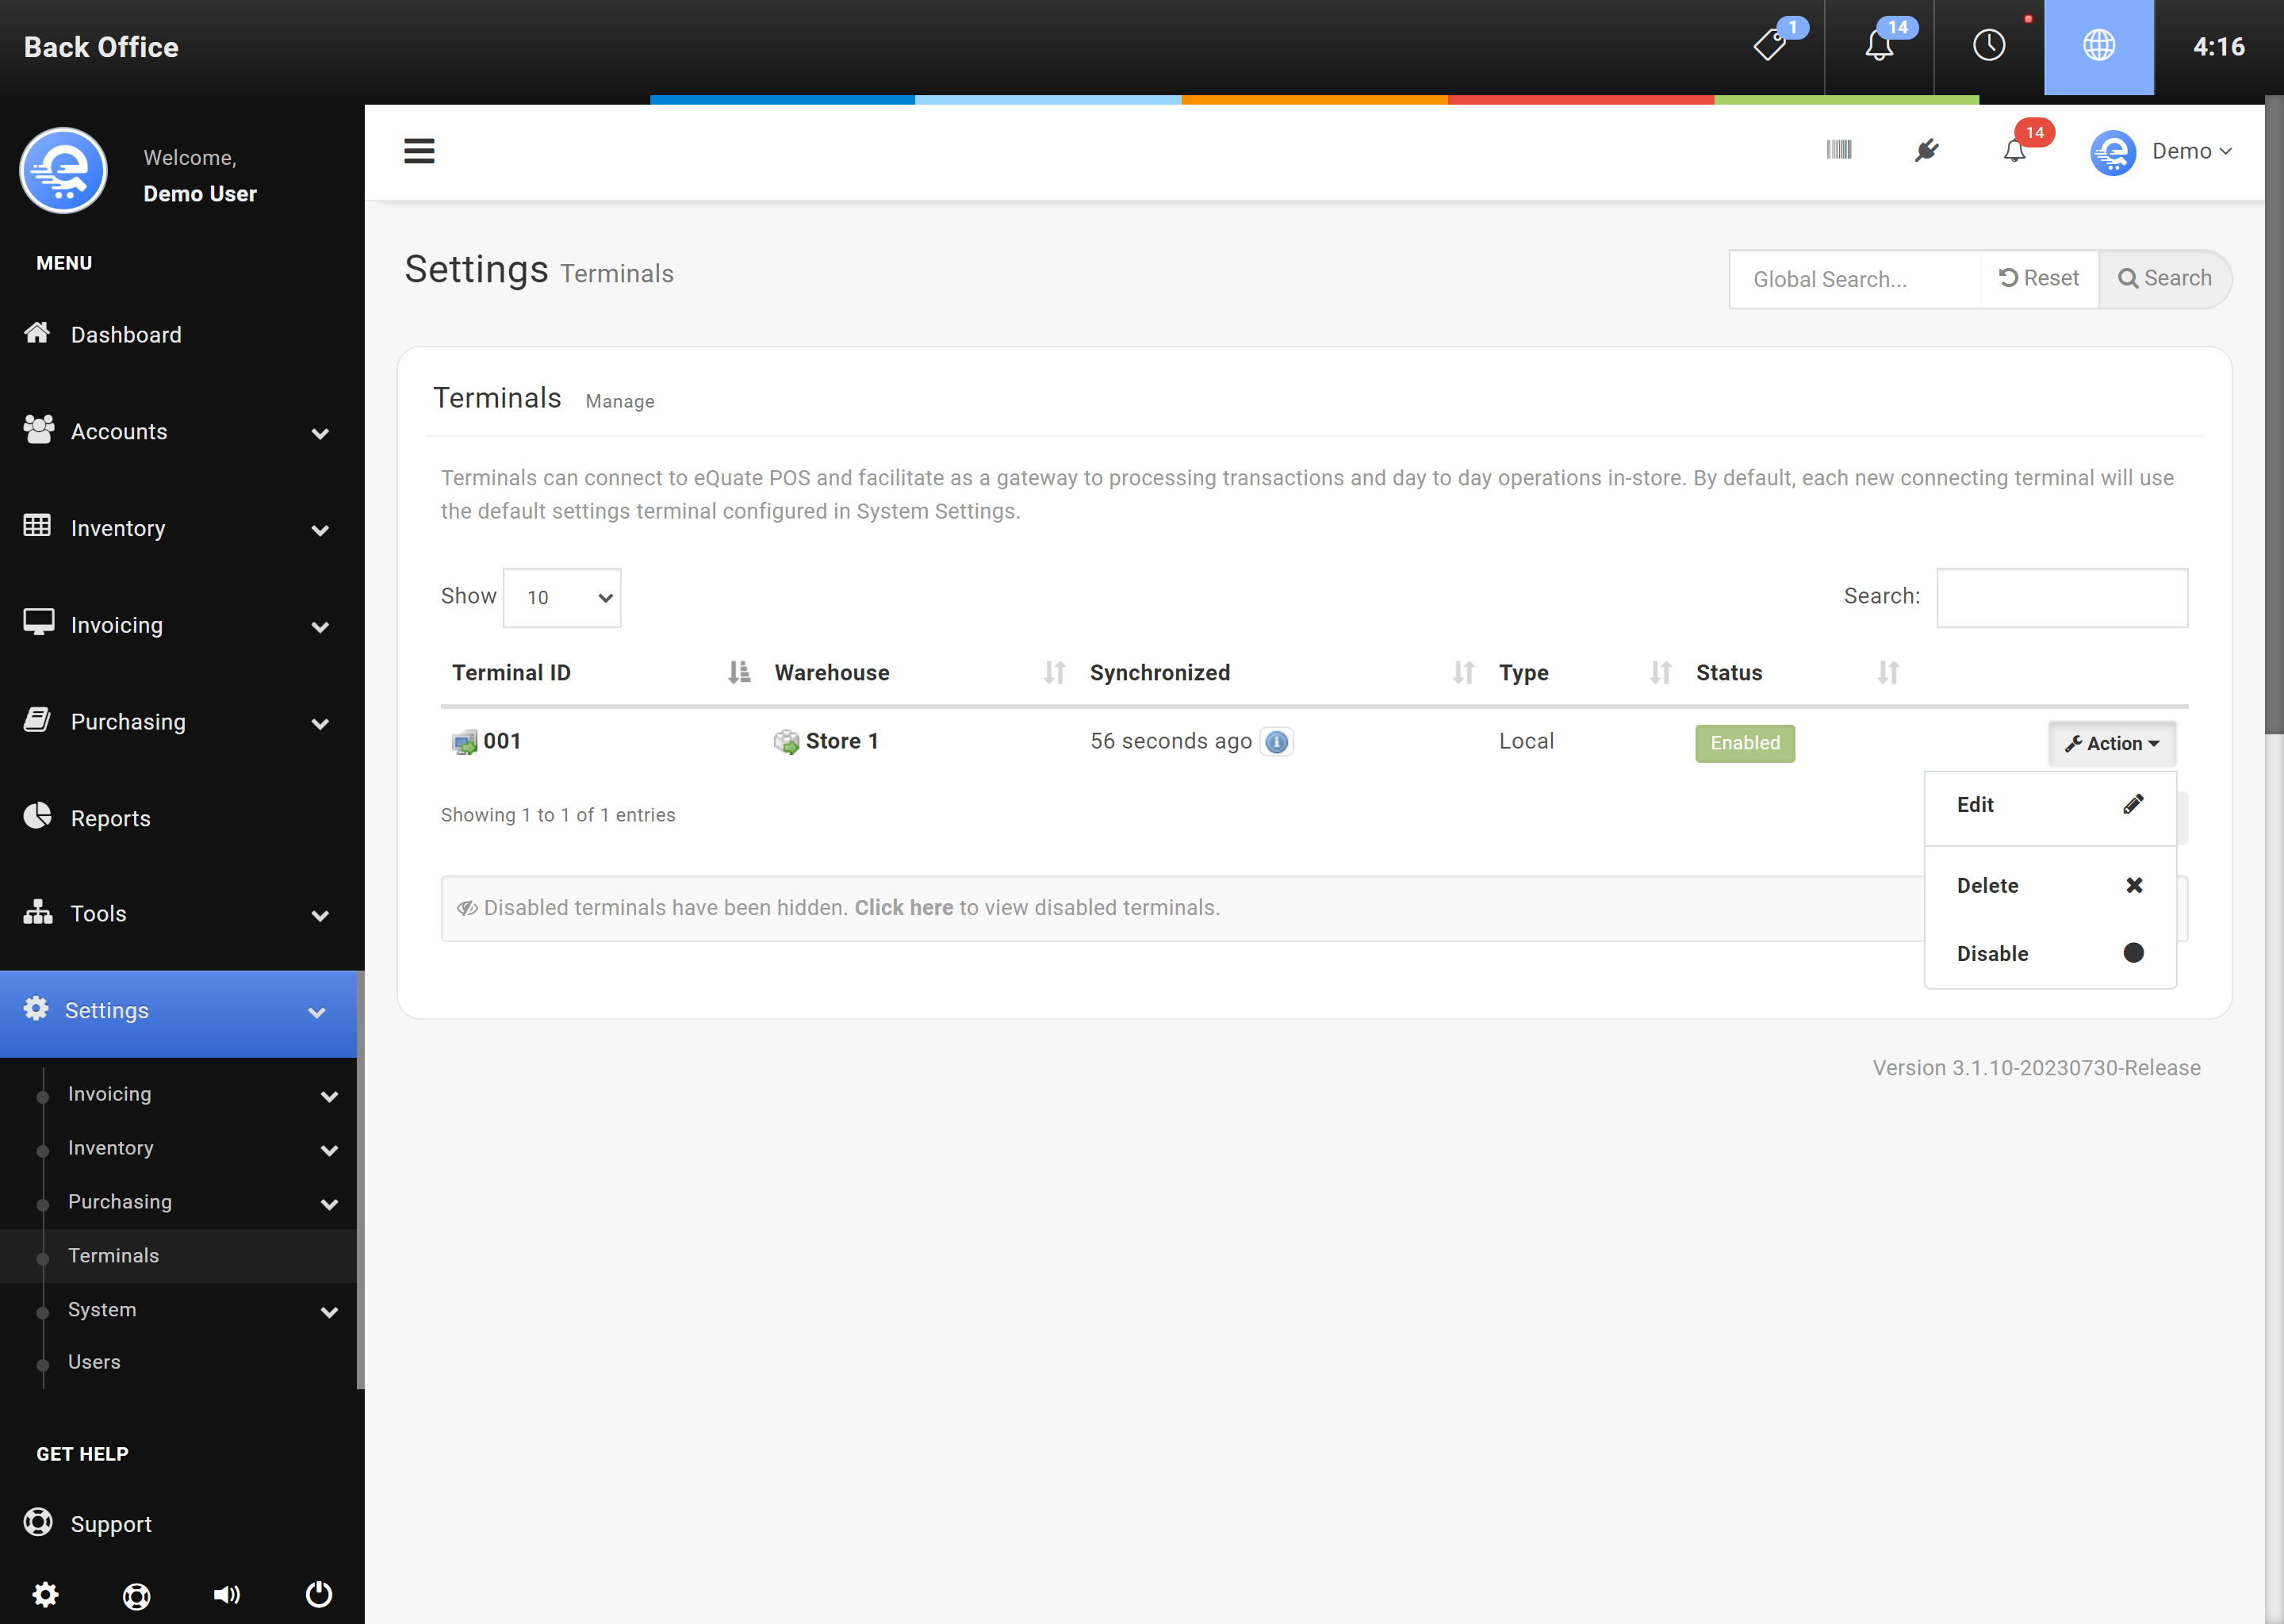
Figure A
Configure the Ingenico Desk/Move 5000 by accessing the Terminal area within the Back Office.

Figure B
On the Peripherals tab, select Ingenico Desk/Move 5000 and fill in the terminal details then press "Save Changes".
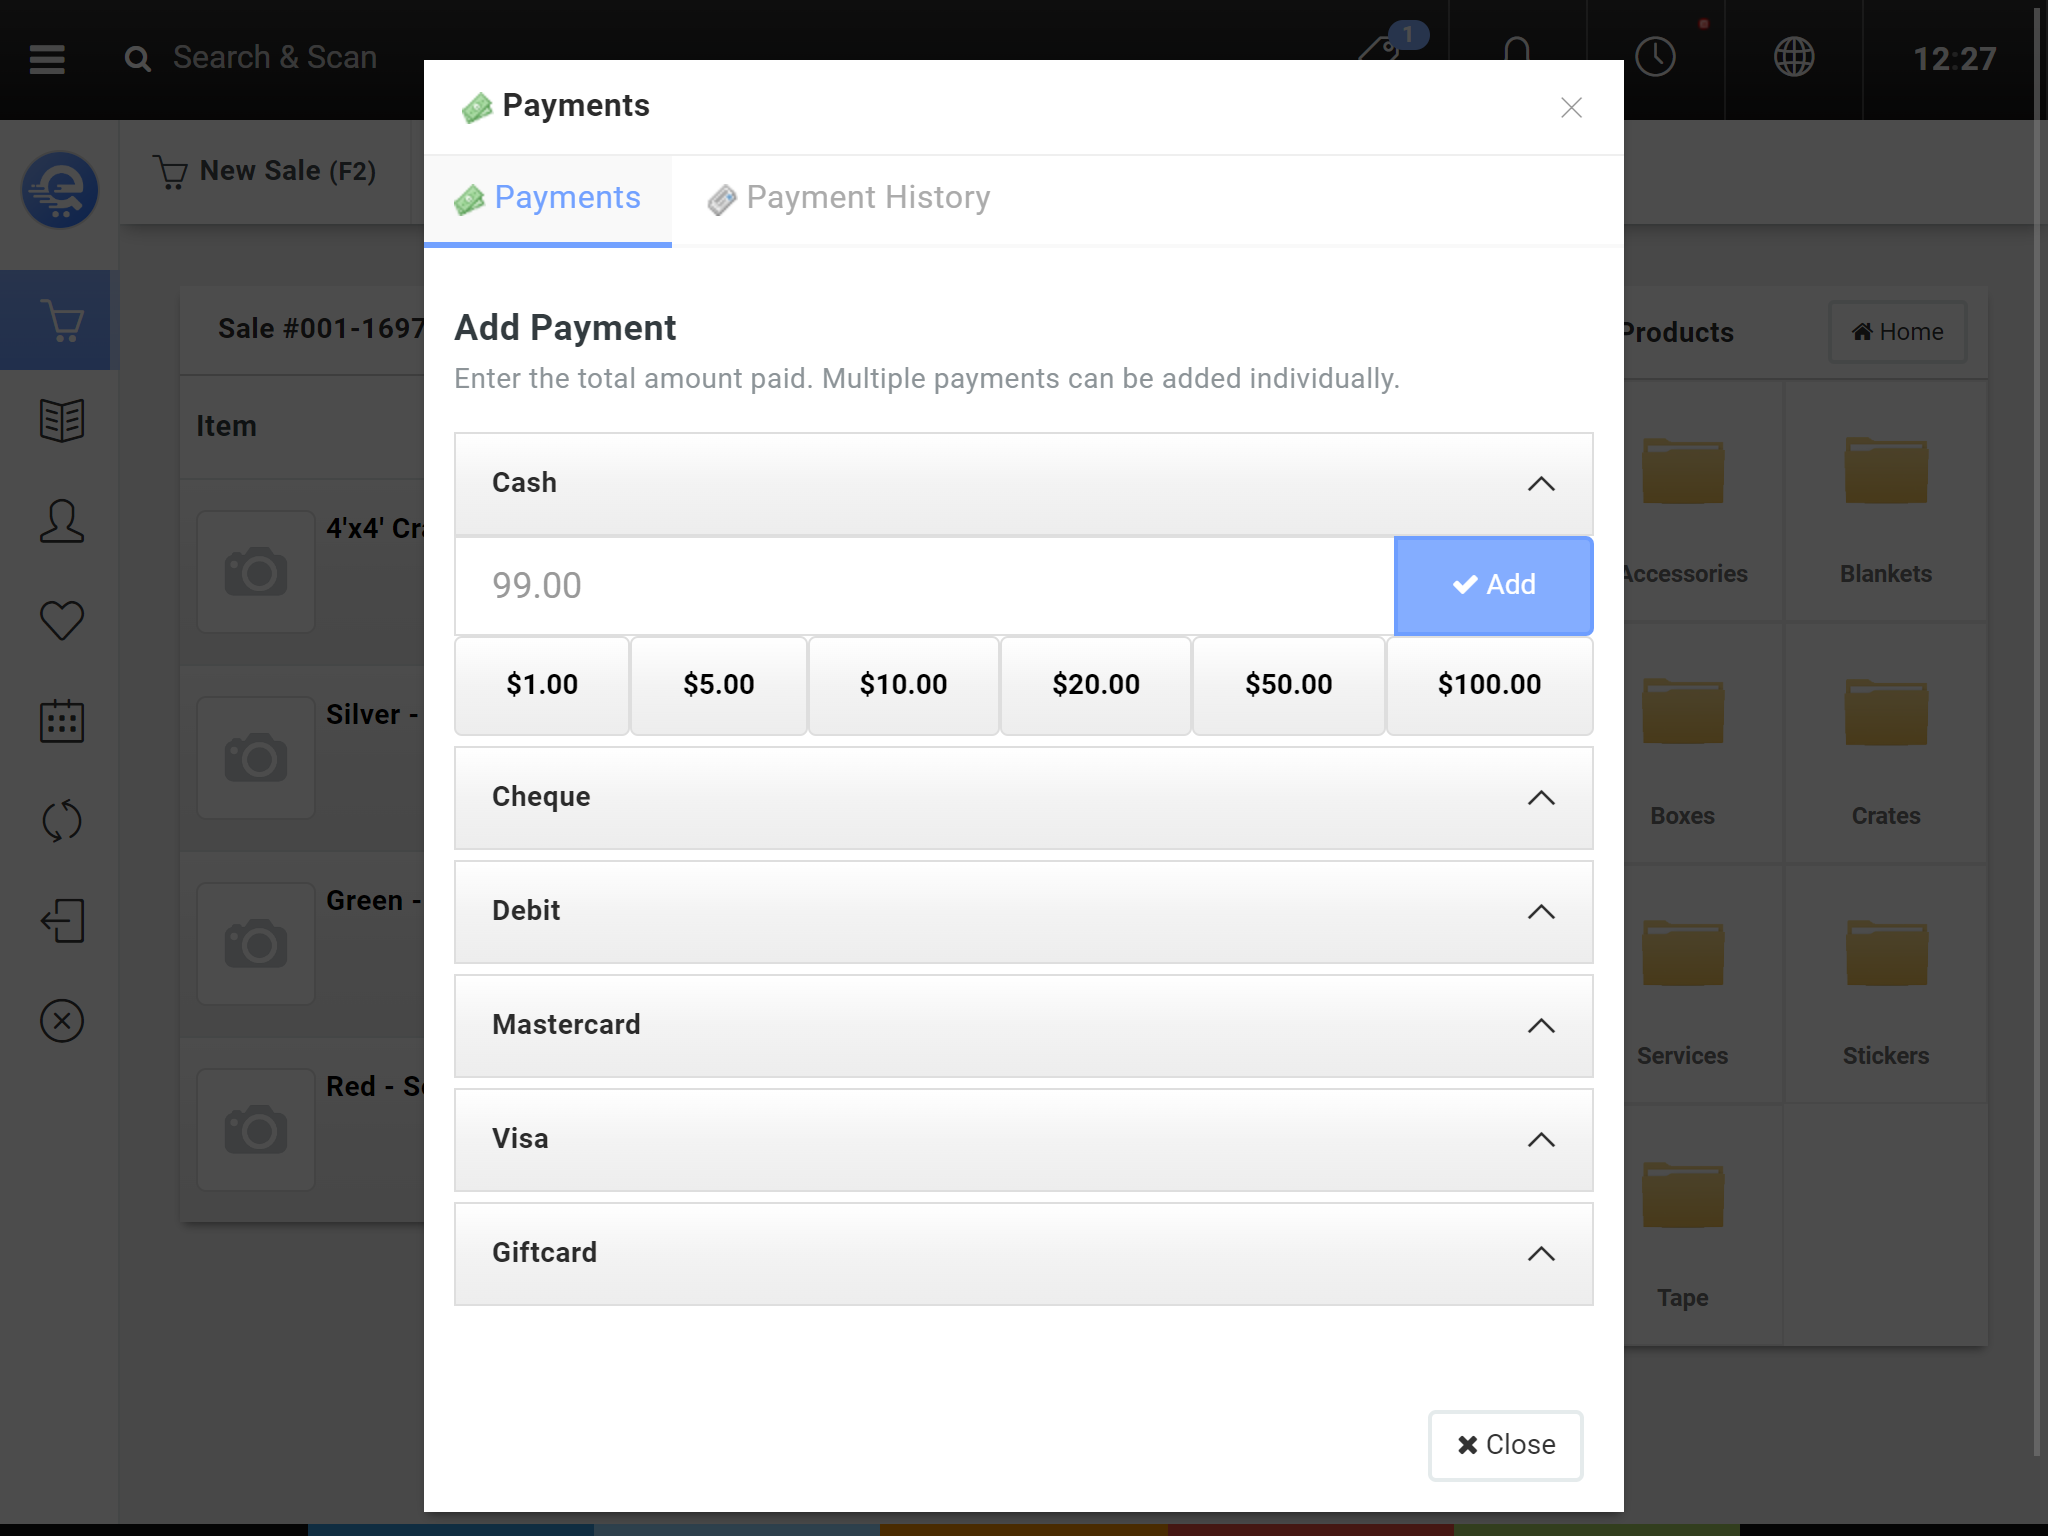
Figure C
Select the payment type you have configured for the peripheral and click Add to send the request to the peripheral.
Connecting to PrestaShop
PrestaShop is an open source based shopping cart available for free. PrestaShop allows you to customize your website with a large choice of available templates in their marketplace. PrestaShop also has many addon's that are compatible with eQuate POS.
Always make a back-up copy of your PrestaShop database before adding it to eQuate POS.
eQuate POS can connect to your PrestaShop database and synchronize orders, products, and customers with your in-store operation. Some functions that eQuate offers may not be available in PrestaShop. See below for the full list of supported features:
| eQuate Feature | PS 1.5 | PS 1.6 | PS 1.7 |
|---|---|---|---|
| Attributes | Yes | Yes | Yes |
| Customers | Yes | Yes | Yes |
| Discounts | Yes | Yes | Yes |
| Gift Cards | Yes | Yes | Yes |
| Images | Yes | Yes | Yes |
| Inventory | Yes | Yes | Yes |
| Loyalty | No | No | No |
| Multi Store | Yes | Yes | No * |
| Orders | Yes | Yes | Yes |
| Stock Adjustments | Yes | Yes | Yes |
* PrestaShop discontinued native Advanced Stock Management starting in version 1.7.x. You can add additional stores in eQuate POS, but only one can deduct from PrestaShop inventory. You can choose to share inventory between PrestaShop and a store, or you can also have them as seperate inventories.
Before connecting eQuate POS to PrestaShop, you may need to make adjustments to your PrestaShop installation.
Database:
- Always make a backup of your PrestaShop database before adding it to eQuate POS.
- Remote SQL connections to your PrestaShop database is required.
Some shared web hosting providers may require you to contact them to allow our server to connect through their firewall. If you have dedicated a server for your web hosting, you may need to allow access from our server if you have a firewall enabled. You can find your eQuate POS server hostname when you login to your eQuatePOS.com account.
Adding Prestashop to eQuate POS
Once you have backed up your Prestashop database, you can proceed to add the connection between Prestashop and eQuate POS from the Back Office.
- Login to the Back Office.
- On the left menu, select "Settings", under "System", select "Online Stores".
- Click "Add Online Store" button (see Figure A below).
- Enter the Prestashop SQL database details and press "Save Changes" (see Figure B).
- Configure the default settings for Prestashop and "Save Changes" (see Figure C).
- Allow some time for the data to synchronize. Depending on the size of your Prestashop database, this could take anywhere from 1 to 60 minutes.
- Refresh the page to check the status of the synchronization.
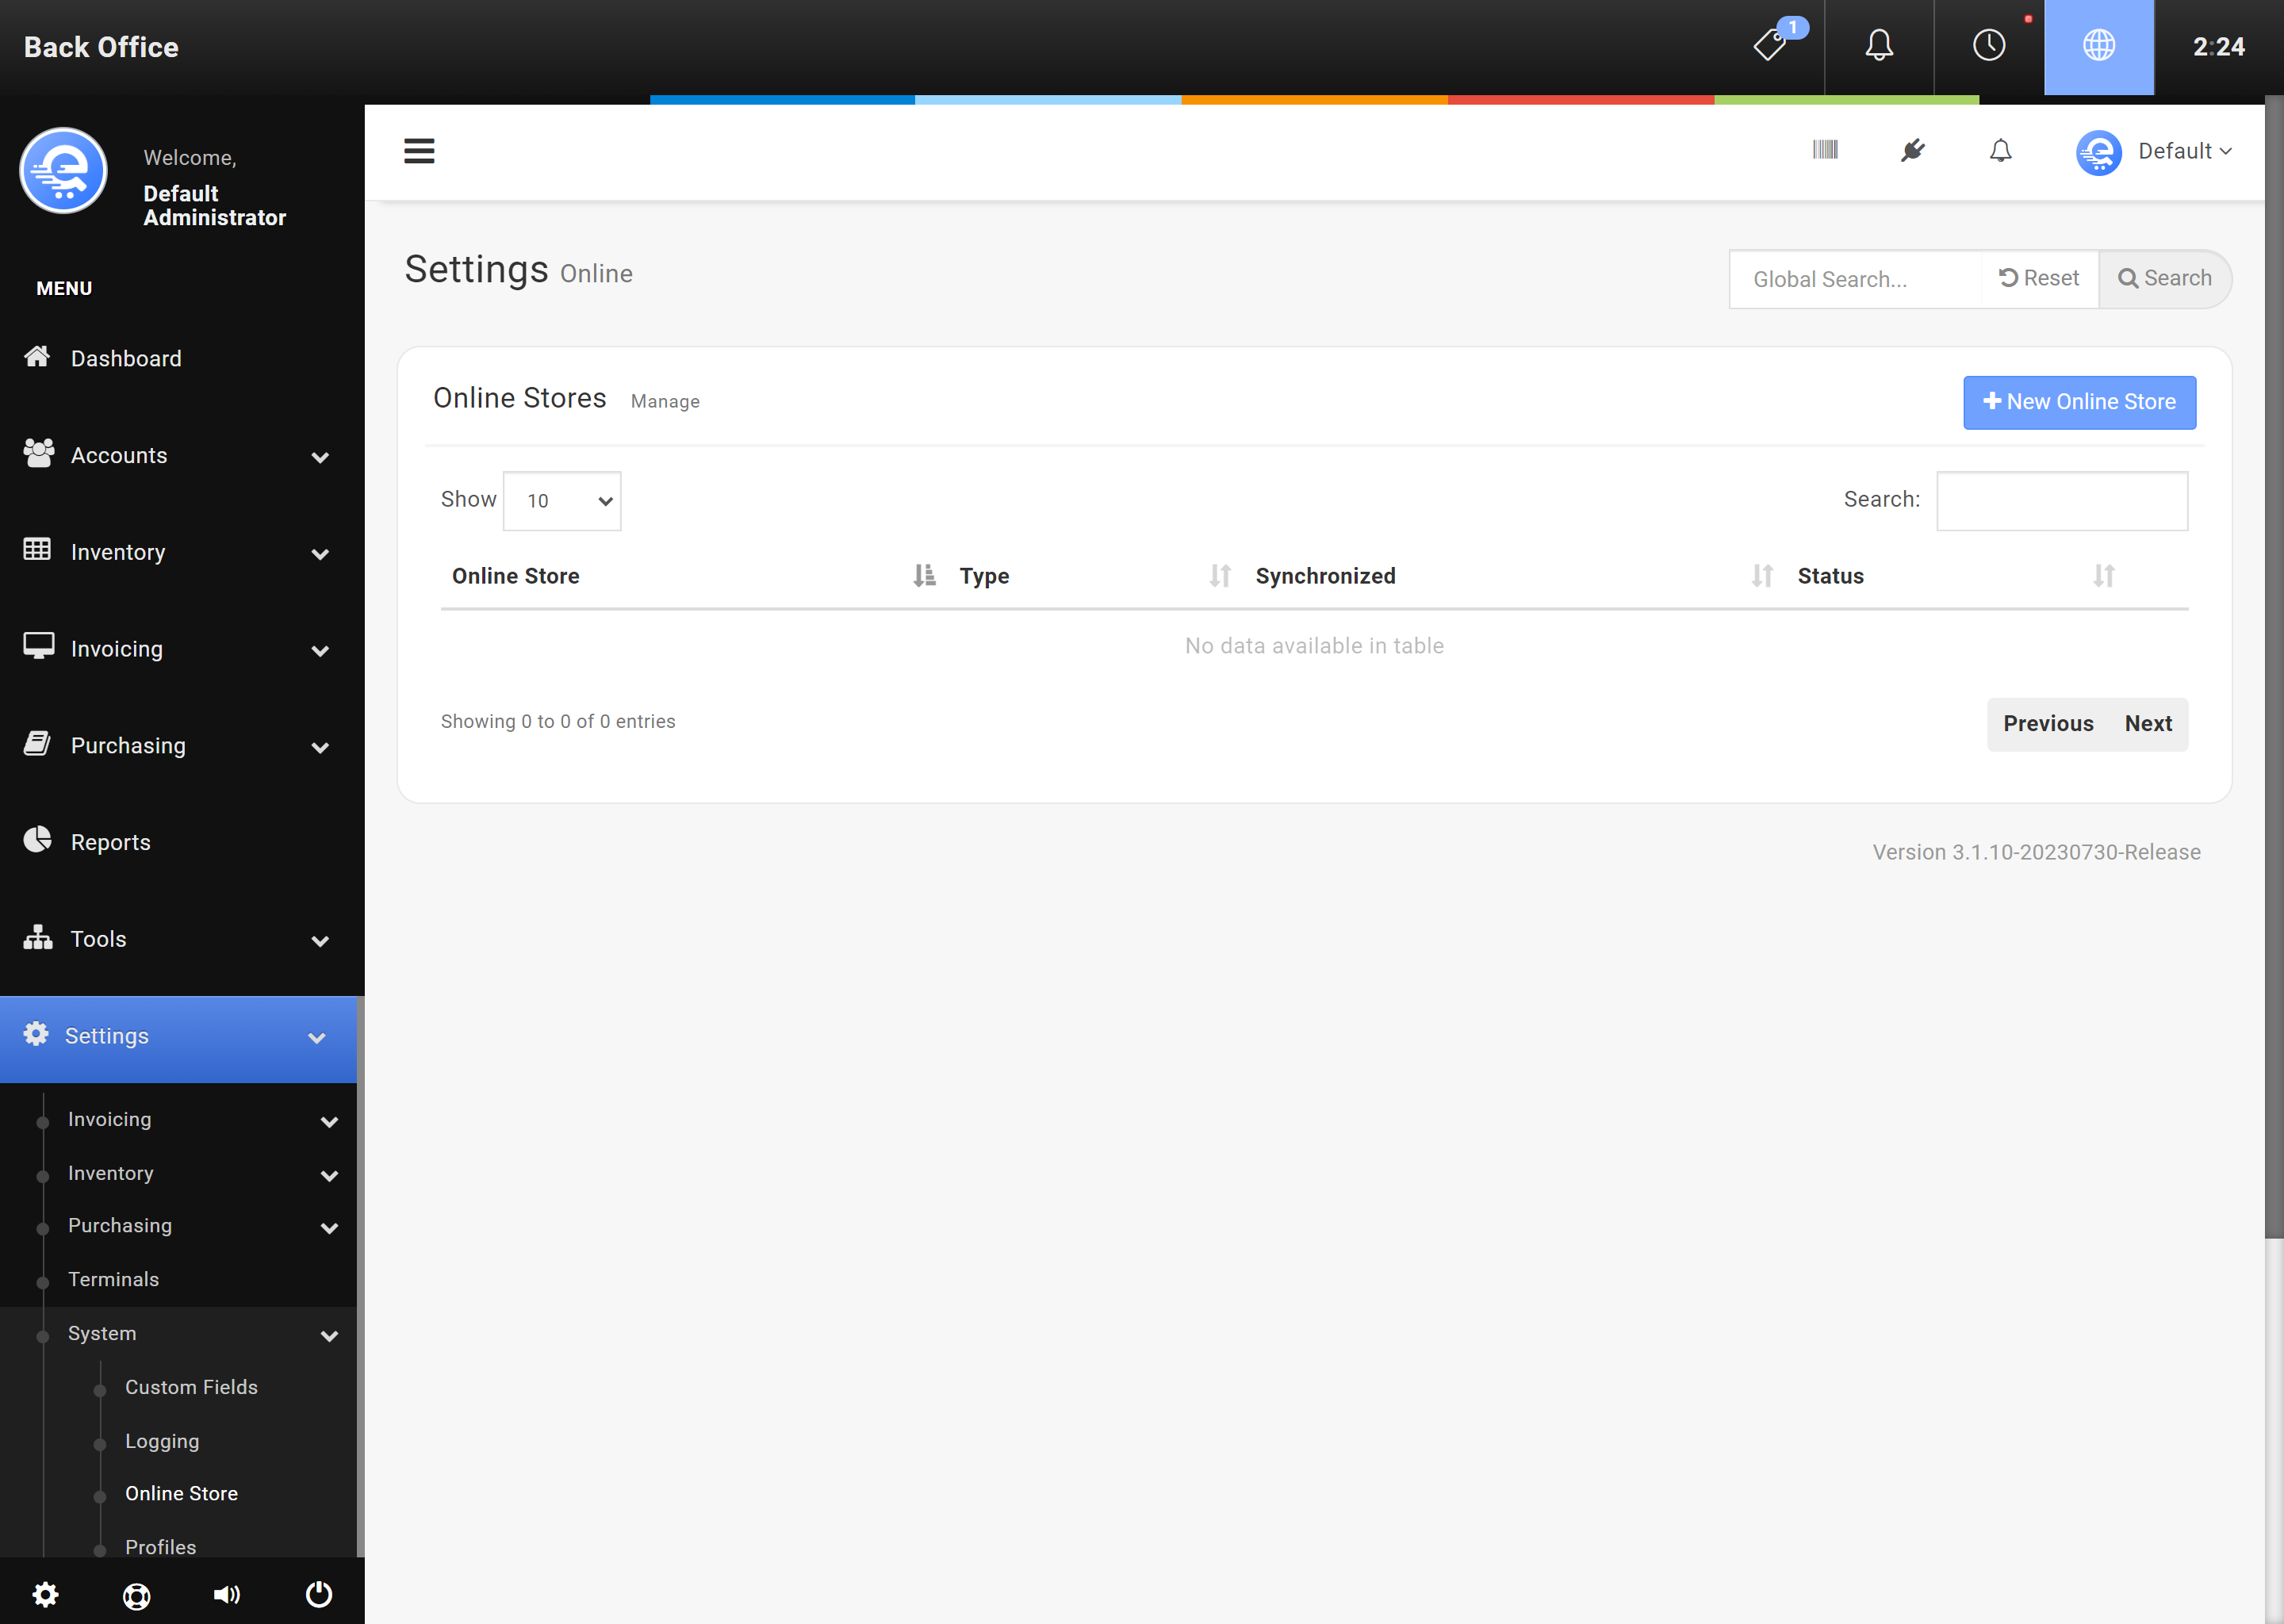
Figure A
Add your online store in the Back Office area. Select "New Online Store".
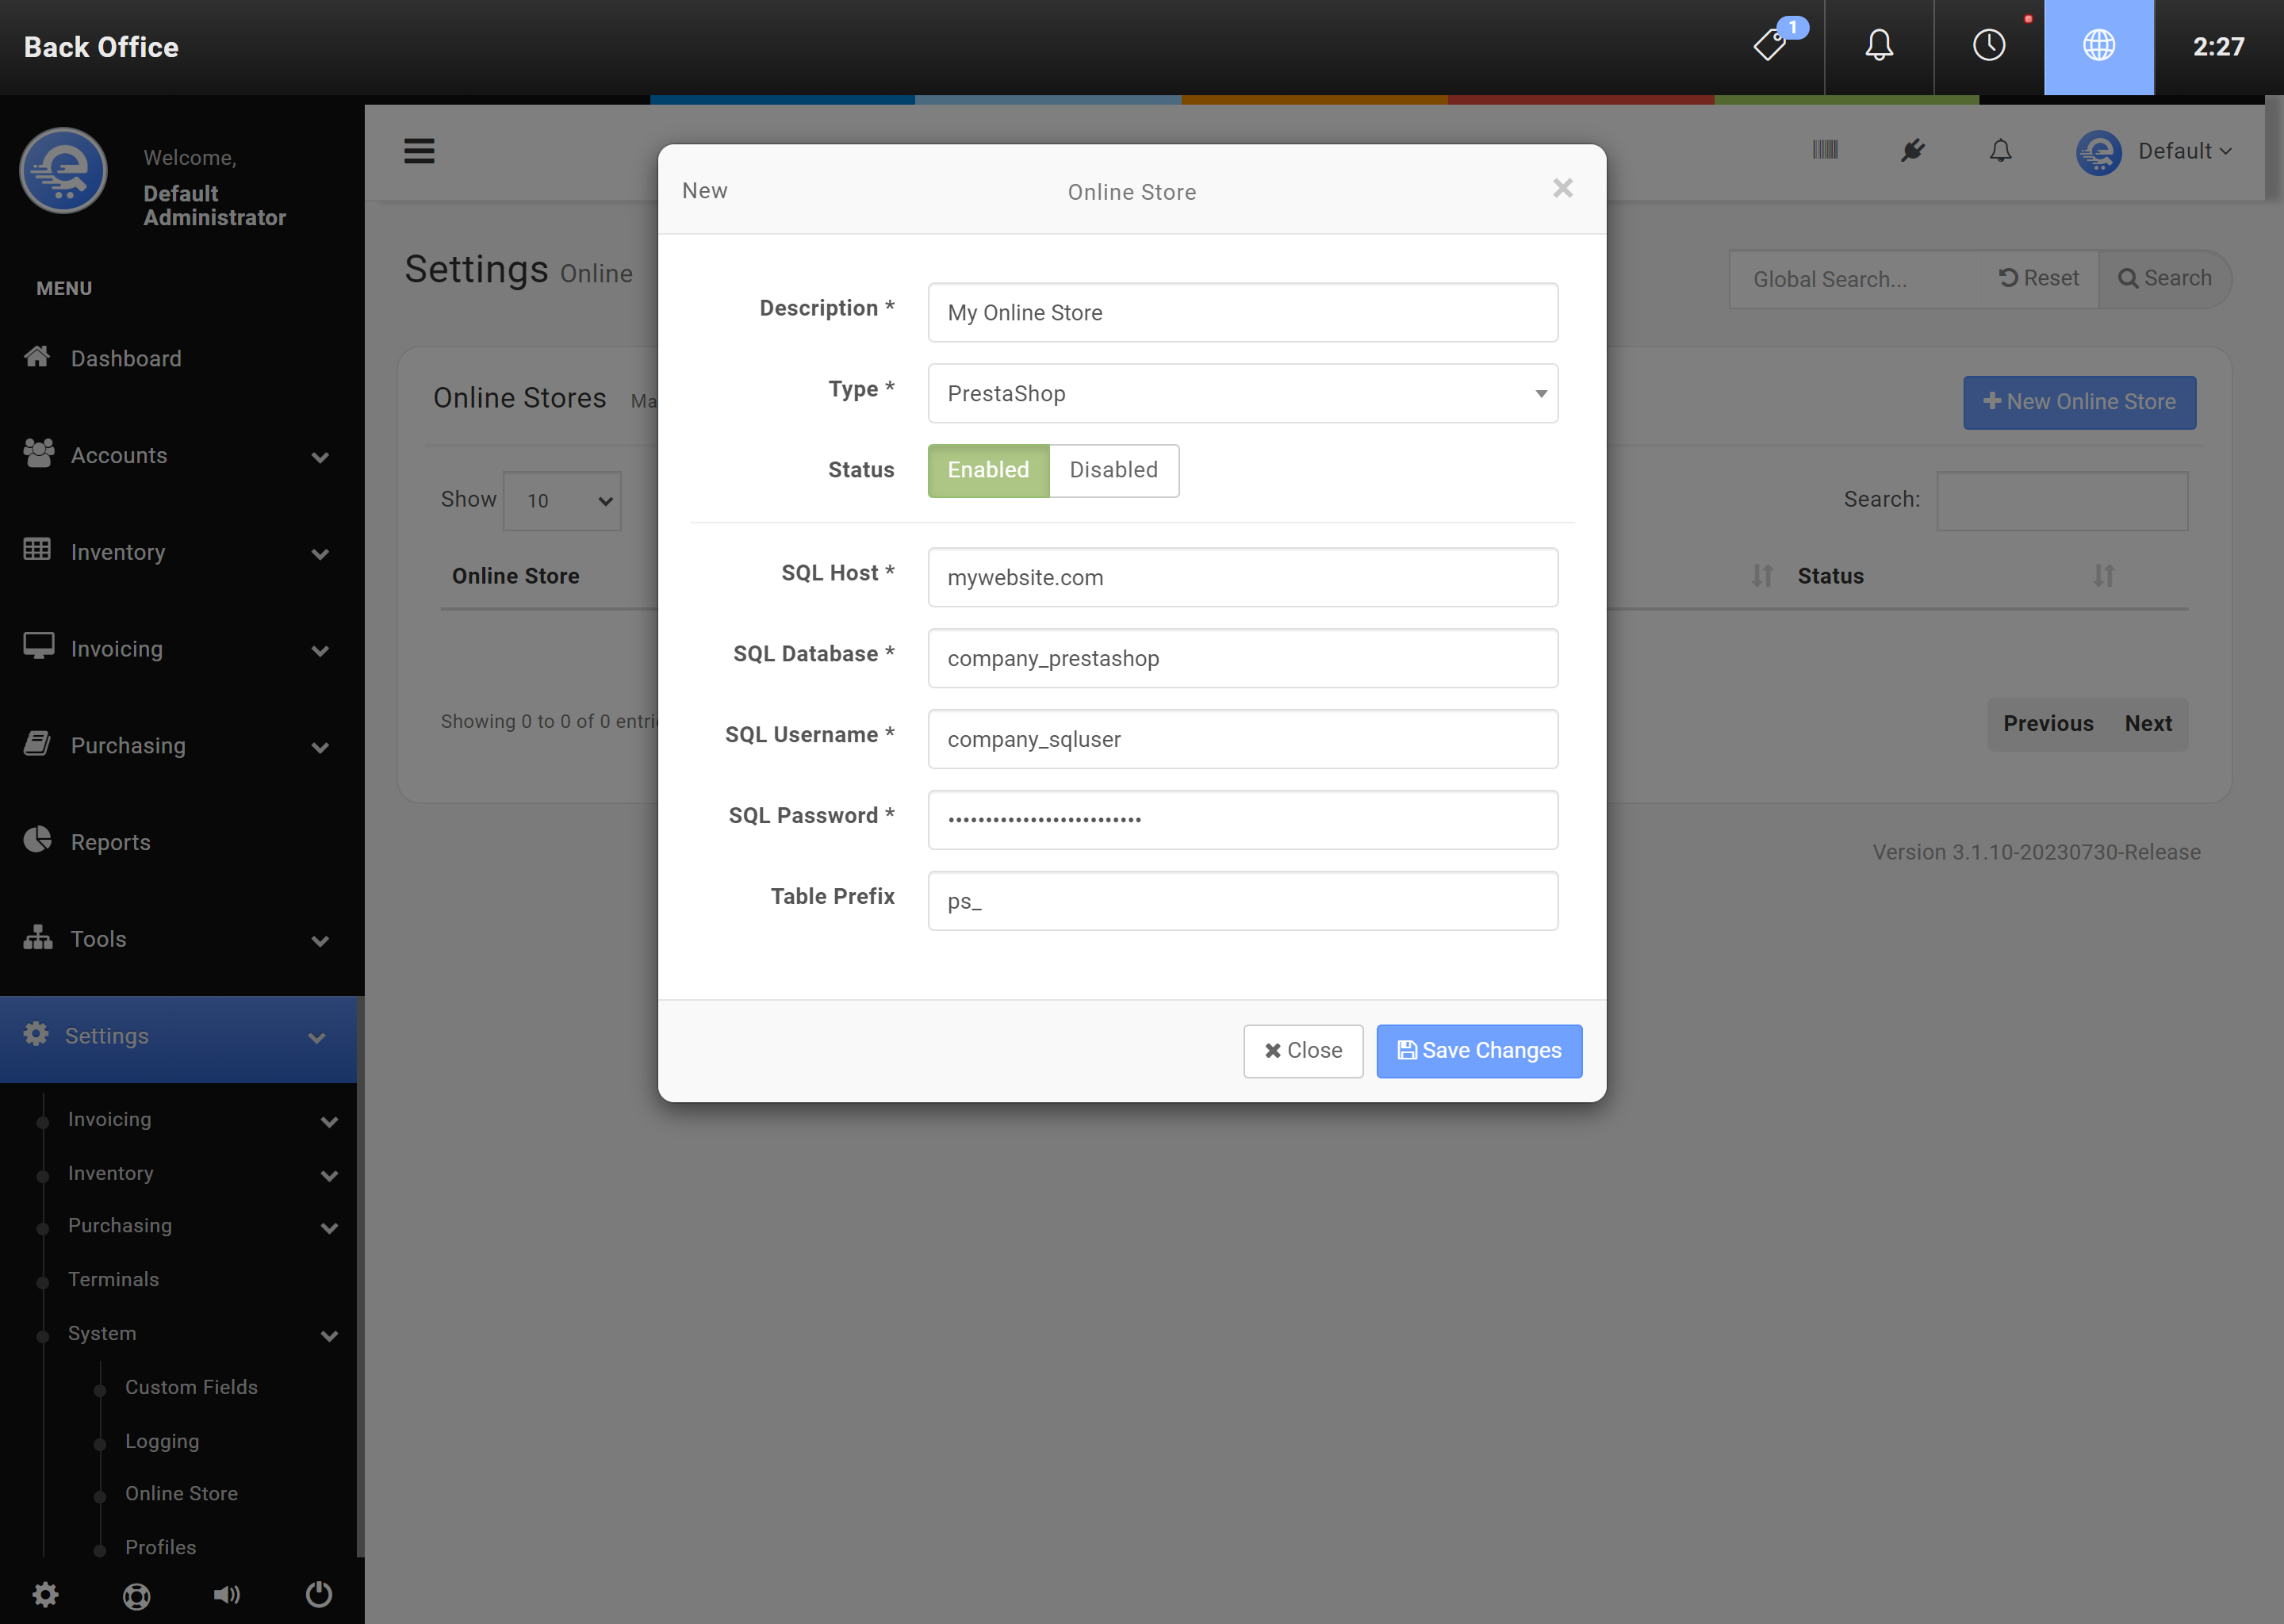
Figure B
Enter your Prestashop SQL details and press "Save Changes".

Figure C
Configure the connection between Prestashop & eQuate POS.
- Login to the Back Office.
- On the left menu, select "Settings", under "System", select "Online Stores".
- Select your online store and under the Actions column, select "Action", then "Edit" (see Figure D).
- You must ensure the database you are editing is the same database that was previously synchronized (see Figure E).
- Click "Save Changes" when complete.
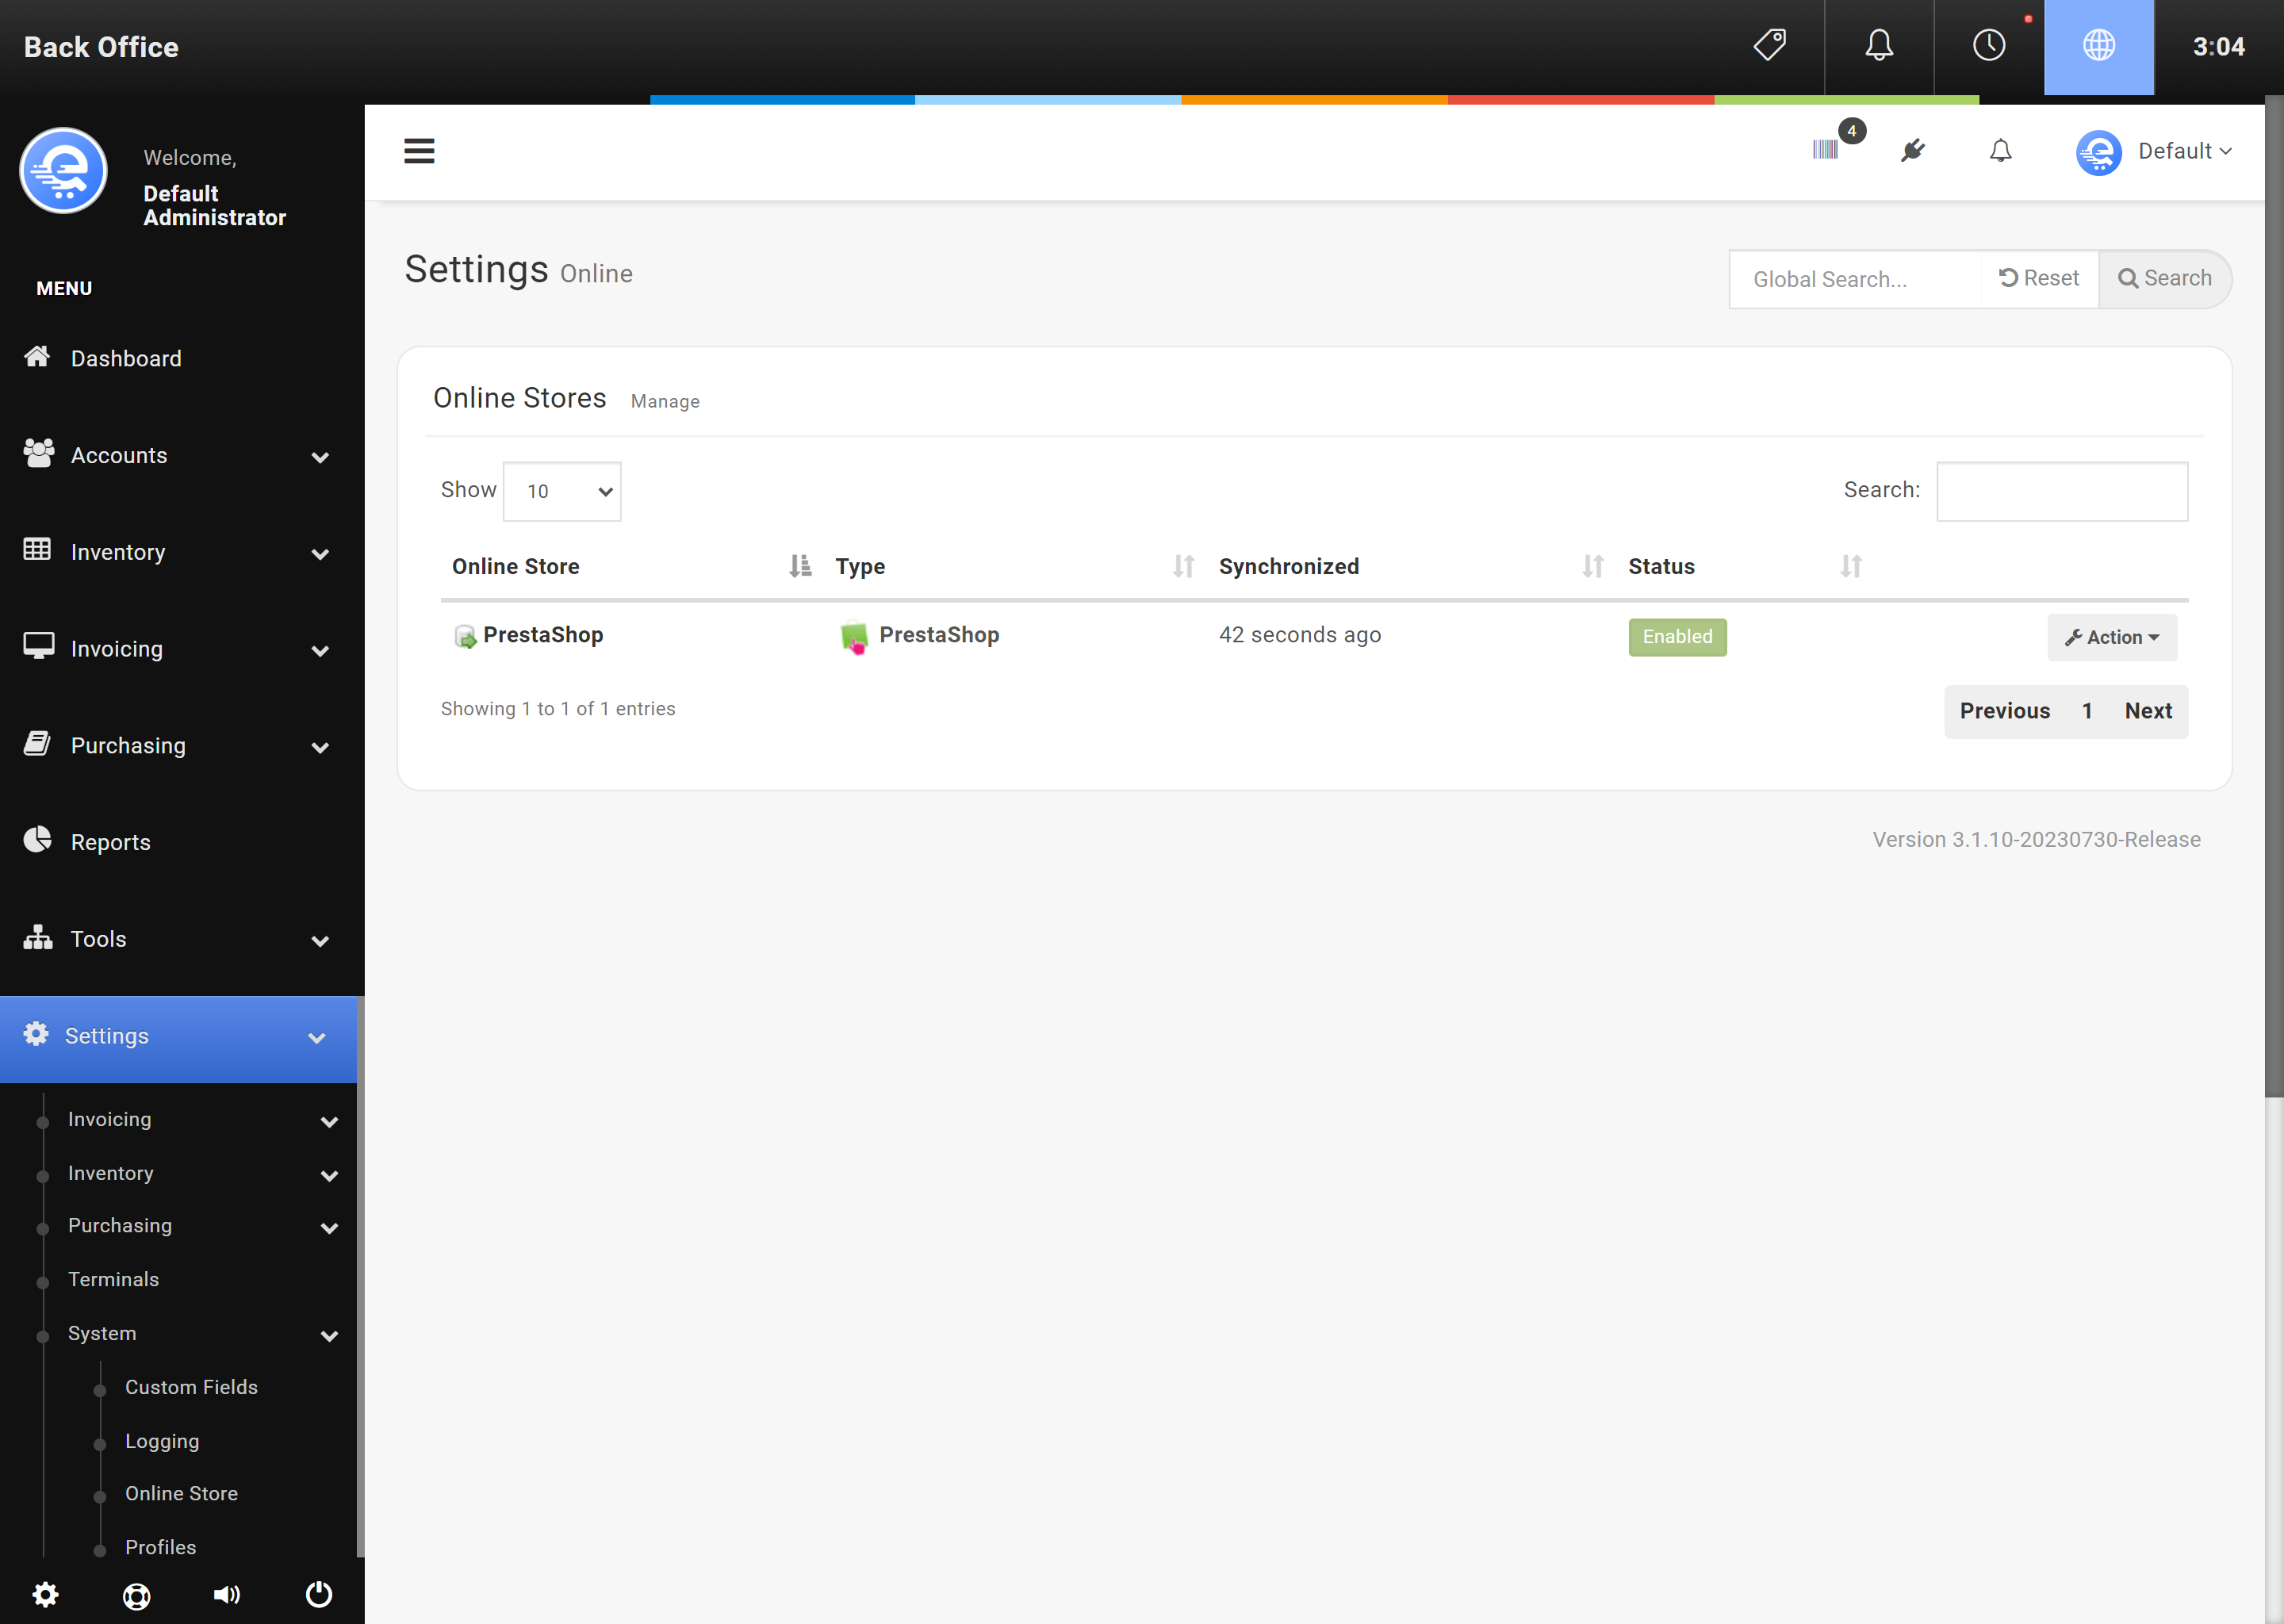
Figure D
After saving your online store to eQuate POS, you will see "Pending" until the system has synchronized.
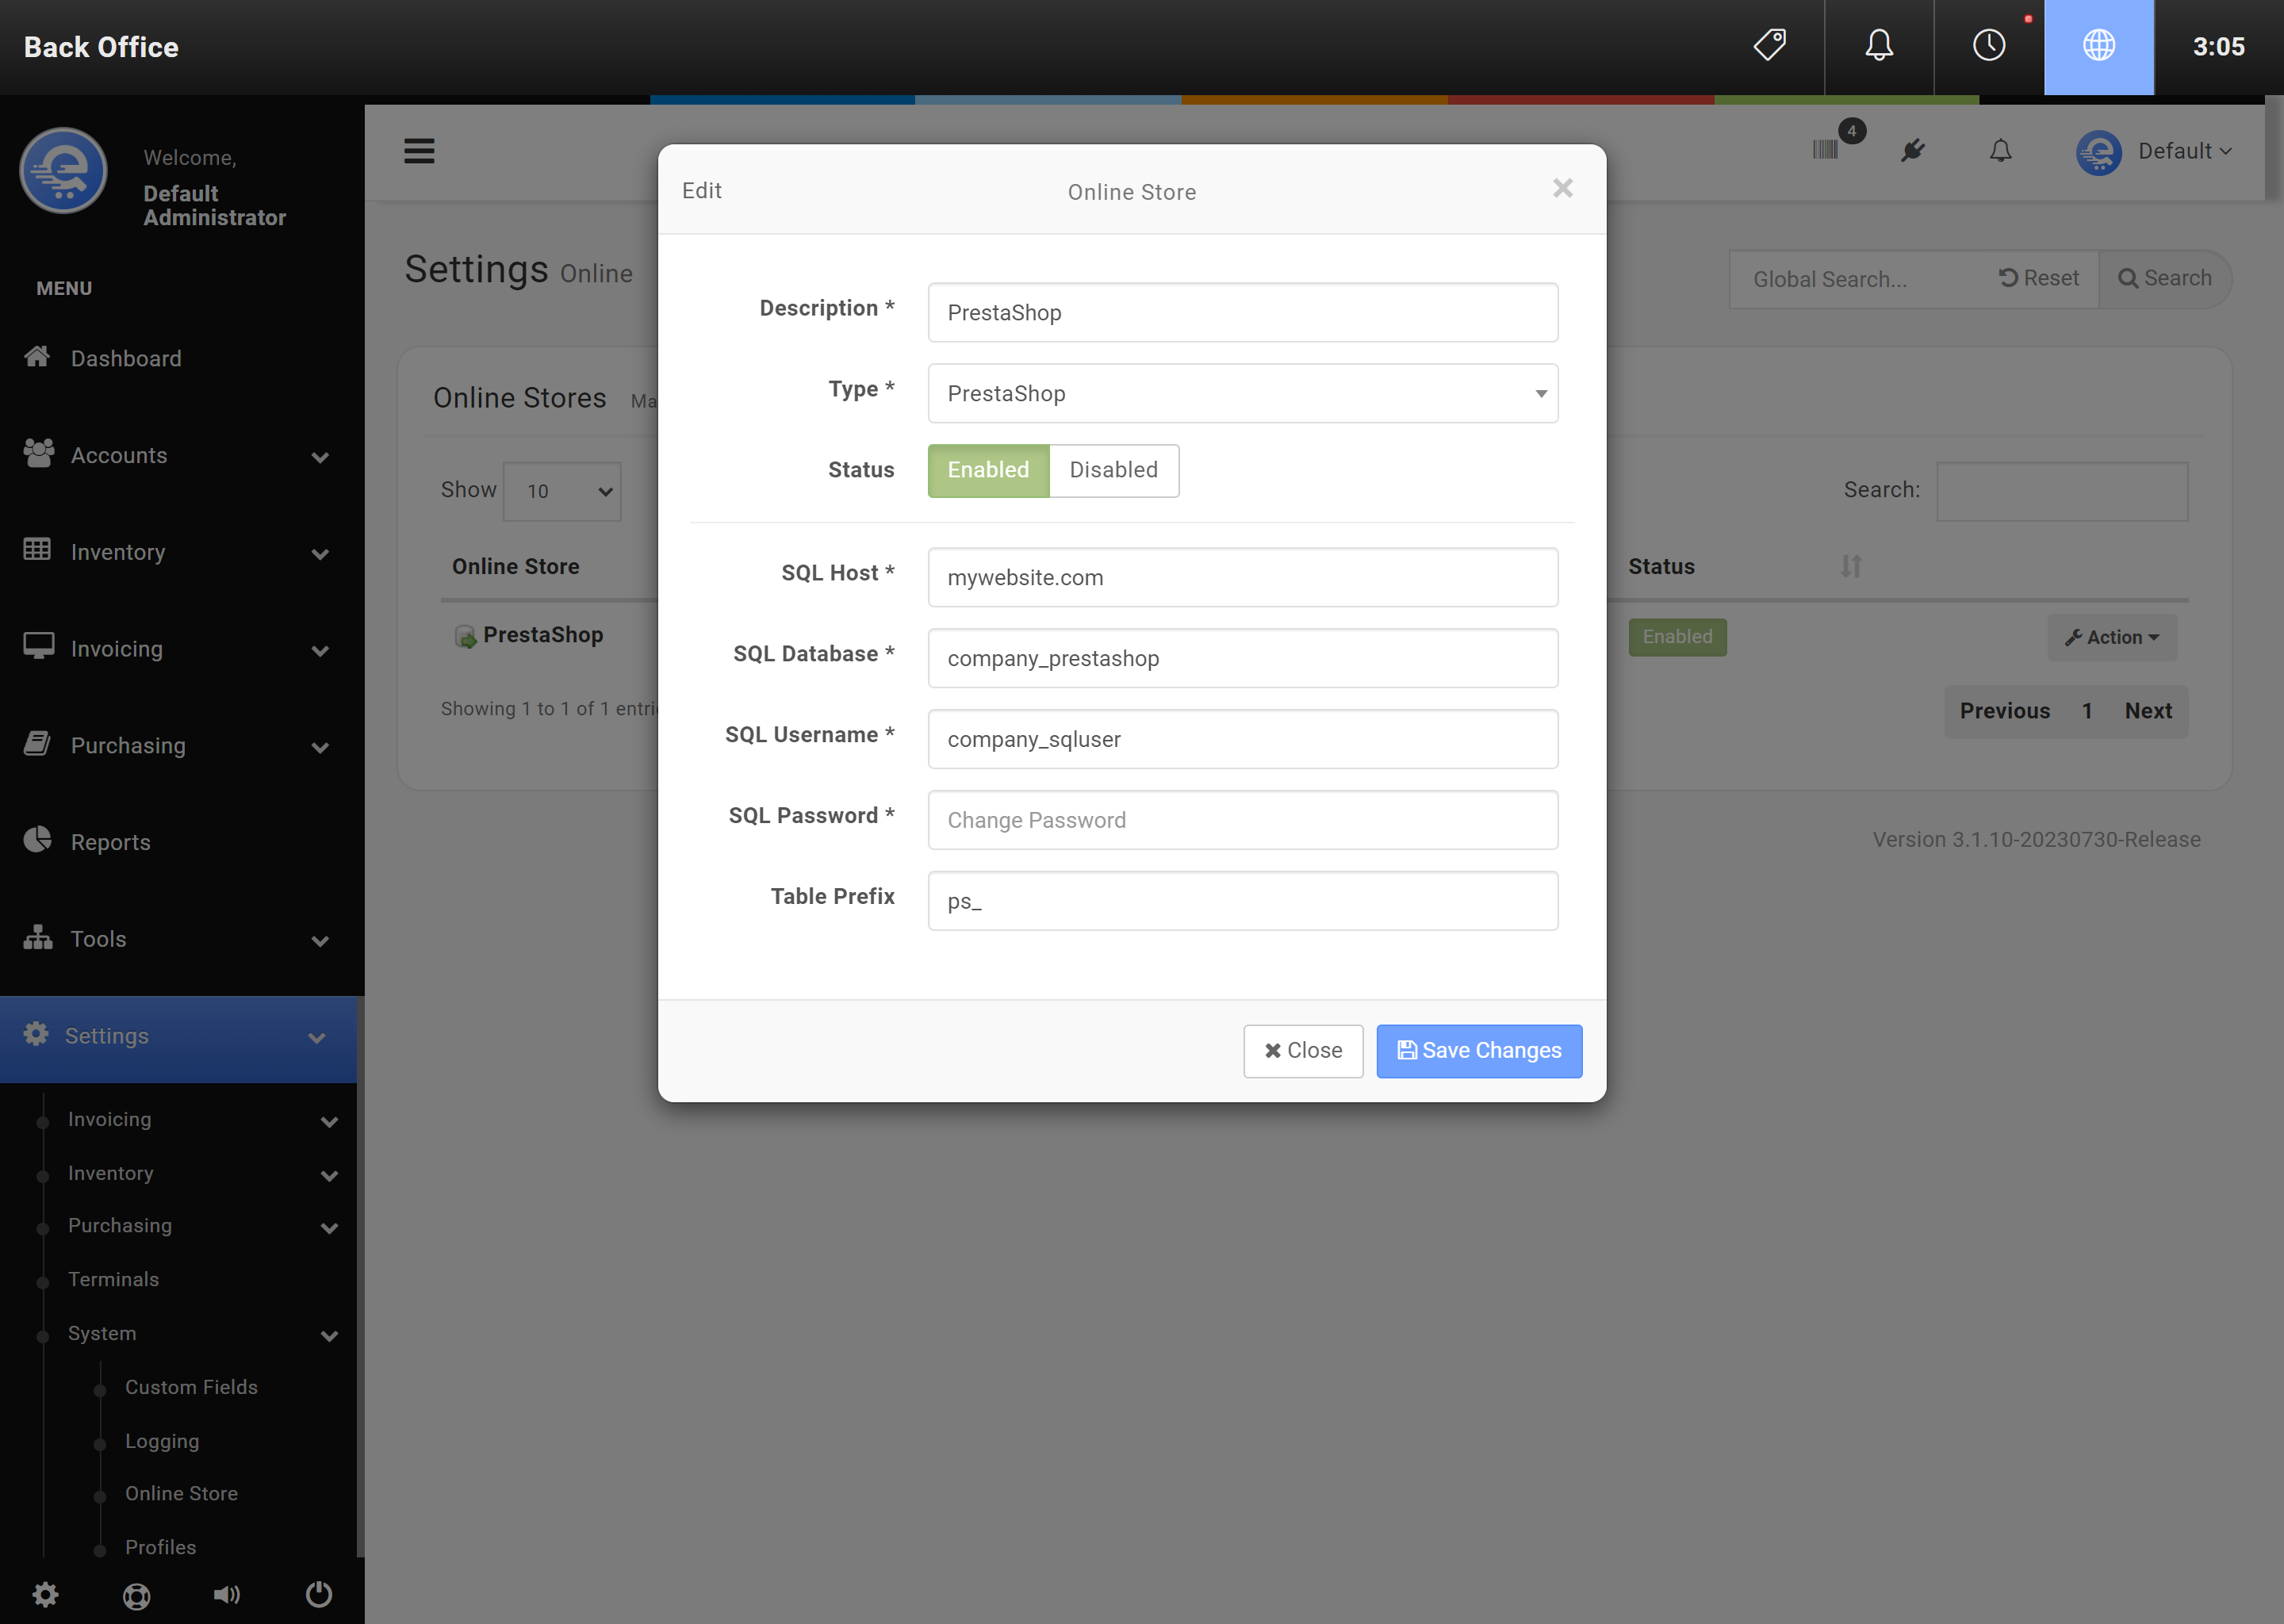
Figure E
To disable the synchronization, select "Edit" under Actions and set the status to Disabled and press "Save Changes".
Connecting to VirtueMart
VirtueMart is an open source based shopping cart available for Joomla. Joomla is a open source content management system (CMS) that allows you to create dynamic websites.
Always make a back-up copy of your VirtueMart database before adding it to eQuate POS.
eQuate POS can connect to your VirtueMart database and synchronize orders, products, and customers with your in-store operation. Some functions that eQuate offers may not be available in VirtueMart. See below for the full list of supported features:
| eQuate Feature | VirtueMart 2 | VirtueMart 3 |
|---|---|---|
| Attributes | No | No |
| Customers | Yes | Yes |
| Discounts | Yes | Yes |
| Gift Cards | Yes | Yes |
| Images | Yes | Yes |
| Inventory | Yes | Yes |
| Loyalty | No | No |
| Multi Store | No * | No * |
| Orders | Yes | Yes |
| Stock Adjustments | Yes | Yes |
* VirtueMart only supports one stock inventory database by default. You can add additional stores in eQuate POS, but only one can deduct from VirtueMart inventory. You can choose to share inventory between VirtueMart and a store, or you can also have them as seperate inventories.
Before connecting eQuate POS to VirtueMart, you may need to make adjustments to your VirtueMart installation.
Database:
- Always make a backup of your VirtueMart database before adding it to eQuate POS.
- Remote SQL connections to your VirtueMart database is required.
Some shared web hosting providers may require you to contact them to allow our server to connect through their firewall. If you have dedicated a server for your web hosting, you may need to allow access from our server if you have a firewall enabled. You can find your eQuate POS server hostname when you login to your eQuatePOS.com account.
Limitations:
- eQuate only supports the default group of specific prices. The price for each product must contain at least one entry for "Available for all".
- eQuate only supports one tax group. Default tax group is set by the default vendor (ID 1).
- Only one warehouse is supported for online sales. Multiple stores can be added with seperate inventory buckets however.
- Attributes & values are not supported by VirtueMart. However, parent & child products are supported.
- Only supports the default currency set. Default currency is set by the default vendor (ID 1).
- The "VM Standard Payment" plugin must be enabled in Joomla.
Adding VirtueMart to eQuate POS
Once you have backed up your VirtueMart database, you can proceed to add the connection between VirtueMart and eQuate POS from the Back Office.
- Login to the Back Office.
- On the left menu, select "Settings", under "System", select "Online Stores".
- Click "Add Online Store" button (see Figure A below).
- Enter the VirtueMart SQL database details and press "Save Changes" (see Figure B).
- Configure the default settings for VirtueMart and "Save Changes" (see Figure C).
- Allow some time for the data to synchronize. Depending on the size of your VirtueMart database, this could take anywhere from 1 to 60 minutes.
- Refresh the page to check the status of the synchronization.
Figure A
Add your online store in the Back Office area. Select "New Online Store".
Figure B
Enter your VirtueMart SQL details and press "Save Changes".
Figure C
Configure the connection between VirtueMart & eQuate POS.
- Login to the Back Office.
- On the left menu, select "Settings", under "System", select "Online Stores".
- Select your online store and under the Actions column, select "Action", then "Edit" (see Figure D).
- You must ensure the database you are editing is the same database that was previously synchronized (see Figure E).
- Click "Save Changes" when complete.
Figure D
After saving your online store to eQuate POS, you will see "Pending" until the system has synchronized.
Figure E
To disable the synchronization, select "Edit" under Actions and set the status to Disabled and press "Save Changes".
Connecting to WooCommerce
WooCommerce is an open source based shopping cart available for free as an plugin for WordPress. WordPress allows you to customize your website with a large choice of available templates in their marketplace. WooCommerce also has many addon's that are compatible with eQuate POS.
Always make a back-up copy of your WooCommerce database before adding it to eQuate POS.
eQuate POS can connect to your WooCommerce database and synchronize orders, products, and customers with your in-store operation. Some functions that eQuate offers may not be available in WooCommerce. See below for the full list of supported features:
| eQuate Feature | WooCommerce 5.x |
|---|---|
| Attributes | Yes |
| Customers | Yes |
| Discounts | Yes |
| Gift Cards | No |
| Images | Yes |
| Inventory | Yes |
| Loyalty | No |
| Multi Store | No |
| Orders | Yes |
| Stock Adjustments | Yes |
Before connecting eQuate POS to WooCommerce, you may need to make adjustments to your WooCommerce installation.
Database:
- Always make a backup of your WooCommerce database before adding it to eQuate POS.
Limitations:
- Only one warehouse is supported for online sales. Multiple stores can be added with seperate inventory buckets however.
- Only supports the default currency set in WooCommerce.
Creating an API key in WooCommerce
Before you connect eQuate POS with WooCommerce, you will need to create an API key in WooCommerce's settings.
- Login to your WordPress administrator site. WooCommerce must already be installed to continue.
- On the left menu, select "WooCommerce", then select "Settings".
- Select "Advanced" on the top menu.
- Click "REST API" link on the top page menu (see Figure A below).
- Click "Create an API Key".
- Give the API Key a description, and select a user with sufficient Administrative privledges. Permissions must be set to Read/Write.
- Click "Generate API Key".
- On the next page, your Consumer Key and Consumer Secret will be displayed. Save these details for later when you add WooCommerce to eQuate POS.
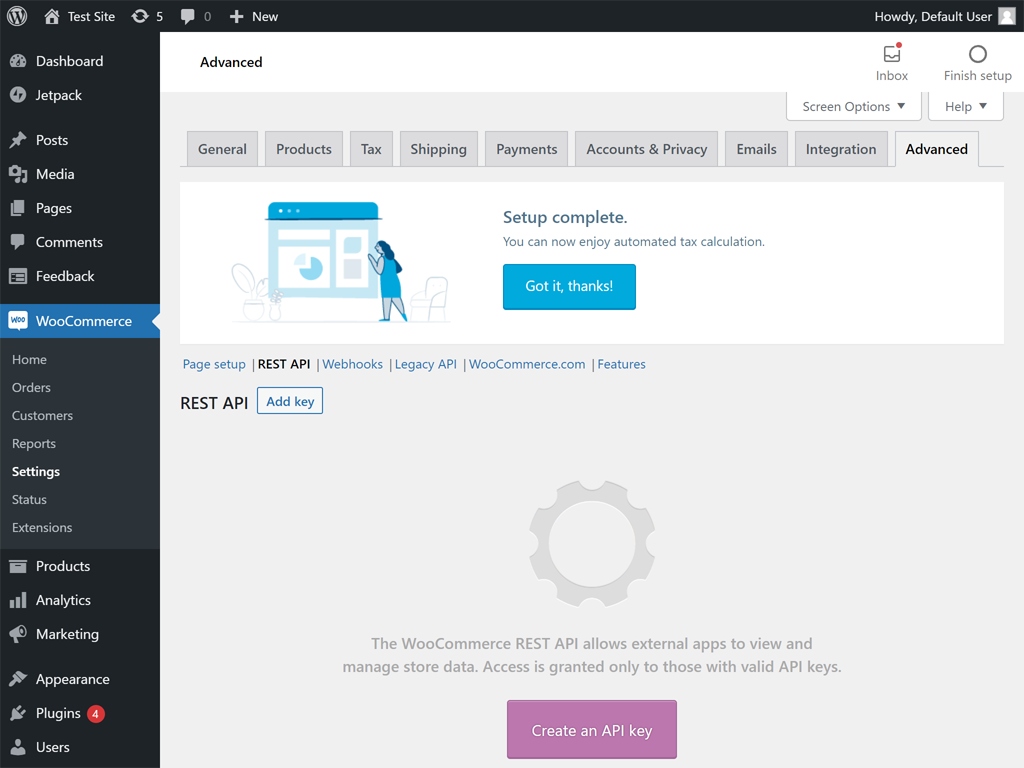
Figure A
Within WordPress, generate your API key by going to WooCommerce > Settings > Advanced > REST API.

Figure B
Provide the API key a Description and select an Adminstrative user and set the permissions to "Read/Write" and press "Generate API key".
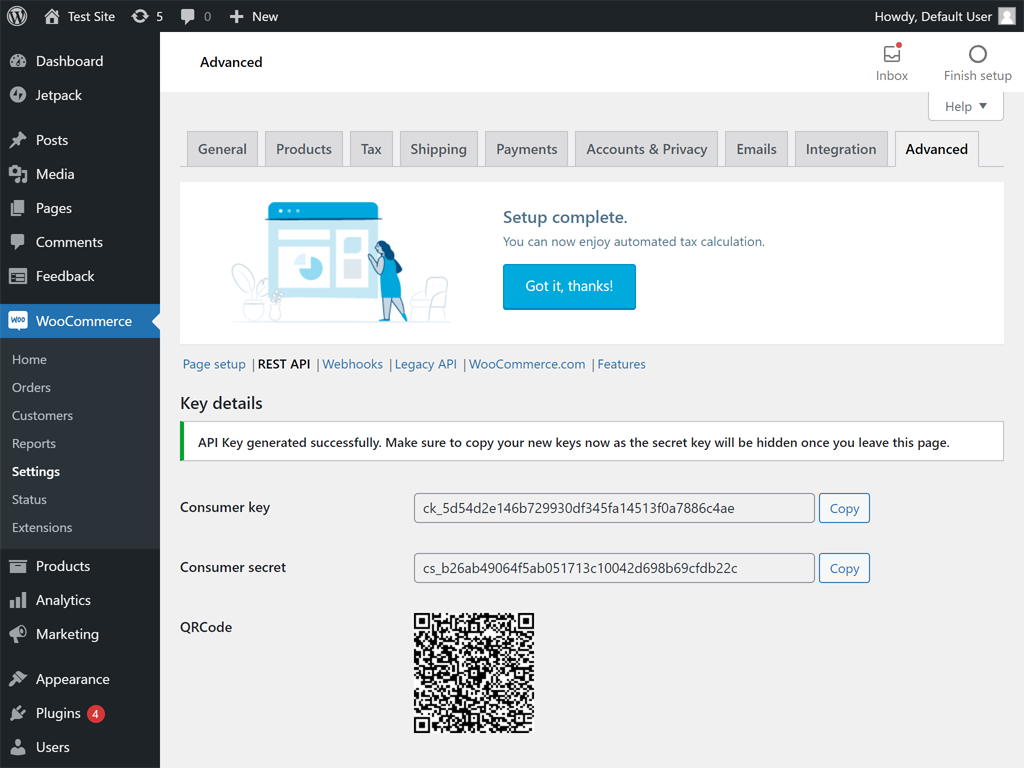
Figure C
Take note of the Consumer Key and Consumer Secret which you will need while adding WooCommerce to eQuate POS.
Installing the eQuate POS WordPress plugin
After you have generated your WooCommerce API key, you must install the eQuate POS plugin. The plugin allows eQuate POS to communicate to your WooCommerce site.
- Download the eQuate POS WordPress plugin here.
- Login to your WordPress administrator site. WooCommerce must already be installed to continue.
- On the left menu, select "Plugins", then select "Add New".
- Select "Upload Plugin" on the top menu.
- Attach the eQuate POS WordPress plugin zip file you downloaded (see Figure D below).
- You will see that the plugin is now installed, but not activated. Click "Activate Plugin" to enable the plugin (see Figure E below).
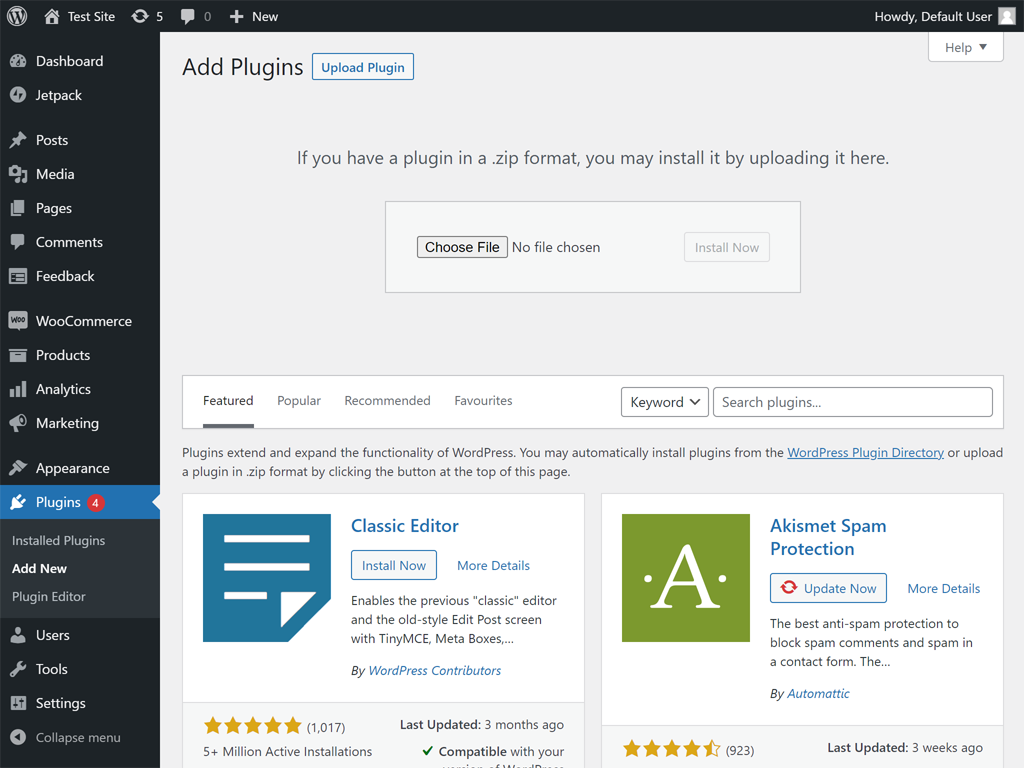
Figure D
From your WordPress backend, click "Plugins", then "Add New". Click Upload Plugin and attach the eQuate POS WooCommerce plugin zip file you downloaded.
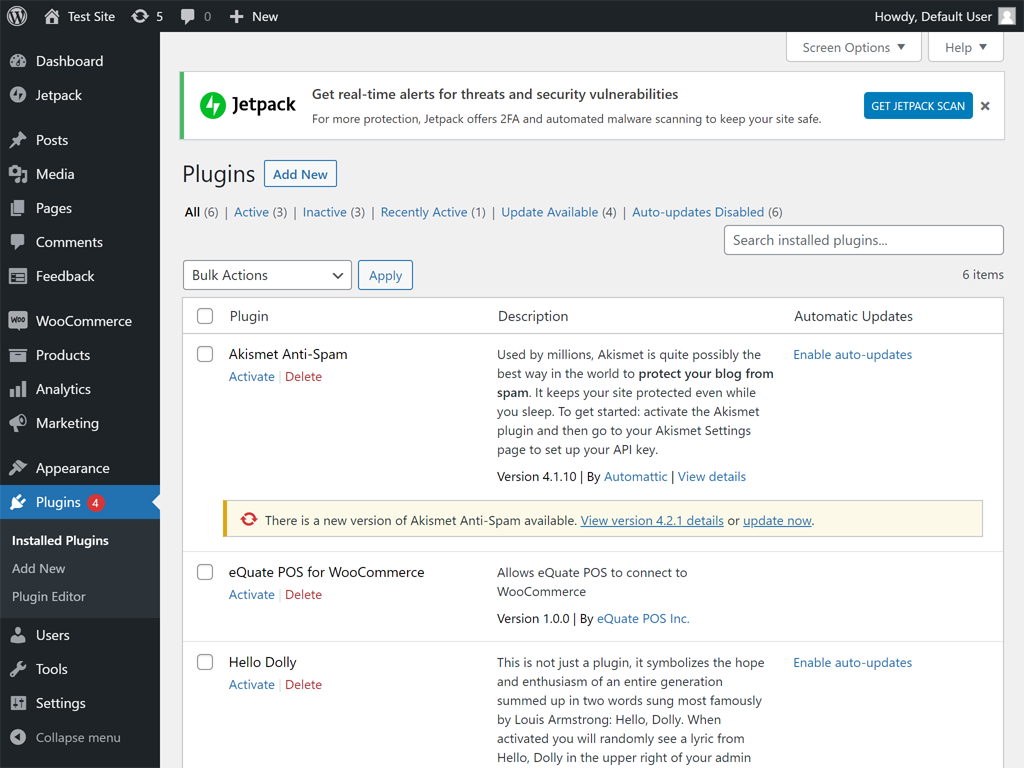
Figure E
After the plugin has been installed, locate it on the list of plugins and click "Activate".
Adding WooCommerce to eQuate POS
Once you have backed up your WooCommerce database, created an API key, and installed the eQuate POS WordPress plugin, you can proceed to the final step of adding the connection between WooCommerce and eQuate POS from the Back Office.
- Login to the eQuate POS Back Office.
- On the left menu, select "Settings", under "System", select "Online Stores".
- Click "Add Online Store" button (see Figure F below).
- Enter the WooCommerce API details and press "Save Changes" (see Figure G below).
- Configure the default settings for WooCommerce and "Save Changes" (see Figure H below).
- Allow some time for the data to synchronize. Depending on the size of your WooCommerce database, this could take anywhere from 1 to 60 minutes.
- Refresh the page to check the status of the synchronization.
Figure F
Add your online store in the Back Office area. Select "New Online Store".
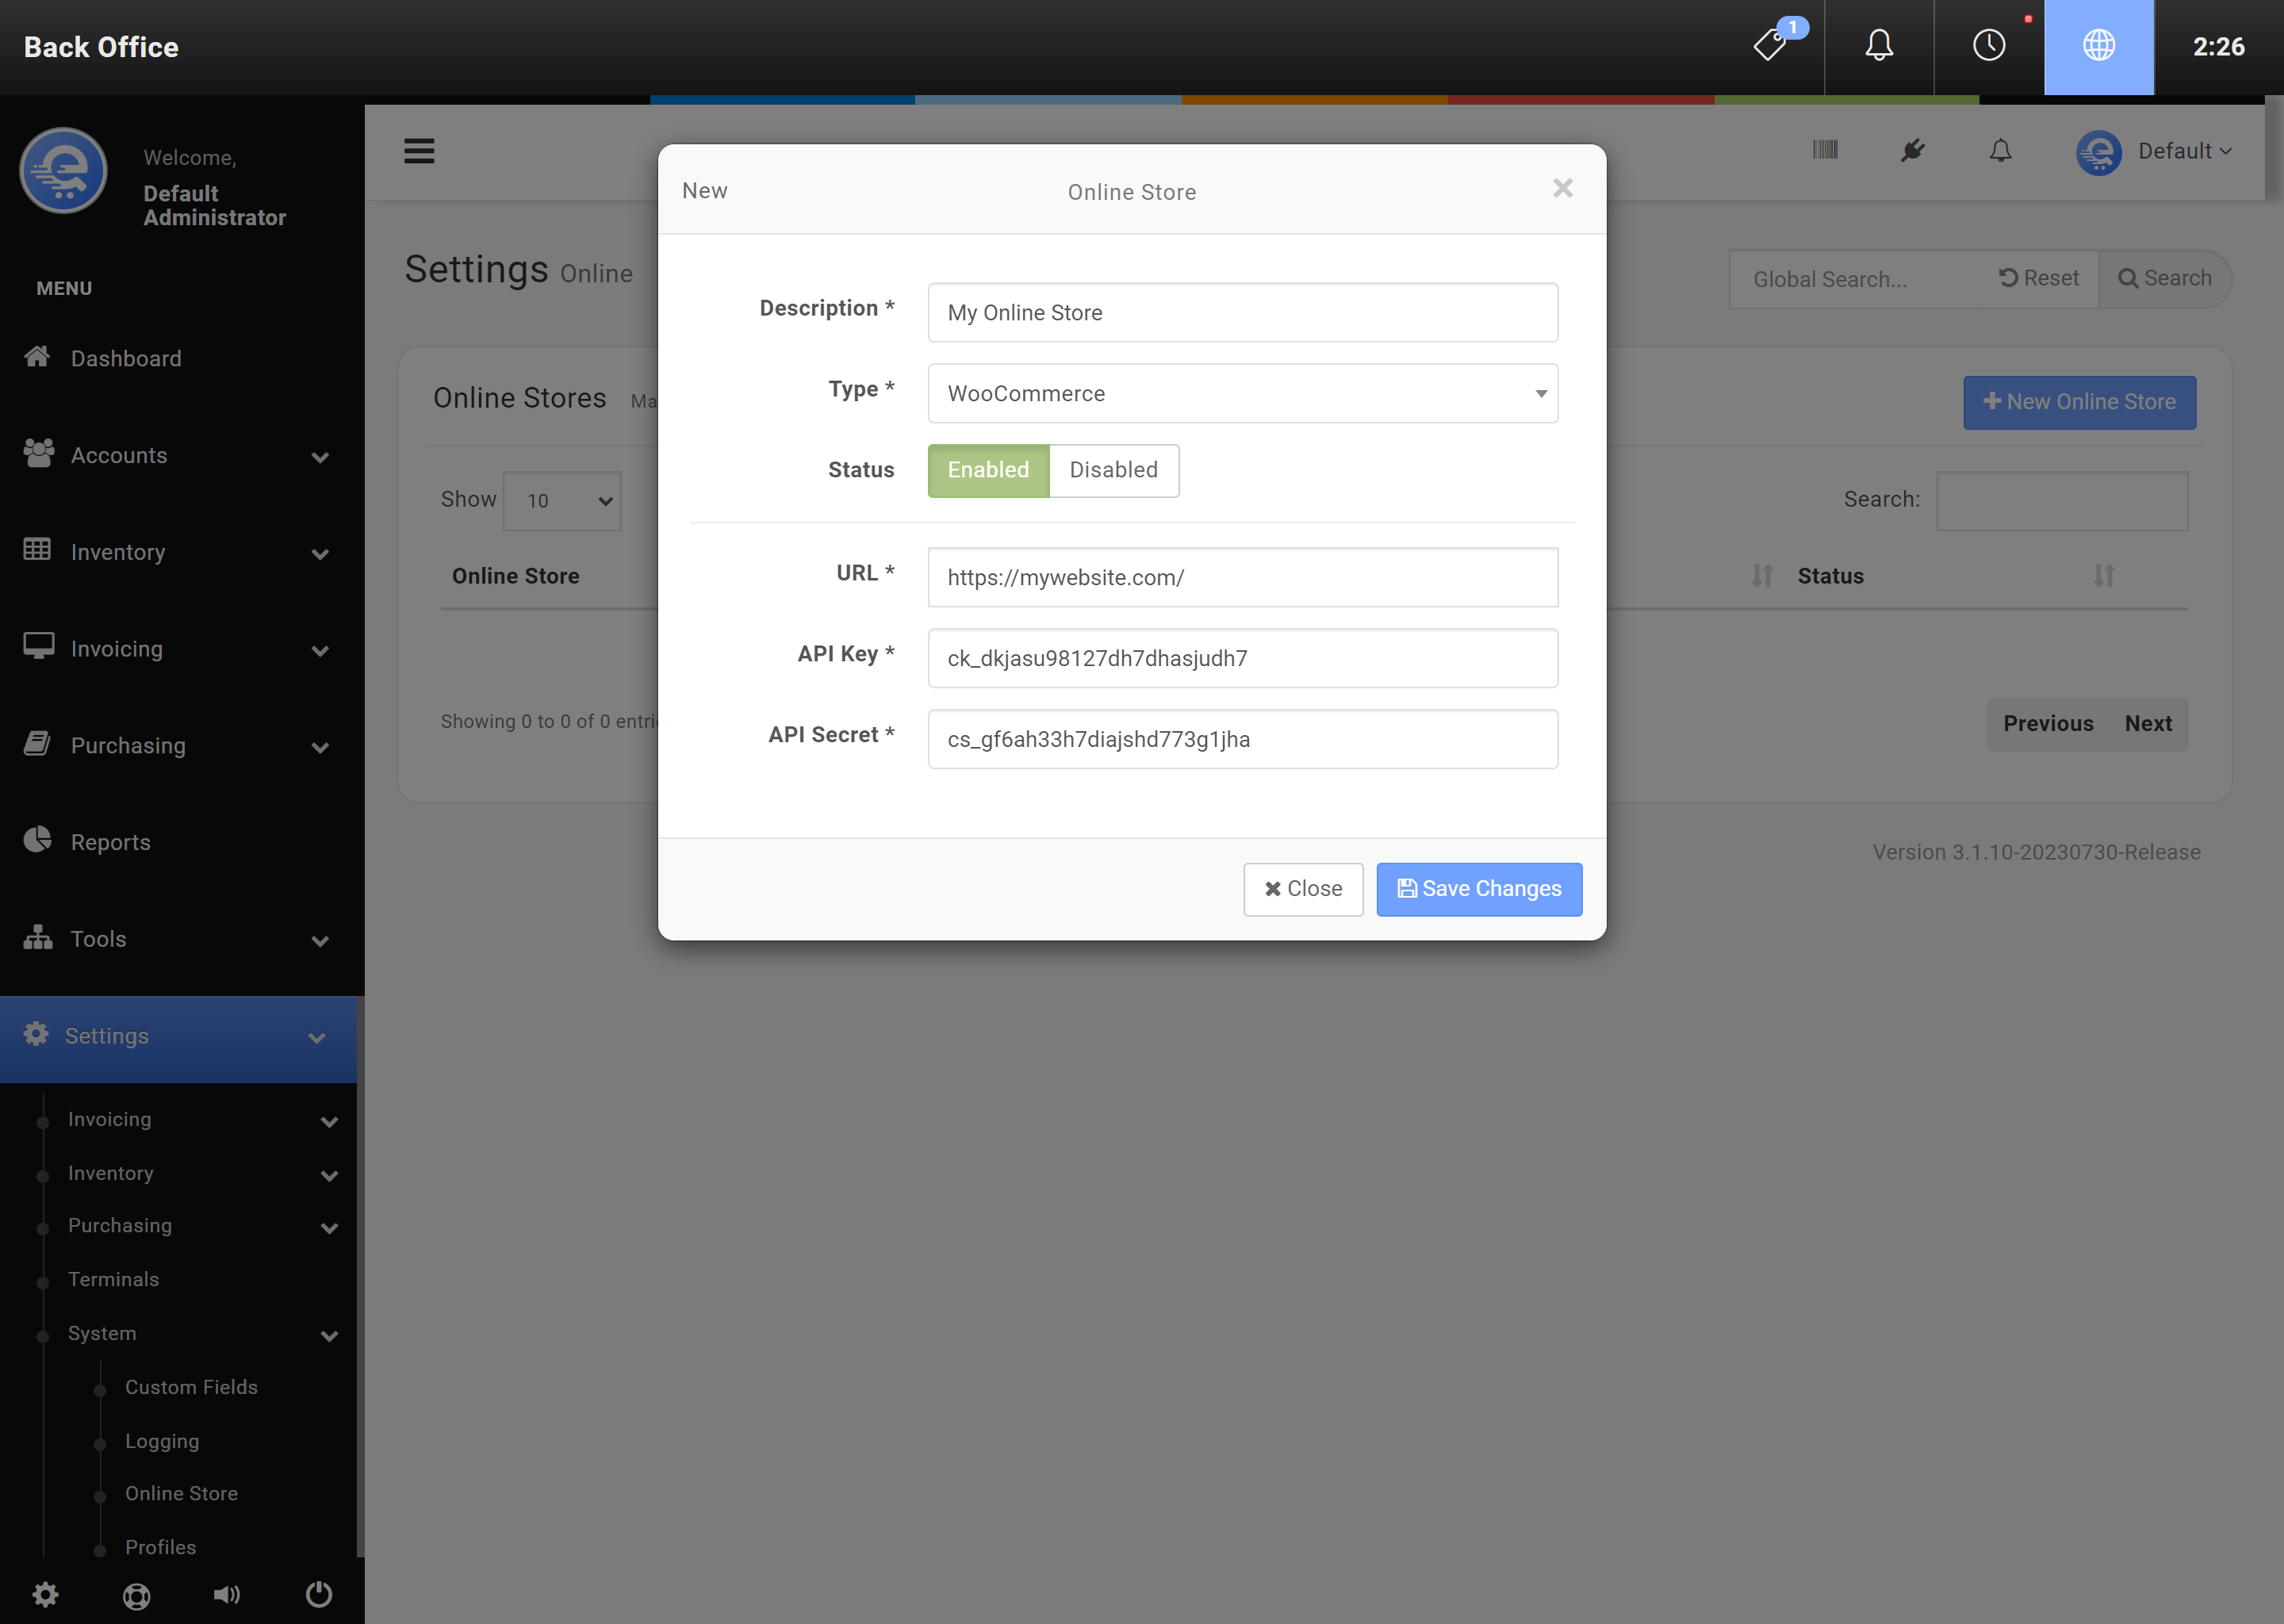
Figure G
Enter your WooCommerce API details and press "Save Changes".
Figure H
Configure the connection between WooCommerce & eQuate POS.
- Login to the Back Office.
- On the left menu, select "Settings", under "System", select "Online Stores".
- Select your online store and under the Actions column, select "Action", then "Edit" (see Figure I below).
- You must ensure the database you are editing is the same database that was previously synchronized (see Figure J below).
- Click "Save Changes" when complete.
Figure I
After saving your online store to eQuate POS, you will see "Pending" until the system has synchronized.
Figure J
To disable the synchronization, select "Edit" under Actions and set the status to Disabled and press "Save Changes".
Creating A Security Group
Security Groups allow you to restrict certain areas of your Point Of Sale system. For example, you can create a security group that allows users to run reports but not create new invoices. Security Groups can be configured in eQuate POS Back Office. Once a Security Group is created, users can then be assigned to the new security group by editing the user profile in the Back Office.
- Navigate to the Back Office area
- On the left menu, click on "Settings", then click "System", then "Security Groups".
- Click on "Create Security Group" (see Figure A).
- Enter the details of the security group. Select which areas you would like this group to have access to (see Figure B below).
- Press "Save Changes" to finalize changes made.
- The terminal must synchronize before the changes are discovered.

Figure A
From the Back Office, create a new Security Group by clicking "Create Security Group".
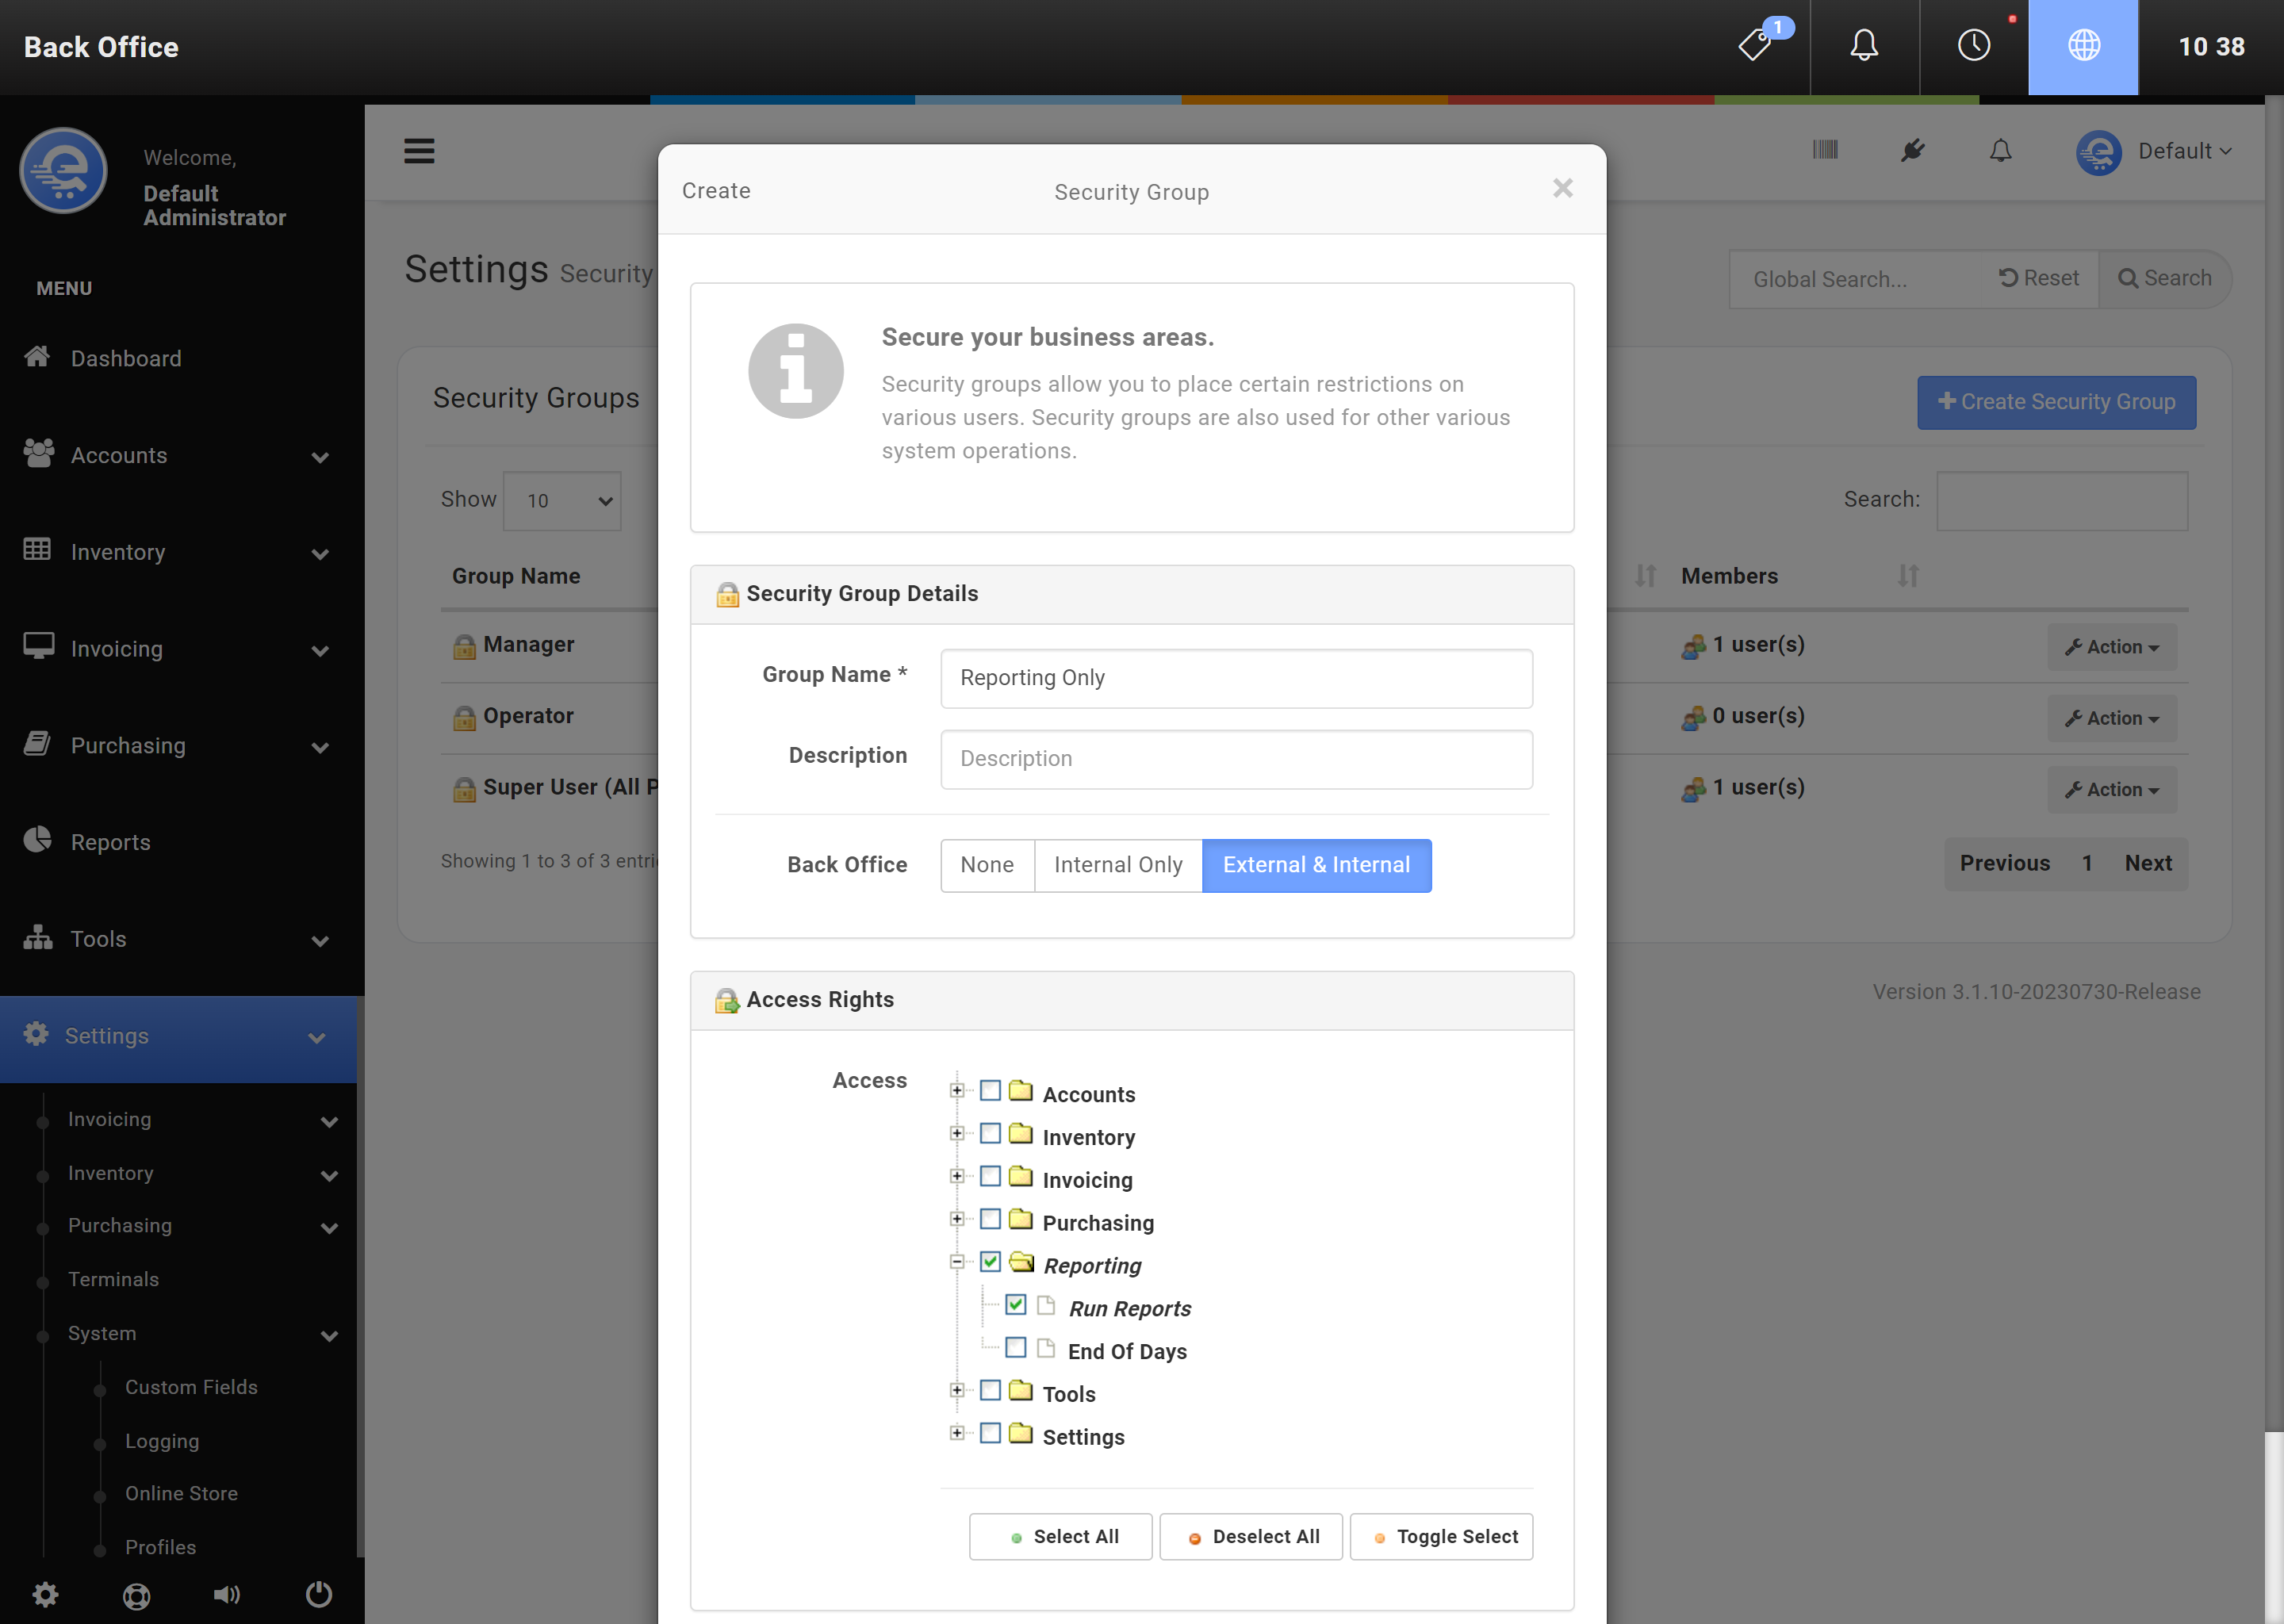
Figure B
Select the relavent areas you would like the users assigned in this group to access. Any areas that are not selected, the user will not have access to.
Creating New Users
Users have access to your Point Of Sale system. Users can be assigned to certain Security Groups to restrict or allow access to certain elements of your Point Of Sale. Users can be added in the Back Office area of eQuate POS.
- Navigate to the Back Office area
- On the left menu, click on "Settings", then click on "Users".
- Click on "New User" (see Figure A).
- Enter the users details. Both e-mail address and Operator ID & PIN are mandatory fields and must be unique.
- Press "Save Changes" to finalize changes made.
- The terminal must synchronize before the changes are discovered (see Figure B below).

Figure A
From the Back Office, access the User area in the Settings Menu. To create a new user, click "New User".
Figure B
The login screen allows for both e-mail address/password or operator ID & PIN.